
Manual
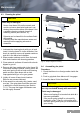
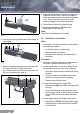
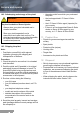
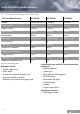

Table Of Contents
- 1 General instructions
- 2 Safety regulations
- 3 Product description
- 3.1 Main parts
- 3.2 Main features
- 3.3 Scope of delivery
- 5 Safety devices
- 5.1 Manual safety lock
- Fig. 2 , Safety lever 56 of the manual safety lock (left: Pistol locked, right: pistol ready to fire)
- 1. Turn the safety lever 56 down up to the stop to lock the firing pin. The red dot is not visible. The pistol cannot be fired in this state.
- 1. Turn the safety lever 56 all the way up to unlock the firing pin. The red dot is visible. The pistol is ready to fire in this state.
- 5.2 Shock protection
- 6.1 General remarks
- 6.2 Initial preparation
- 6.3 Ammunition
- 6.4 Loading the magazine
- 6.5 Loading the pistol (ready to fire)
- 6.6 Discharging a shot
- Procedure:
- 1. Aim the pistol at a safe target.
- 2. Turn the safety lever 56 all the way up to unlock the safety lock. The red dot is visible. The pistol is ready to fire in thi...
- 3. Place finger on trigger and pull back the trigger to discharge the shot.
- 4. Keep the pistol aimed at the target and fire further shots as required.
- 5. Turn the safety lever 56 down up to the stop to lock the safety lock (and thus the firing pin). The red dot is not visible. The pistol cannot be fired in this state.
- 6. Remove magazine and unload the pistol (see Section 6.8). If the pistol has been fired until the magazine is empty, slide 4 will be caught in the open position. If firing is to continue, reload the pistol (see Section 6.7).
- 6.7 Reloading during shooting
- 6.8 Unloading the pistol
- 6.8.1 Unloading the pistol, magazine not empty
- 1. Keep the muzzle of the pistol pointed in a safe direction.
- 2. For Double Action/Single Action pistols: Actuate decocking lever 38, the hammer 29 catches in the safety intercept notch. With Double Action Only pistols, hammer 29 C automatically registers in the safety intercept notch.
- 3. Actuate magazine catch 24 and remove the magazine (see Fig. 4).
- 4. Draw back slide 4 to the stop and thumb up slide catch lever 17 (see Fig. 12). The round is ejected and the slide is caught in the open position.
- 5. Check visually and manually with a tool that the round was ejected and that no other round is chambered (see Fig. 5).
- 6. Actuate slide catch lever 17. Slide 4 is impelled forward.
- 7. Press decocking lever 38 down (Not applicable to DAO pistols).
- 8. Empty magazine.
- 9. Pick up and clean ejected round.
- 6.8.2 Unloading the pistol, magazine empty, slide open
- 1. Keep the muzzle of the pistol pointed in a safe direction.
- 2. Actuate magazine catch 24 and remove the magazine (see Fig. 4).
- 3. Check visually and manually with a tool that the round was ejected and that no other round is chambered.
- 4. Actuate slide catch lever 17. Slide 4 is impelled forward.
- 5. Press decocking lever 38 down (Not applicable to DAO pistols).
- 6. Check the load state of the magazine.
- 7 Modification of the pistol
- 7.1 Repositioning the magazine catch
- 1. Push in magazine catch 24 until it projects slightly on the opposite side (see Fig. 6).
- 2. Push the straightened end of a paper clip into the opening of the magazine catch. The sear of the magazine catch stop 25 is released (see Fig. 7).
- 3. Remove magazine catch stop 25.
- 4. Remove magazine catch 24 and insert it from the desired operating side (see Fig. 8).
- 5. Push in the magazine catch stop from the opposite side until the sear engages.
- 7.2 Changing the grip plate
- 7.2.1 Disassembly
- 7.2.2 Assembly
- 6.8.1 Unloading the pistol, magazine not empty
- 5.1 Manual safety lock
- 8 Sight correction
- 8.1 Sight correction for windage
- 8.1.1 Shifting the rear sight
- 8.1.2 Shifting the front sight
- 8.2 Sight correction for elevation
- 8.2.1 Changing the rear sight
- 8.2.2 Changing the front sight
- 8.3 Rear and front sight variants
- 8.3.1 Rear sight variants
- 8.3.2 Front sight variants
- 8.4 Rear sight and front sight key
- 9.1 Stripping the pistol
- 1. Unload the pistol (see Section 6.8).
- 2. Draw back slide 4 to the stop and arrest it in the open position by thumbing up the slide catch lever 17.
- 3. Check that no round is chambered (see Fig. 5).
- 4. Clasp the grip and locking piece with the right hand, draw back slide 4 slightly to disengage slide catch lever 17. Afterward...
- 5. Hold slide 4 firmly and allow it to glide forward, until the recoil spring 3 is decocked.
- 6. Now slip the complete assembly (slide 4, barrel 1, recoil spring 3 and recoil spring guide 2) forward and off the frame.
- 9.1.1 Stripping the slide
- Note:
- 9.2 Disassembly of the magazine
- 9.3 Cleaning the pistol
- 1. Lubricate the cleaning brush with gun oil and insert it into the barrel 1 via the chamber. Use brush to carefully remove all powder residues and dirt in the barrel and chamber.
- 2. Wipe powder residues and oil from the barrel bore and chamber with cleaning patches.
- 3. Clean external surfaces of barrel with a brush dipped in gun oil.
- 4. Remove dirt from metal guide in the frame 13, inside and outside of slide 4, locking insert 14 and recoil spring 3 with a brush and cleaning patch and then wipe down with a cloth impregnated with gun oil or gun grease.
- 5. Lightly oil bores of barrel and chamber. Remove any excess lubricant.
- 6. If the weapon is extremely dirty (water, sand, mud etc.), the grip plate should be removed in addition to normal cleaning (see Section 7.2.1). This way the trigger mechanism can be thoroughly cleaned.
- 9.4 Assembling the pistol
- 1. Check that there is no foreign matter inside the pistol.
- 2. Push in grip plate from below until it engages.
- 3. Insert the barrel 1 into the slide 4.
- 4. Insert recoil spring guide 2 and recoil spring 3 into slide 4.
- 6. Slip the complete assembly from the front onto the frame 13 until it is flush at the rear.
- 7. Insert slide catch lever 17 horizontally from the left, until it reaches the slide 4.
- 8. Clasp the frame with the right hand, draw back slide with the left hand, until the notch 4b at slide corresponds to the nose at the slide catch lever. Push in the slide catch lever, until it audibly engages in its rearmost position.
- 9. Hold slide and allow it to glide forward.
- 10. Press decocking lever 38 down (Not applicable to DAO pistols).
- 9.5 Verification of functions
- 1. Make sure that the magazine is removed and the pistol unloaded (see Section 6.8).
- 2. Check the elasticity of the recoil spring 3 and the smoothness of the slide 4 (no jamming).
- 3. Check the double-action trigger (DA).
- 4. Check trigger travel and trigger interruption.
- 5. Check simple trigger function (SA).
- 6. Check function of decocking lever 38 and safety intercept notch on hammer 29.
- 7. Check slide catch lever 17.
- 8. Inspect magazine.
- 9. Inspect external appearance of the pistol.
- 10. Verification of numbered components.
- 9.6 Care of the pistol
- 10 Pistol service and repairs
- 10.1 Cause and correction of malfunctions
- 1. Remove and safeguard the magazine.
- 2. Draw back slide 4 to the stop and arrest it in the open position by thumbing up the slide catch lever 17.
- 3. Verify (visually or with a tool) that there is no bullet, round, case or foreign body in the chamber or barrel bore (see Fig....
- 4. Remove round, cartridge case or foreign bodies. Clean, lubricate and assemble the pistol (see Section 9.3 and 9.4).
- 5. Have the pistol inspected by an armourer or gunsmith.
- 10.2 Safekeeping and storage of the pistol
- 10.3 Shipping the pistol
- 1. Check the pistol to ensure that it is unloaded and decocked.
- 2. Pack the pistol well (if possible in its original packaging) to prevent damage in transit. To prevent the pistol being recogn...
- 3. Enclose a letter stating the following:
- 4. Send the pistol properly insured and carriage- paid (packages without correct postage will not be accepted) to:
- 11 Product line
- 12 Disposal
- 10.3 Shipping the pistol
- 10.1 Cause and correction of malfunctions
- 13 Technical data/types/accessories
- 14 Spare parts

Service and repairs
2207.01 EN
Assembly/Malfunction Potential Cause Potential Remedy
Ammunition feed:
No round chambered.
Magazine not properly inserted,
deformed or dirty.
Pistol or rounds dirty or too
heavily greased.
Incorrect ammunition.
Pistol defective.
Insert magazine properly or
replace it.
Strip, clean and lubricate pistol
(see Section 9.1 to 9.4)
Replace ammunition.
Repair by manufacturer.
Slide:
Slide does not close properly.
Recoil insufficient because of
fouling.
Incorrect ammunition.
Pistol defective.
Strip, clean and lubricate pistol
(see Section 9.1 to 9.4)
Replace ammunition.
Repair by manufacturer.
Case ejection:
Spent case sticks in chamber or
jams in ejection port.
Incorrect or underloaded
ammunition.
Pistol defective.
Replace ammunition.
Repair by manufacturer.
Misfire:
Hammer strikes, but no
discharge.
Firing pin sticking in its guide.
Defective ammunition.
Pistol defective.
Strip, clean and lubricate pistol
(see Section 9.1 to 9.4) Have
pistol checked by armourer.
Manually cycle slide to chamber
new round.
Repair by manufacturer.