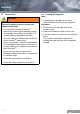
Table of contents 1 General instructions 2 2 2.1 2 2.2 Safety regulations Safety regulations for training system and ammunition Safety indications 3 4 3 3.1 3.2 3.3 Product description Main parts Main features Scope of supply 5 5 6 6 4 Transporting the pistol 7 5 Handling the pistol 5.1 General remarks 5.2 Initial preparation 5.3 Ammunition 5.4 Loading the magazine 5.5 Loading the pistol (ready to fire) 5.6 Discharging a shot 5.7 Reloading during shooting 5.8 Unloading the pistol 5.8.
Instructions 1 General instructions Be sure to read through these instructions carefully before any manipulation on this SIG SAUER pistol. Understanding these instructions and the technically correct implementation of the information contained therein are imperative to correct preparation and safety during handling, maintenance and care of this SIG SAUER pistol. Do not use the pistol until you have fully understood all safety instructions and its handling procedures.
Safety regulations • Always unload the pistol immediately after shooting, before putting it down, holstering it or handing it to another authorised person. • Never hand the pistol to any person who has not thoroughly familiarised himself or herself with the safety regulations and handling of the pistol by reading the accompanying regulations and instructions. • Never leave the pistol unattended and protect the pistol against unauthorised access.
Safety regulations 2.2 Safety indications In the individual sections of these instructions, the following safety indications alert you to various risks: WARNING! Information on risks which, if not scrupulously observed, can lead to severe bodily harm or death. CAUTION! Information on risks which, if not scrupulously observed, can lead to bodily harm or damage to the pistol. CAUTION! Information on technical requirements which, if not scrupulously observed, can lead to damage to the pistol.
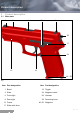
Product description 3 Product description 3.1 Main parts 5 4 1 38 6 29 17 24 13 19 46 - 50 Fig. 1 Item Part designation Item Part designation 1 Barrel 19 Trigger 4 Slide 24 Magazine catch 5 Front sight 29 Hammer 6 Rear sight 38 Decocking lever 13 Frame 46 -50 Magazine 17 Slide catch lever 5 GB 06.
Product description 3.2 Main features The SIG SAUER SP 2022 FOF pistol is a modern training handgun complying with the latest technical advances in weapon design for military and police. They operate on the principle of the unlocked, recoil-operated pistol with semiautomatic reloading.
Transport 4 Transporting the pistol WARNING! Uncontrolled discharge of shot May lead to death or severe injuries • For your own safety and for the safety of others, always transport the pistol in the unloaded condition (see Section 5.8), decocked and under lock. • Never carry the pistol on your person with a round in the chamber and the hammer cocked. • Always carry the pistol in such a manner that, should you fall or otherwise slip, you are able to control the direction of the muzzle.
Handling 5.3 Ammunition WARNING! Incorrect ammunition May lead to death or severe injuries and damage to the pistol • For your pistol use only Simunition®- ammunition in the original packaging, which corresponds to the calibre of the pistol. The correct calibre is stamped on the pistol. • Only use clean, dry, undamaged and factory new Simunition®-ammunition. • Never use reloaded, "restored", hand-loaded, 5.
Handling 5.5 Loading the pistol (ready to fire) WARNING! Insufficient awareness of the dangers May lead to death or severe injuries • Never load or unload the pistol inside a vehicle, inside a building or any other confined space (except in a designated firing range). • Before loading, always wipe off any excess grease and oil and check that there is no obstruction in the bore of the barrel. • Always keep the muzzle of the pistol pointed in a safe direction. • Do not place your finger on the trigger.
Handling 5.6 Discharging a shot WARNING! Insufficient awareness of the dangers May lead to death or severe injuries • Ensure that the target and the environment allow shots to be fired without danger. • When discharging shots, ensure that neither your fingers, hands or any other parts of the body are located in front of, over or adjacent to the barrel muzzle or the ejection port. • Never allow other persons to stand beside you where they might be struck by ejected cartridge cases.
Handling 5.7 Reloading during shooting Slide is caught in the open position. WARNING! Insufficient awareness of the dangers May lead to death or severe injuries • Never let the pistol out of your hands. • Keep the pistol pointed at the safe target. CAUTION! 5.8 Unloading the pistol 5.8.1 Unloading the pistol, magazine not empty WARNING! Pistol is ready to fire May lead to death or severe injuries • Never let the pistol out of your hands before it is unloaded.
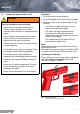
Handling 24 17 WARNING! Pistol has not been cleaned sufficiently May lead to death or severe injuries and damage to the pistol • The pistol must be cleaned after every shooting session (see Section 8.3). 1. 2. Fig. 3, Removing the magazine 4. Draw back slide 4 to the stop and thumb up slide catch lever 17 (see Fig. 11). The round is ejected and the slide is caught in the open position. Fig. 4 5.
Handling Modification 5.8.2 Unloading the pistol, magazine empty, slide open 6 WARNING! Pistol is loaded May lead to death or severe injuries • The pistol must not be put down and out of your hand until the magazine is removed and the pistol is unloaded. Procedure: 1. Keep the muzzle of the pistol pointed in a safe direction. 2. Actuate magazine catch 24 and remove the magazine (see Fig. 3). 3. Check visually and manually with a tool that the round was ejected and that no other round is chambered.
Handling 6.2 Changing the grip plate WARNING! Uncontrolled discharge of shot May lead to death or severe injuries • Prior to modifying the pistol, make sure that it is unloaded and that the magazine is removed (see Section 5.8). 6.2.1 Disassembly Fig. 6, Releasing the magazine catch stop (illustration without trigger) 3. Remove magazine catch stop 25. 4. Remove magazine catch 24 and insert it from the desired operating side (see Fig. 7).
Sight 7 Sight correction CAUTION! Pistol may be damaged • Sight corrections should only be carried out on an unloaded pistol by an armourer, gunsmith or an expert. A special tool (see Section 7.4) is required for this purpose. Any corrections should first be carried out on the rear sight 6. 7.1 Sight correction for windage 7.1.1 Shifting the rear sight Note: A special tool (see Section 7.4) is required for this purpose. Shifting the rear sight 6 to the right alters the point of impact to the right. 7.
Sight 7.3 Rear and front sight variants 7.4 Rear sight and front sight key 7.3.1 Rear sight variants Number Height 04 5.24 mm 05 5.52 mm 06 5.80 mm 07 6.07 mm 08 6.35 mm 09 6.62 mm 10 6.90 mm Fig. 10 7.3.2 Front sight variants Number Height 05 6.01 mm 06 5.88 mm 07 5.74 mm 08 5.60 mm 09 5.46 mm 10 5.32 mm 06.
Maintenance 8 Pistol maintenance 4 17 1. WARNING! Pistol is ready to fire May lead to death or severe injuries • The magazine must be removed from the 2. pistol. • Before stripping your pistol for cleaning, ensure once again that it is unloaded (see Section 5.8). • Do not grasp slide 4 with your fingers. CAUTION! Insufficient cleaning Increasing malfunctions and decreasing precision • Clean your pistol following the recommendation of Simunition®. • Clean the barrel every 150 shots.
Maintenance 5. Hold slide 4 firmly and allow it to glide forward, until the recoil spring 3 is decocked. 8.1.1 Stripping the slide CAUTION! 4 Slide and recoil spring unit are only connected loosely with each other May lead to injuries and damage to the pistol • The recoil spring 3 is cocked. Uncontrolled removal of recoil spring guide 2 can cause it and the recoil spring 3 to jump away. When stripping, control decompression of the preloaded recoil spring 3 with your hand. Procedure: Fig. 13 6.
Maintenance Note: 8.2 Disassembly of the magazine • This level of stripping is sufficient to allow a CAUTION! thorough cleaning after shooting. • Further dismantling of the pistol may only be carried out by qualified armourers and gunsmiths. Magazine spring is compressed May lead to injuries and damage to the pistol • Do not carry out any work on the pistol near your face and hold magazine with the magazine floor plate pointing downwards. Procedure: 1.
Maintenance 8.3 Cleaning the pistol CAUTION! Pistol may be damaged • Never clean barrel 1 from the muzzle end and do not use a steel wire brush as it can destroy the smooth surface of the barrel. Use a suitable cleaning rod and a brush of matching calibre (see Section 12). 4 3 1 2 • Solvents can be harmful to the surface finish 14 of the pistol. Read the manufacturer's indications and warnings before using solvents or cleansers. Procedure: 1.
Maintenance 8.3.1 Assembling the pistol 5. 4 Procedure: 3 2 2. 1. Check that there is no foreign matter inside the pistol. 1. 2. Push in grip plate from below until it engages. 3. Insert the barrel 1 into the slide 4. Insert barrel 1, with the cam facing downwards, in the slide 4. CAUTION! Slide, recoil spring guide and recoil spring are only connected loosely with each other Pistol may be damaged • When recoil spring 3 is inserted into slide 4, it becomes preloaded.
Maintenance 9. Hold slide and allow it to glide forward. 8.4 10.Press decocking lever 38 down (Not applicable to DAO pistols). Note: Note: The pistol is unloaded and decocked. Verification of functions • Verification of functions must be conducted on the assembled pistol: – to identify causes of malfunction, – after completion of repairs, – and after each cleaning and assembly of the pistol. Procedure: 1. Make sure that the magazine is removed and the pistol unloaded (see Section 5.8). 2.
Maintenance 6. Check function of decocking lever 38 and safety intercept notch on hammer 29. – Cock hammer 29 and decock it with decocking lever without touching trigger 19 (Not applicable to DAO pistols). – Check that hammer 29 is arrested in the safety intercept notch before reaching its forward end position and trigger is guided to the rest position. 9. Inspect external appearance of the pistol. – Check front sight 5, rear sight 6 and grip plate 45 for signs of damage or dirt.
Maintenance Service and Repairs 8.5 9 Pistol service and repairs 9.1 Cause and correction of malfunctions Care of the pistol CAUTION! Inadequate care of the pistol May lead to injuries and damage to the pistol • Always keep your pistol in immaculate condition and in good working order. • Always clean your pistol after use. • Never modify or repair parts of your pistol yourself.
Service and Repairs Assembly/Malfunction Potential Cause Potential Remedy Ammunition feed: No round chambered. Magazine not properly inserted, deformed or dirty. Insert magazine properly or replace it. Pistol or rounds dirty or too heavily greased. Strip, clean and lubricate pistol (see Section 8.1 to 8.3.1). Incorrect ammunition. Replace ammunition. Pistol defective. Repair by manufacturer. Recoil insufficient because of fouling. Strip, clean and lubricate pistol (see Section 8.1 to 8.4).
Service and Repairs 9.2 Safekeeping and storage of the pistol WARNING! Uncontrolled discharge of shot May lead to death or severe injuries • Always store your pistol unloaded and in cleaned condition. • Store your pistol separate from its ammunition and under lock and key. The pistol and ammunition must not be accessible to children and other inexperienced or unauthorised persons. 9.3 4.
Service and Repairs 10 Product line 11 – Pistols for government agencies and the military – Strictly observe any current national legislation governing the disposal of handguns. – Sport pistols – Provided this is not contrary to current national legislation, we recommend shipping the pistol to one of the addresses listed under Section 9.3.
Technical data/types/accessories 12 Technical data/types/accessories Technical Specifications SP 2022 FOF Calibre 9 mm FX® / CQT® / Securi BlankTM Length, overall 187 mm Height, overall 144 mm Width, overall 34 mm Barrel length 98 mm Rifling lead 254 mm, right No. of grooves 6 Sight base 150 mm Weight incl.
Spare parts 13 Spare parts Note: Illustration of spare parts list, see Fig. 21 Required specifications when placing spare part orders – Pistol model (calibre, type) – Pistol serial number – Item number and index – Part designation Index explanation – C = DAO pistol models – * = not for DAO pistols WARNING! Uncontrolled discharge of shot May lead to death or severe injuries • Never use a standard hammer 29 in a DAO pistol.
Spare parts Fig. 21, Spare parts SP 2022 FOF 06.
J. P. Sauer & Sohn GmbH gegr. 1751 Sauerstr. 2-6 D-24340 Eckernförde Germany Telephone +49 4351 471 100 Fax +49 4351 471 160 www.sigsauer.