
Manual
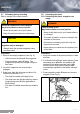
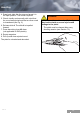
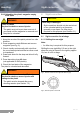
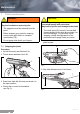
Table Of Contents
- 1 General instructions
- 2 Safety regulations
- 3 Product description
- 4 Transporting the pistol
- 5 Handling the pistol
- 5.1 General remarks
- 5.2 Initial preparation
- 5.3 Ammunition
- 5.4 Loading the magazine
- 1. Place round on feeder 53, close to the magazine lips.
- 2. Press round down and push it to the rear.
- 3. Load the number of rounds that you intend to shoot.
- 5.5 Loading the pistol (ready to fire)
- Procedure:
- Procedure:
- 1. Aim the pistol at a safe target.
- 2. Place finger on trigger and pull back the trigger to discharge the shot.
- 3. Keep the pistol aimed at the target and fire further shots as required.
- 4. Remove magazine and unload the pistol (see Section 5.8). If the pistol has been fired until the magazine is empty, slide 4 will be caught in the open position. If firing is to continue, reload the pistol (see Section 5.7).
- 5.7 Reloading during shooting
- 5.8 Unloading the pistol
- 5.8.1 Unloading the pistol, magazine not empty
- 1. Keep the muzzle of the pistol pointed in a safe direction.
- 2. For Double Action/Single Action pistols: Press decocking lever 40 down, the hammer 29 catches in the safety intercept notch. With Double-Action-Only pistols, hammer 29C automatically registers in the safety intercept notch.
- 3. Press magazine catch 43 down and remove magazine (see Fig. 2).
- 4. Draw back slide 4 to the stop and arrest it in the open position. The round is ejected.
- 5. Check visually and manually with a tool that the round was ejected and that no other round is chambered (see Fig. 3).
- 6. Release slide 4. The slide 4 is impelled forward.
- 7. Press decocking lever 40 down (not applicable to DAO pistols).
- 8. Empty magazine.
- 9. Pick up and clean ejected round.
- 5.8.1 Unloading the pistol, magazine not empty
- 5.8.2 Unloading the pistol, magazine empty, slide open
- 1. Keep the muzzle of the pistol pointed in a safe direction.
- 2. Press magazine catch 43 down and remove magazine (see Fig. 2).
- 3. Check visually and manually with a tool that the round was ejected and that no other round is chambered.
- 4. Draw back slide 4 to the stop and allow it to fly forward.
- 5. Press decocking lever 40 down (not applicable to DAO pistols).
- 6. Check the load state of the magazine.
- 6 Sight correction
- 5 Handling the pistol
- 7 Pistol maintenance
- 7.1 Stripping the pistol
- 1. Unload the pistol (see Section 5.8).
- 2. Thumb down takedown lever 16.
- 3. Draw back slide 4 to the stop and arrest it in the open position.
- 4. Check that no round is chambered (see Fig. 3).
- 5. Lift and hold slide 4 in the back and allow it to glide forward.
- 6. Slip slide 4 forward and off the frame.
- 7. Pull recoil spring 3 off the barrel 1.
- 7.2 Disassembly of the magazine
- 7.3 Cleaning the pistol
- 1. Lubricate the cleaning brush with gun oil and insert it into the barrel 1 via the chamber. Use brush to carefully remove all powder residues and dirt in the barrel and chamber.
- 2. Wipe powder residues and oil from the barrel bore and chamber with cleaning patches.
- 3. Clean external surfaces of barrel with a brush dipped in gun oil.
- 4. Remove dirt from metal guide in the frame 15, inside and outside of slide 4 and recoil spring 3 with a brush and cleaning patch and then wipe down with a cloth impregnated with gun oil or gun grease.
- 5. Lightly oil bores of barrel and chamber. Remove any excess lubricant.
- 7.4 Assembling the pistol
- 1. Check that there is no foreign matter inside the pistol.
- 2. Check that serial number, slide number and frame number tally.
- 3. Cock hammer 29 (not applicable to DAO pistols).
- 4. Slide the recoil spring 3 with the smaller diameter on the barrel 1 first.
- 5. Thumb down takedown lever 16.
- 6. Lead slide 4 over the recoil spring 3 and pull over the barrel 1 with slightly lifted end until the rear part.
- 7. Lift the rear part onto the frame 15 and let the slide glide forward with your hand.
- 8. Flip up the takedown lever 16 clockwise.
- 9. Press decocking lever 40 down (Not applicable to DAO pistols).
- 7.5 Verification of functions
- 1. Make sure that the magazine is removed and the pistol unloaded (see Section 5.8).
- 2. Check the elasticity of the recoil spring 3 and the smoothness of the slide 4 (no jamming).
- 3. Check the double-action trigger (DA).
- 4. Check trigger travel and trigger interruption.
- 5. Check simple trigger function (SA). (Not applicable to DAO pistols)
- 6. Check function of decocking lever 40 and safety intercept notch on hammer 29.
- 7. Check slide catch lever 18.
- 8. Inspect magazine.
- 9. Inspect external appearance of the pistol.
- 10. Verification of numbered components.
- 7.6 Care of the pistol
- 8 Pistol service and repairs
- 8.1 Cause and correction of malfunctions
- 8.2 Procedure:
- 1. Remove and safeguard the magazine.
- 2. Draw back slide 4 to the stop and arrest it in the open position.
- 3. Verify (visually or with a tool) that there is no bullet, round, case or foreign body in the chamber or barrel bore (see Fig....
- 4. Remove round, cartridge case or foreign bodies. Clean, lubricate and assemble the pistol (see Section 7.3 and 7.4).
- 5. Have the pistol inspected by an armourer or gunsmith.
- 8.3 Safekeeping and storage of the pistol
- 8.4 Shipping the pistol
- 1. Check the pistol to ensure that it is unloaded and decocked.
- 2. Pack the pistol well (if possible in its original packaging) to prevent damage in transit. To prevent the pistol being recogn...
- 3. Enclose a letter stating the following:
- 4. Send the pistol properly insured and carriage- paid (packages without correct postage will not be accepted) to:
- 9 Product line
- 10 Disposal
- 8.4 Shipping the pistol
- 7.1 Stripping the pistol
- 11 Technical data/types/accessories
- 12 Spare parts
Maintenance
15 07.01GB
7 Pistol maintenance
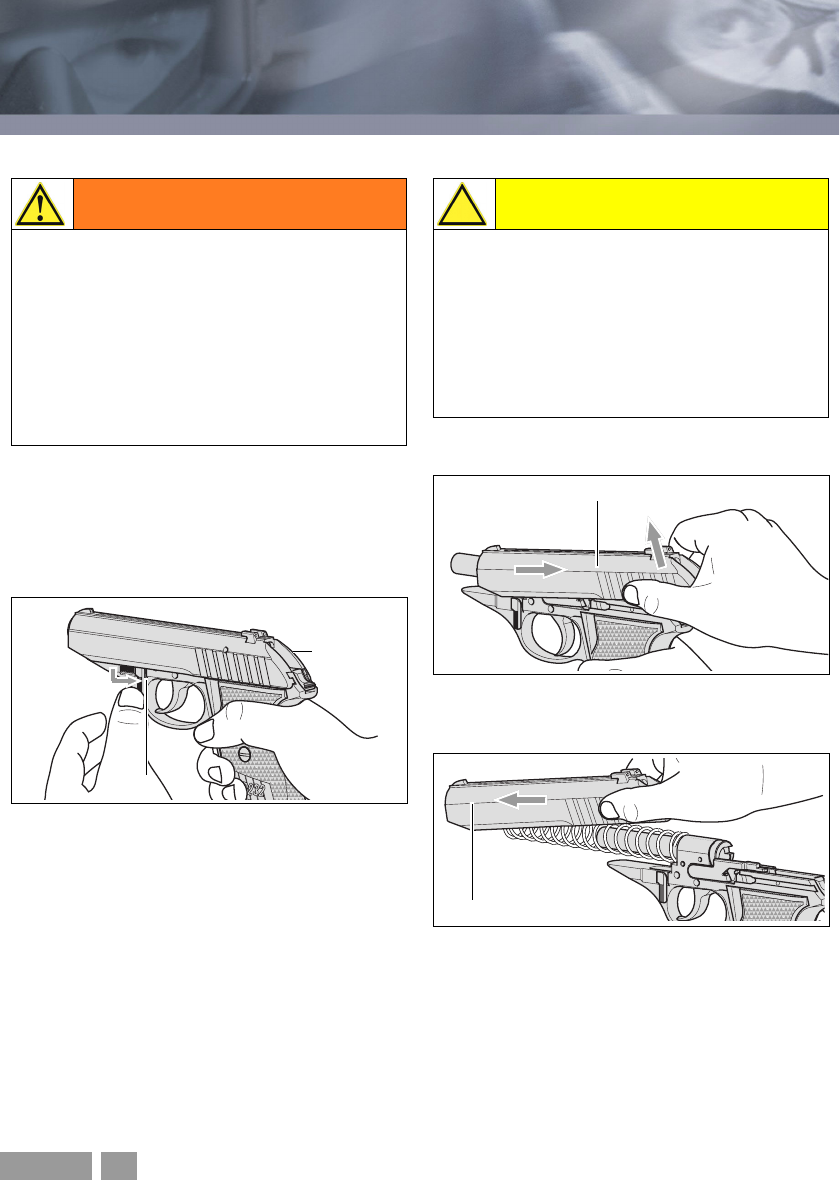
7.1 Stripping the pistol
Procedure:
1. Unload the pistol (see Section 5.8).
2. Thumb down takedown lever 16.
.
3. Draw back slide 4 to the stop and arrest it in
the open position.
4. Check that no round is chambered
(see Fig. 3).
5. Lift and hold slide 4 in the back and allow it to
glide forward.
6. Slip slide 4 forward and off the frame.
WARNING!
Pistol is ready to fire
May lead to death or severe injuries
• The magazine must be removed from the
pistol.
• Before stripping your pistol for cleaning,
ensure once again that it is unloaded
(see Section 5.8).
• Do not grasp slide 4 with your fingers.
Fig. 7
16
4
CAUTION!
Slide and recoil spring unit are only
connected loosely with each other
May lead to injuries and damage to the pistol
• The recoil spring 3 is cocked. Uncontrolled
forward slipping of the slide 4 can cause it or
the recoil spring 3 to jump away. When
stripping, control decompression of the
preloaded recoil spring 3 with your hand.
Fig. 8
Fig. 9
4
4