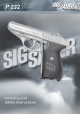
Table of contents 1 General instructions 2 2 2.1 Safety regulations Safety instructions 3 4 3 3.1 3.2 3.3 Product description Main parts Main features Scope of supply 5 5 6 6 4 Transporting the pistol 7 5 Handling the pistol 5.1 General remarks 5.2 Initial preparation 5.3 Ammunition 5.4 Loading the magazine 5.5 Loading the pistol (ready to fire) 5.6 Discharging a shot 5.7 Reloading during shooting 5.8 Unloading the pistol 5.8.1 Unloading the pistol, magazine not empty 5.8.
Instructions 1 General instructions Be sure to read through these instructions carefully before any manipulation on this SIG SAUER pistol. This applies in particular to liability for bodily harm or damage to property resulting in part or in whole to: Understanding these instructions and the technically correct implementation of the information contained therein are imperative to correct preparation and safety during handling, maintenance and care of this SIG SAUER pistol.
Safety regulations 2 Safety regulations • Never use the pistol under the influence of alcohol or drugs, during illness or other complaints; they may influence your judgement and reflexes. • Always consider the pistol as loaded and unsafe until you have verified that it is not by means of the unloading procedure (see Section 5.8). • During all manipulations, keep the muzzle of the pistol pointed in a safe direction.
Safety regulations 2.1 Safety instructions In the individual sections of these instructions, the following safety indications alert you to various risks: WARNING! Information on risks which, if not scrupulously observed, can lead to severe bodily harm or death. CAUTION! Information on risks which, if not scrupulously observed, can lead to bodily harm or damage to the pistol. CAUTION! Information on technical requirements which, if not scrupulously observed, can lead to damage to the pistol.
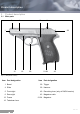
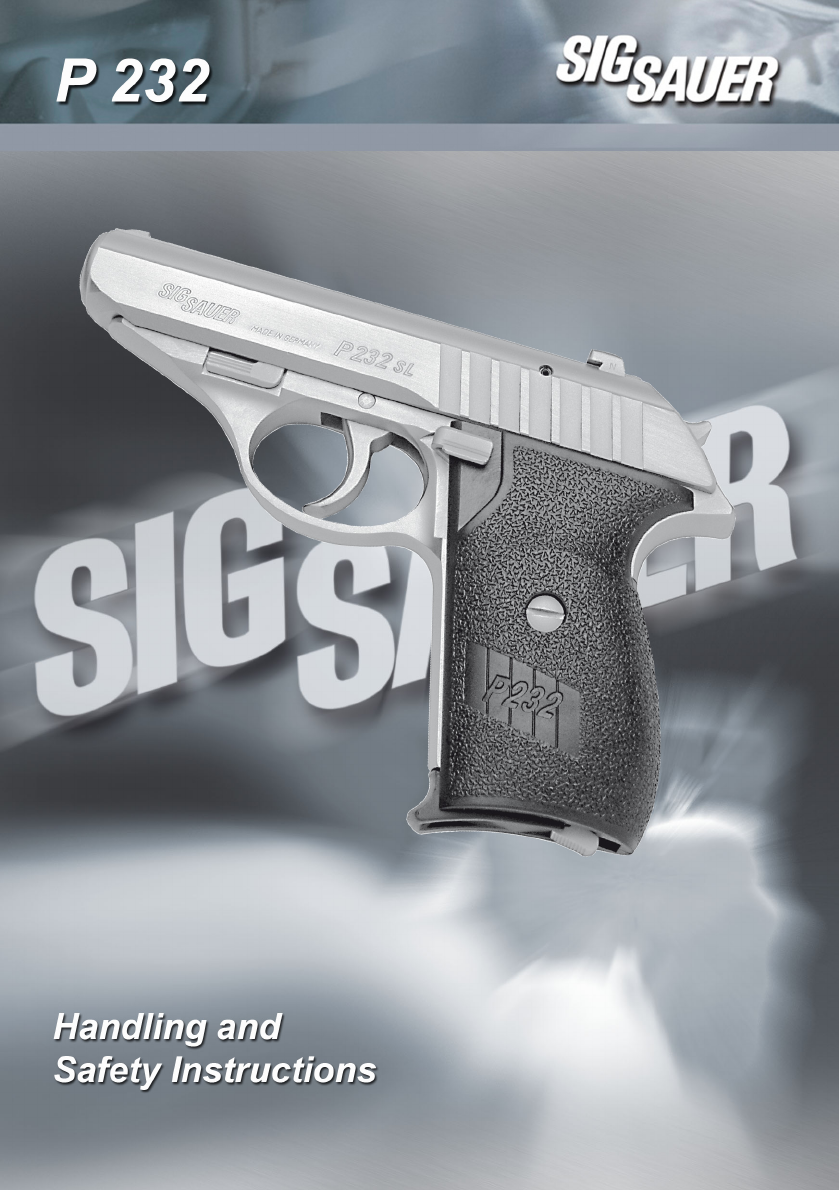
Product description 3 Product description 3.1 Main parts 5 40 4 6 29 1 15 16 20 51-54 43 Fig. 1, P 239 (DA/SA version) Item Part designation Item Part designation 1 Barrel 20 Trigger 4 Slide 29 Hammer 5 Front sight 40 Decocking lever (only at DA/SA version) 6 Rear sight 43 Magazine catch 15 Frame 51-54 Magazine 16 Takedown lever 5 GB 07.
Product description 3.2 Main features SIG SAUER pistols are modern handguns complying with the latest technical advances in weapon design for military, police and sporting use. The P 232 is a non-locked, recoil-operated pistol with semi-automatic loading, fixed barrel, inner slide catch lever and fixed front sight.
Transporting 4 Transporting the pistol WARNING! Uncontrolled discharge of shot May lead to death or severe injuries • For your own safety and for the safety of others, always transport the pistol in the unloaded condition (see Section 5.8), decocked and under lock. • Never carry the pistol on your person with a round in the chamber and the hammer cocked. • Always carry the pistol in such a manner that, should you fall or otherwise slip, you are able to control the direction of the muzzle.
Handling 5.3 Ammunition WARNING! Incorrect ammunition May lead to death or severe injuries and damage to the pistol • For your pistol, use only commercial grade ammunition in the original packaging, which corresponds to the calibre of the pistol. The correct calibre is stamped on the pistol. 5.4 Loading the magazine Procedure: 1. Place round on feeder 53, close to the magazine lips. 2. Press round down and push it to the rear. 3. Load the number of rounds that you intend to shoot.
Handling 5.5 Loading the pistol (ready to fire) Procedure: WARNING! Insufficient awareness of the dangers May lead to death or severe injuries • Never load or unload the pistol inside a vehicle, inside a building or any other confined space (except in a designated firing range). • Before loading, always wipe off any excess grease and oil and check that there is no obstruction in the bore of the barrel. • Always keep the muzzle of the pistol pointed in a safe direction.
Handling 5.6 Discharging a shot Procedure: WARNING! Insufficient awareness of the dangers May lead to death or severe injuries • Ensure that the target and the environment allow shots to be fired without danger. • When discharging shots, ensure that neither your fingers, hands or any other parts of the body are located in front of, over or adjacent to the barrel muzzle or the ejection port. • Never allow other persons to stand beside you where they might be struck by ejected cartridge cases.
Handling 5.7 Reloading during shooting Slide is caught in the open position. WARNING! Insufficient awareness of the dangers May lead to death or severe injuries • Never let the pistol out of your hands. • Keep the pistol pointed at the safe target. CAUTION! 5.8 Unloading the pistol 5.8.1 Unloading the pistol, magazine not empty WARNING! Pistol is ready to fire May lead to death or severe injuries • Never let the pistol out of your hands before it is unloaded.
Handling 4. Draw back slide 4 to the stop and arrest it in the open position. The round is ejected. 5. Check visually and manually with a tool that the round was ejected and that no other round is chambered (see Fig. 3). 6. Release slide 4. The slide 4 is impelled forward. 7. Press decocking lever 40 down (not applicable to DAO pistols).
Handling Sight correction 5.8.2 Unloading the pistol, magazine empty, slide open 6 Sight correction CAUTION! WARNING! Pistol may be damaged Pistol is loaded May lead to death or severe injuries • Sight corrections should only be carried out on an unloaded pistol by an armourer, gunsmith or an expert. An Allan key is required for this purpose (see Section 6.1). • The pistol must not be put down and out of your hand until the magazine is removed and the pistol is unloaded. Procedure: 6.1 1.
Sight correction 6.2 Sight correction for elevation 6.2.1 Changing the rear sight Changing the rear sight 6 for a deeper rear sight (one front sight increment) alters the point of impact by approx. 6.2 cm at a 25 m range. 6.3 Rear sight variants Number Height +. 5.2 mm + 5.5 mm N 5.8 mm - 6.1 mm -. 6.4 mm Fig. 6, Point of impact is high 07.
Maintenance 7 Pistol maintenance WARNING! CAUTION! Pistol is ready to fire May lead to death or severe injuries • The magazine must be removed from the pistol. • Before stripping your pistol for cleaning, ensure once again that it is unloaded (see Section 5.8). • Do not grasp slide 4 with your fingers. 7.1 Slide and recoil spring unit are only connected loosely with each other May lead to injuries and damage to the pistol • The recoil spring 3 is cocked.
Maintenance 7. Pull recoil spring 3 off the barrel 1. 7.2 Disassembly of the magazine 1 CAUTION! Magazine spring is compressed May lead to injuries and damage to the pistol • Do not carry out any work on the pistol near 3 Fig. 10 Note: • This level of stripping is sufficient to allow a thorough cleaning after shooting. • Further dismantling of the pistol may only be carried out by qualified armourers and gunsmiths. your face and hold magazine with the magazine floor plate pointing downwards.
Maintenance 7.3 Cleaning the pistol 6. CAUTION! Pistol may be damaged • Never clean barrel 1 from the muzzle end and do not use a steel wire brush as it can destroy the smooth surface of the barrel. Use a suitable cleaning rod and a brush of matching calibre (see Section 11). • Solvents can be harmful to the surface finish of the pistol. Read the manufacturer's notes and warnings before using solvents or cleansers. 4 3 1 15 Procedure: 1.
Maintenance 7.4 Assembling the pistol Procedure: 5. Thumb down takedown lever 16. 1. Check that there is no foreign matter inside the pistol. . 2. Check that serial number, slide number and frame number tally. 3. Cock hammer 29 (not applicable to DAO pistols). 4. Slide the recoil spring 3 with the smaller diameter on the barrel 1 first. 16 1 Fig. 14 6. Lead slide 4 over the recoil spring 3 and pull over the barrel 1 with slightly lifted end until the rear part. 3 Fig.
Maintenance 8. Flip up the takedown lever 16 clockwise. . 3. Check the double-action trigger (DA). – With hammer 29 decocked, pull trigger 20 through. 4 – Check that hammer cocks and that at the end of trigger travel, it strikes firmly forward and comes to rest ini the safety intercept notch. 4. Check trigger travel and trigger interruption. 16 Fig. 17 9. Press decocking lever 40 down (Not applicable to DAO pistols). Note: • The pistol is unloaded and decocked. 7.
Maintenance – Check that slide remains caught in its rearmost position. – Remove magazine 51. – Draw back slide 4 to the stop and release it. The slide must be impelled forward with sufficient energy. – Actuate decocking lever 40 (not applicable to DAO pistols). 8. Inspect magazine. – Check condition of the magazine tube 51 for signs of damage or dirt (lips and floor plate). – Check that the magazine floor plate 54 is properly secured. – Check free movement and spring action of feeder 53.
Service and repairs 8 Pistol service and repairs 8.1 Cause and correction of malfunctions 8.2 Procedure: Pistol maintenance (cleaning and inspection) according to the instructions can prevent malfunctions. 1. Remove and safeguard the magazine. Should, nevertheless, a malfunction occur during shooting, proceed as follows: 3. Verify (visually or with a tool) that there is no bullet, round, case or foreign body in the chamber or barrel bore (see Fig. 3).
Service and repairs Assembly/Malfunction Potential Cause Potential Remedy Ammunition feed: No round chambered. Magazine not properly inserted, deformed or dirty. Insert magazine properly or replace it. Pistol or rounds dirty or too heavily greased. Strip, clean and lubricate pistol (see Section 7.1 to 7.4). Incorrect ammunition. Replace ammunition. Pistol defective. Repair by manufacturer. Recoil insufficient because of fouling. Strip, clean and lubricate pistol (see Section 7.1 to 7.4).
Service and repairs 8.3 Product line Safekeeping and storage of the pistol WARNING! 4. Send the pistol properly insured and carriagepaid (packages without correct postage will not be accepted) to: Uncontrolled discharge of shot May lead to death or severe injuries – the sales outlet from which you purchased the pistol • Always store your pistol unloaded and in – the local appointed J. P. Sauer & Sohn dealer cleaned condition. – the J. P.
Technical data/types/accessories 11 Technical data/types/accessories Technical Specifications P 232, P 232 B&W P 232 SL P 232 DAO Calibre 9 mm short / 7.65 mm Browning 9 mm short / 7.65 mm Browning 9 mm short / 7.65 mm Browning Length, overall 169 mm 169 mm 169 mm Height, overall 121 mm 121 mm 121 mm Width, overall 33 mm 33 mm 33 mm Barrel length (tube length) 92 mm 92 mm 92 mm Rifling lead 250 mm 250 mm 250 mm No.
Spare parts 12 Spare parts Note: Illustration of spare parts list, see Fig. 18 Required specifications when placing spare part orders – Pistol model (calibre, type) – Pistol serial number – Item number and index – Part designation Index explanation – C = P 232 DAO – * = not for P 232 DAO WARNING! Uncontrolled discharge of shot May lead to death or severe injuries • Never use a standard hammer 29 in a DAO pistol.
Spare parts Fig. 18, Spare parts P 232 07.
J. P. Sauer & Sohn GmbH gegr. 1751 Sauerstr. 2-6 D-24340 Eckernförde Germany Phone +49 4351 471 100 Fax +49 4351 471 160 www.sigsauer.