SIG SAUER PISTOL Owners Manual Models P220 P225 P226 P228 P229 P239 P245 WARNING Please read and understand this owner’s manual before taking your new SIGARMS pistol out of the box. It is vital to your safety and to the safety of others that you accurately follow the information contained in this m a n u a l , a s w e l l a s t h e information supplied by the ammunition manufacturer. If you have any questions, please call or write: SIGARMS Inc.
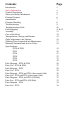
Contents Page Introduction Safety Information General Description Safety and Safety Mechanism Principal Features Ammunition Firearms Handling Troubleshooting Troubleshooting Guide Field Stripping Assembly Care of the Pistol Transportation, Storage and Returns Sight Adjustment s and Options Ordering Parts, Inspection and Maintenance Warranty Statement and Service Policy Specifications: P220 & P245 P225 P226 P228 P229 P239 Parts Diagram - P220 & P245 Parts List - P220 & P245 Parts Diagram - P225 Parts List
Congratulations You are now the owner of one of the world's finest and most superbly engineered firearms. The SIG SAUER® Semiautomatic Pistol has been designed and crafted to meet the stringent requirements of law enforcement agencies and the military. Used with the proper ammunition and given reasonable maintenance, it will serve you dependably and well for many years. To make sure you get the best performance and reliability from your pistol, please read and follow the procedures outlined in this manual.
Safety Information Before you take your new SIG SAUER pistol out of the box, please read the following information. It is vital to your safety and the safety of others. Firearms safety is your responsibility PISTOLS are classified as FIREARMS and are sold by us with the specific understanding that we are not responsible in any manner whatsoever for their safe handling or resale under local laws and regulations. SIGARMS Inc.
The Ten Commandments of Firearms Safety 1. ALWAYS treat every gun as if it were loaded. 2. ALWAYS keep the gun pointed in a safe direction. 3. ALWAYS keep your finger off the trigger until ready to shoot. 4. ALWAYS keep the gun unloaded until ready to use. 5. ALWAYS be sure the gun is safe to operate and the barrel is clear of any obstruction. 6. ALWAYS use the proper, factory-made ammunition for your particular gun. 7. ALWAYS know your target and what is beyond it. 8.
Principal Features We've designed the automatic firing pin lock to provide additional safety with the hammer in either the cocked or decocked position. You can fire the pistol only by pulling the trigger. The double-action feature and the absence of manual safeties make it easier for you to get off a quick first shot. A decocking lever* allows you to lower the cocked hammer safely into the safety intercept notch without your touching the trigger.
Ammunition Your SIG SAUER pistol will function effectively and safely with a wide variety of commercial and military-standard ammunition. Here are some suggestions that will help you keep your pistol free from ammunition-related problems: WARNING Using the wrong ammunition could result in serious injury or death. Catastrophic damage could occur. 1. Use only ammunition of the caliber for which your pistol is chambered. The right caliber is permanently engraved on your pistol. 2.
Firearms Handling You have the pistol and the ammo, and you've read and understood all the safety instructions. You know about decocking the pistol by using the decocking lever (which doesn't apply if you have the DAO). Now, you're ready to use the pistol. Removing the magazine Remove the magazine by pressing the magazine catch. Retracting the slide Draw back the slide, and engage it by pushing up the slide catch lever. Loading the magazine 1. Press down on the magazine follower with the cartridge case rim.
Troubleshooting Firearms work reliably if properly maintained. If there is a malfunction during firing, here's what to do: 1. Keep the pistol pointed in a safe direction with your finger off the trigger. 2. Remove and secure the magazine. 3. Move the slide rearward and forward to clear any cartridge case in or near the chamber. 4. If you suspect that a bullet is lodged in the bore, field strip your pistol and check to see if the barrel is blocked.
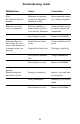
Troubleshooting Guide Malfunction Cause Correction Feed: No round fed into the chamber Magazine not properly inserted or magazine is deformed or dirty Insert magazine properly or change magazine Slide does not close easily or completely Pistol or cartridge is fouled (dirty) or pistol is too heavily lubricated Clean and lubricate pistol and /or replace the ammunition Pistol requires service Return to SIGARMS Insufficient recoil due to dirt Clean and lubricate the pistol Light hold or limp wrist
Field Stripping Before you take the pistol apart, make sure it's unloaded. This is essential for your safety and the safety of others. Field strip the pistol as follows: 43 51 Figure A ● Press the magazine catch (43). Remove the magazine (51). 4 18 16 Figure B ● ● ● Pull back the slide (4) as far as it will go and hold it in the open position by pushing up the slide catch lever (18) with your thumb. Check carefully to ensure that the chamber is empty and the magazine well is clear.
1 18 15 Figure C ● 4 Pull back the slide (4) slightly to disengage the slide catch lever (18). Hold the slide firmly and allow it to glide forward gently. Now slip the complete assembly, comprising slide (4), barrel (1), recoil spring and guide, forward and off the frame (15). 2&3 Figure D ● Remove the recoil spring (3) and guide (2), taking care to control the release of spring tension while pointing the assembly away from your body and in a safe direction.
Assemble the pistol as follows: Insert the barrel (1) into the slide (4); fit the recoil spring (3) and guide (2) into place. If the recoil spring and guide were separated during stripping, ensure that the narrower end of the spring is slipped over the guide first. During spring compression, point the assembly away from your body. Slip the assembled slide system onto the frame (15) until it contacts the end stop, and hold it in place with the slide catch lever (18). Now, push up the take-down lever (16).
Caring for your Pistol WARNING BEFORE PERFORMING ANY CLEANING OR MAINTENANCE, MAKE SURE THE PISTOL IS COMPLETELY UNLOADED. THIS INCLUDES THE MAGAZINE AND CHAMBER. Follow these instructions and your SIG SAUER pistol will remain in excellent condition even after years of hard service. NOTE: Your SIG SAUER pistol comes from the factory with a light coating of protective grease and oils. Before you fire the pistol, you should disassemble, clean and lubricate it as recommended on this page.
Transport and Storage When transporting your pistol, keep it unloaded for your safety and for the safety of others. Know and comply with all laws governing the transport of firearms in your locality. When storing your pistol, keep it separated from ammunition, under lock and key and out of the reach of children and other inexperienced or unauthorized persons. Returning your Firearm When you return a pistol to the SIGARMS Inc. Service Department, here's what to do: 1.
Sights The SIG SAUER pistol is equipped with drift adjustable fixed sights which have proven their worth under severe conditions. The sights consist of a rear sight and a front sight blade, designed and dimensioned to ensure rapid target acquisition even when visibility is poor. You can adjust the sights as follows: Windage: Change windage by moving the rear sight either to the left or right in its dovetail.
Parts Before you order any parts, please be advised that: while most gunsmiths and armorers are perfectly capable of repairing your firearm, we can't vouch for any individual's skill or workmanship. Remember, unauthorized adjustments or parts replacement can void your service policy. Your SIG SAUER pistol is a precision instrument and some replacement parts may require a trained gunsmith or armorer to ensure proper operation.
Warranty Statement Based on Magnuson-Moss Warranty Act, SIGARMS Inc. offers no express warranty on their product line. However, SIGARMS Inc. recognizes its obligations concerning service to owners of SIGARMS products. SIGARMS Inc. stands behind its products and will continue to provide service to their product line as they have over the years. SIGARMS Inc. products will be serviced for a period of one year from date of retail purchase, for defects in materials or workmanship, at no charge to the purchaser.
Specifications SIG SAUER P220 & P245 Mechanically-Locked, Recoil-Operated, Semiautomatic Pistol Trigger: Double-Action/Single-Action or Double-Action Only 4 Point Safety System: 1. Patented automatic firing-pin lock 2. Decocking Lever (DA/SA Only) 3. Safety Intercept Notch 4. Disconnector P220 P245 Caliber .45 ACP .45 APC Length, overall 7.8" 7.28˝ Height, overall 5.6" 5.0˝ Width, overall 1.4" 1.34˝ Barrel length 4.4" 3.
Specifications - SIG SAUER P225 Mechanically Locked, Recoil-Operated, Semiautomatic Pistol Trigger: Double-Action/Single-Action or Double-Action Only 4 Point Safety System: 1. Patented automatic firing-pin lock 2. Decocking Lever (DA/SA Only) 3. Safety Intercept Notch 4. Disconnector Caliber 9mm Luger (Parabellum) Length, overall 7.1" Height, overall 5.2" Width, overall 1.3" Barrel length 3.9" Rifling twist 1 in 10" Rifling grooves 6 Sight radius 5.7" Weight, w/o magazine 25.9 oz.
Specifications- SIG SAUER P226 Mechanically-Locked, Recoil-Operated, Semiautomatic Pistol Trigger: Double-Action/Single-Action or Double-Action Only 4 Point Safety System: 1. Patented automatic firing-pin lock 2. Decocking Lever (DA/SA Only) 3. Safety Intercept Notch 4. Disconnector Caliber 9mm Luger .357 SIG .40 S&W Length, overall 7.7" 7.7" 7.7" Height, overall 5.5" 5.5" 5.5" Width,overall 1.5" 1.5" 1.5" Barrel length 4.4" 4.4" 4.
Specifications - SIG SAUER P228 Mechanically-Locked, Recoil-Operated, Semiautomatic Pistol Trigger: Double-Action/Single-Action or Double-Action Only 4 Point Safety System: 1. Patented automatic firing-pin lock 2. Decocking Lever (DA/SA Only) 3. Safety Intercept Notch 4. Disconnector Caliber 9mm Luger (Parabellum) Length, overall 7.1" Height, overall 5.4" Width, overall 1.5" Barrel length 3.9" Rifling twist 1 in 10" Rifling grooves 6 Sight radius 5.7" Weight w/o magazine 26.2 oz.
Specifications - SIG SAUER P229 Mechanically-Locked, Recoil-Operated, Semiautomatic Pistol Trigger: Double-Action/Single-Action or Double-Action Only 4 Point Safety System: 1. Patented automatic firing-pin lock 2. Decocking Lever (DA/SA Only) 3. Safety Intercept Notch 4. Disconnector Caliber 9mm Luger .357 SIG Length, overall 7.1" Height, overalI 5.4" 5.4" 5.4" Width, overall 1.5" 1.5" 1.5" Barrel length 3.9" 3.9" 3.
Specifications - SIG SAUER P239 Mechanically-Locked, Recoil-Operated, Semiautomatic Pistol Trigger: Double-Action/Single-Action or Double-Action Only 4 Point Safety System: 1. Patented automatic firing-pin lock 2. Decocking Lever (DA/SA Only) 3. Safety Intercept Notch 4. Disconnector Caliber 9mm Luger .357 SIG .40 S&W Length, overall 6.6" 6.6" 6.6" Height, overall 5.1" 5.2" 5.2" Width, overall 1.2" 1.2" 1.2" Barrel length 3.6" 3.6" 3.
SIG Sauer Pistol Exploded Diagrams & Parts Lists 25
P220 Exploded View 8 4 7 53 6 5 3 10 2 9 14 17 20 19 52 51, 51 A 1 22 23 11 54 25 27 18 41 28 29 29 C 26 24 38 15 A 12 13 33 48, 48 A 30 44 15 34 33 A 37 16 56 50 26 21 49, 49 A 39 31 34 A 56 50 43 46 36 45 47 50 56 50 56 40 42 35 A 58 57 A 43 A
왖 For the accompanying figure to the list, see page 26. Essential information when ordering spare parts 27 – Pistol model (calibre, designation) – Pistol serial number – Item number and index – Part designation Index explanation – – – – A B C * = = = = P 220 (European) P 220-1(American) P 220-1 DAO not for P 220-1 DAO 왖 Never install a standard hammer 29 in a DAO pistol.
P225 Exploded View 8 4 7 6 5 3 10 2 1 9 14 17 20 19 22 23 12 13 53 25 28 27 18 28 41 29 29 C 24 38 15 11 48 30 54 33 37 16 21 26 46 49 50 56 50 56 52 51 56 50 39 43 31 47 40 34 56 50 55 45 42 36 35
왖 For the accompanying figure to the list, see page 28. Essential information when ordering spare parts 29 – Pistol model (calibre, designation) – Pistol serial number – Item number and index – Part designation Index explanation – C = P 225 DAO – * = not for P 225 DAO 왖 Never install a standard hammer 29 in a DAO pistol.
50 50 5 16 19 17 42 49 3 9 20 2 8 47 21 43 46 40 26 18 10 45 31 22 14 4 15 44 41 23 24 39 37 38 32 27 25 13 12 11 6, 6 B 7 48 1 50 50 30 28 33 4, 4 B 34 36 29 29 C 8° 54 51 9 ° 14 ° 6, 6 B 7° 12 13 ° 10 ° 55 52 53 11 P226 Exploded View
B C * ° = = = = P 226 Sport P 226 DAO not for P 226 DAO sheet metal slide 왖 Never install a standard hammer 29 in a DAO pistol. – – – – Index explanation – Pistol model (calibre, designation) – Pistol serial number – Item number and index – Part designation Essential information when ordering spare parts 왖 For the accompanying figure to the list, see page 30.
8 7 6 5 3 10 2 1 9 14 17 20 22 23 11 25 28 27 18 19 53 12 13 32 44 41 29 29 C 24 51 32 38 52 48 30 54 33 37 16 50 26 21 43 46 39 31 34 50 55 49 47 45 40 50 36 42 50 15 P228 Exploded View 4
왖 For the accompanying figure to the list, see page 32. Essential information when ordering spare parts 33 – Pistol model (calibre, designation) – Pistol serial number – Item number and index – Part designation Index explanation – C = P 228 DAO – * = not for P 228 DAO 왖 Never install a standard hammer 29 in a DAO pistol.
50 50 5 16 19 17 42 49 3 9 20 2 8 40 47 26 21 43 46 18 10 45 31 22 14 4 15 44 41 23 39 37 38 32 24 27 25 13 12 6 7 11 48 50 50 30 28 33 1 34 36 54 51 29 29 C 55 52 53 P229 Exploded View
Item 왖 For the accompanying figure to the list, see page 34.
9 8 10 M 8M 56 M 4 7 60 M 9M 4M 6 59 M 5 57 M 3 12 14 2 58 M 11 13 11 M 17 14 M 1 20 22 13 M 23 25 18 28 27 36 19 44 41 29 29 C 53 24 32 38 48 30 52 33 16 50 26 34 51 54 21 31 43 49 47 46 50 45 36 40 42 35 15 55 P239 Exploded View 10
왖 For the accompanying figure to the list, see page 36. 1 2 3 4 5 Essential information when ordering spare parts 6 37 – Pistol model (calibre, designation) – Pistol serial number – Item number and index – Part designation Index explanation – C = P 239 DAO – * = not for P 239 DAO 왖 Never install a standard hammer 29 in a DAO pistol.
P245 Exploded View 8 4 7 6 5 3 10 2 1 9 14 17 20 19 22 23 12 13 44 28 29 29 C 38 24 41 38 15 53 25 27 18 11 52 51 48 30 54 33 37 16 56 50 26 21 43 49 50 56 34 39 56 50 46 47 50 56 31 45 42 40 36 55
왖 For the accompanying figure to the list, see page 38. Essential information when ordering spare parts 39 – Pistol model (calibre, designation) – Pistol serial number – Item number and index – Part designation Index explanation – C = P 245 DAO – * = not for P 245 DAO 왖 Never install a standard hammer 29 in a DAO pistol.
Be aware of those around you. If their actions are not in keeping with safe gun handling procedures, TELL THEM. IMPORTANT: Do not discard. Keep this manual with your firearm. Upon change of ownership, transfer this manual with the firearm. SIGARMS Inc. Corporate Park Exeter, NH 03833 (603) 772-2302 www.sigarms.com SIG SAUER ®, SIG ®, and SIGLITE ® are registered trademarks of SIGARMS Inc. All specifications are subject to change without notice. P/N OM-P245-USA 6/1/01 Printed in U.S.A.