
Operator's Manual

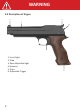

3.0 Adjusng the Trigger
Understand before ring! Small adjustments will make a noceable
change to the operaon of the trigger. Only make 1/4 turn
adjustments at a me and test re the airgun before making
further adjustments. The trigger is two stage with adjustments on
both stages. Be aware that adjustment to one screw will eect the
adjustment of the others and the trigger will only work properly
if there is the correct balance between all screws. If you have no
experience in adjusng two stage triggers seek guidance or leave
the trigger as set by the factory. Incorrect adjustment can make the
airgun unsafe. Never adjust the weight of the trigger below 1000g.
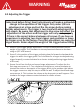
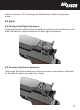
1. Screw 1 is the trigger weight adjustment. This will increase/decrease the pull
weight of the trigger. Turn clockwise to increse/counterclockwise to decrease -
using an 1/8" allen wrench
2. Screw 2 is the posion of the trigger: adjusng how far forward or backward the
trigger sits within the trigger guard. Turn clockwise for a longer stroke(posoning
trigger forward), counterclockwise for a shorter stroke(posioning trigger farther
to the rear).
3. Screws 3 and 4 are the rst and second stage adjustments. To adjust the the
rst stage use screw no. 3. Turn clockwise to lengthen or coutnerclockwise to
shorten the stroke or drop point of the trigger, which is the posion right before
the trigger comes to a stop-this stop is called the wall. To adjust the second stage
use screw no. 4. This is where the release at the drop point or wall happens. Turn
clockwise for longer release-counterclockwise for shoter release.
WARNING
5