
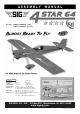
User Manual

TAIL SURFACE & TAILWHEEL INSTALLATION
For the following steps you will need:
(1) Fuselage
(1) Wing
(1) Stabilizer & Elevator set
(1) Vertical Fin & Rudder Set
(2) M6.5 Nylon Wing Bolts
(1) Tailwheel assembly, including Wheel and Wheel Collars
(2) M3 x 12mm Screws
(1) Nylon Rudder Steering Clasp with Bolt and Hex Nut
(2) Nylon Control Horns
(6) M2 x 14mm Sheet Metal Screws
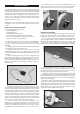
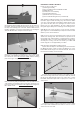
❑ 11) Remove the elevator and hinges from the horizontal stab
and set them aside for now. Test fit the stabilizer on the fuselage.
Notice that the covering has been removed from both the fuselage
and horizontal stabilizer where they will mate together. Eyeball
the location of the horizontal stabilizer and pin it in place.
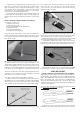
❑ 12) Bolt the wing in place on the fuselage with the Nylon Wing
Bolts provided. Carefully check the alignment of the stabilizer to
the wing.
a) First view the model from directly in front. Check to see if
the stabilizer is level with the wing. You should find it to be very
close. If necessary use a sanding block to fine tune the stabilizer
platform to level the stabilizer to the wing.
b) Next use a tape measure to measure the distance from each
stab tip to the back edge of the wing - the distance should be
equal on both sides. Adjust if necessary.
c) Mark the front and rear of the stabilizer with a felt pen for
alignment guides. You can now remove the pins and lift up the
stabilizer for gluing.
❑ 13) The horizontal stabilizer is now glued in place into the rear
of the fuselage. We suggest using slow drying epoxy glue for this
job to allow time to position the stab accurately and make any final
adjustments that might be needed. Apply the glue to both sides
and reset the stab in place. Use pins to hold it in place. Re-check
the alignment. Wipe away any excess epoxy with rubbing alcohol
and a soft paper towel. Allow the glue to set completely.
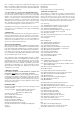
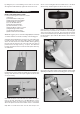
❑ 14) Pull the Fin and Rudder apart set the rudder and hinges
aside for now. Test fit the fin in place on top of the stabilizer.
Check to see that the fin sits flush and perpendicular to the stabi-
lizer. When satisfied with the fit, glue the fin in place using slow
drying epoxy glue. Apply a thin coat of glue to the bottom of the
fin and to the exposed wood on the stab. With the fin in place,
sight the model from the front to make sure the fin is absolutely
90 degrees upright to the stab. If needed, use a little masking tape
to hold it in alignment. Wipe off any excess glue rubbing alcohol
and a soft paper towel.
❑ 15) Just like the aileron hinges, the elevator hinges are factory
installed, but not yet glued. Hinge the elevator assembly to the
stabilizer, using the same techniques you did for the ailerons on
page 5 of this manual. Let the hinges dry before flexing them.
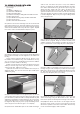
❑ 16) The rudder is now hinged to the fin and to the rear of the
fuselage using the same techniques you did for the other hinges.
Make sure to line up the top of the rudder flush with the top of the
fin. This will ensure the tail wheel bracket lines up correctly. Let
the hinges dry adequately before proceeding.
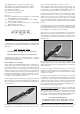
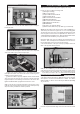
❑ 17) Mount the Tailwheel assembly in place on the lower rear
end of the fuselage, using two M3 x 12mm screws. Note that
there are two pilot holes already in the fuselage for the screws.
❑ 18) Adjust the wheel collar shown to set the height of the tail-
wheel wire. Then check to see if the long steering leg of the tail-
wheel wire is parallel to the bottom of the rudder. The wire may
need to be tweaked slightly to make it parallel.
8