
User Manual


.
9.
Roll the foam core forward onto the wing
skin with a rocking motion until the entire
skin is attached.
10.
Trim off most of the excess balsa wing
skin, to within about 1/16" of the foam
core, with a sharp single-edge razor
blade or a modeling knife. It is not
necessary to trim the balsa completely
flush with the foam wing core at this
time.
11.
Repeat steps 1 through 10 to skin the other three sides of the foam cores.
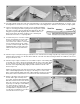
12.
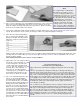
After sheeting all four sides of the wing panels, stack the panels back in the foam shipping cradles. Place on a flat surface
or building board and weight down. (Notice in this picture that four one gallon jugs filled with water have been placed on a
piece of plywood larger than the foam.) Allow to dry overnight before proceeding.
13. Sand the edges of the balsa wing skins flush with the foam core with a long sanding block. Take care to sand just up to the
foam, not into it.
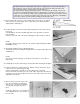
14.
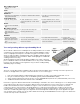
Glue the 1/4"x1/2"x30" balsa leading and trailing edges in place with Kwik-Set epoxy or Sig-Bond glue. Use masking tape
and straight pins to hold the pieces in place until dry.
15.
Carve the leading and trailing edges to their approximate shape with a #26 X-Acto blade.
BUILDER'S TIP: Wrap the tip of the blade with masking tape to prevent gouging of the wing skins.
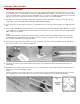
16.
Finish shaping the leading and trailing edges to shape. Finish shaping the leading and trailing edges with a long sanding
block.
(NOTE: A pencil line down the center of the leading edge from root to tip will help keep the shape true all along the way.)
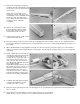
17.
Glue in place the 1"x1"x8" balsa wing tip blocks with epoxy or SigBond glue. Use masking tape or a straight pin to hold in
place until dry.
18.
Roughly carve the wing tip block to profile shape with a #26 X-Acto blade, as shown in the photo. For now, just rough out
the block. Leave plenty of extra wood at the trailing edge, for final carving later on after the aileron is attached (NOTE: This
final shaping will be done in step 27).