
User Manual


.
SIG CA, like most brands of cyanoacrylates, comes in three viscosities thin, medium, and thick. An accelerator spray and
debonder are also available and are described below.
SIG CA THIN
Watery in consistency, thin C/A should only be used when the two parts to be joined are in perfect contact with zero gap.
Capillary action pulls this glue deep into the wood resulting in a very strong bond and it dries in just a few seconds. Thin C/A
can be used to tack assemblies together, but these joints should be glued again later with medium or thick C/A. Thin C/A is also
necessary for installing EASY HINGES.
SIG CA MEDIUM
Our medium thickness C/A is excellent for almost any step during construction, and is particularly recommended for gluing the
plywood fuselage parts. The extra thickness allows the glue to fill small gaps, but it dries a little slower than thin C/A. If you want
only one type of C/A, use medium thickness.
SIG CA SLOW
This thickest formula is good for filling large gaps and building up strong fillets at joints requiring extra strength. It also dries slow
enough to allow you to apply it to one part and position it on another before it dries. (With the thin and medium C/A's, the parts
must be in contact and positioned correctly before glue application.) This feature is useful when laminating large sheeted areas
like a fuselage side and a fuselage doubler.
SIG KWIK-SHOT ACCELERATOR
Spraying accelerator on C/A (any thickness) will cure it almost instantly. Although C/A is fast, it's sometimes nice to speed it up
even more.
DEBONDER
This can be used to separate parts, but you'll probably use it for unsticking your fingers more than anything else!
CAUTION:
Some people have experienced allergic reactions when exposed to epoxy or cyanoacrylate
glues. This is very rare. However, it is always important that such glues, and also paints, thinners
and solvents, be used with adequate ventilation to carry fumes away.
About The Building Sequence
The quickest and most efficient way to complete a model is to work on several pieces at the same time. While the glue is drying
on one section, you can start on or proceed with another part. Keep in mind that the number sequence used in these
instructions book was chosen as the best way to explain the building of each major component and is not intended to be
followed in exact one-two-three fashion. Start on the wing at NO.1 and after doing as many steps as is convenient, flip over to
"FUSELAGE CONSTRUCTION" and do a step or two there, then back to "WING CONSTRUCTION" and so forth. You will
arrive at points where you can go no farther until another component is available. Plan ahead! Read the book completely and
study the plan before beginning construction.
WING CONSTRUCTION
1.
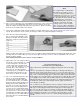
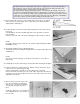
The foam wing cores are shipped in the block from which they were cut. Untape
the foam block and remove the wing cores.
NOTE: Save the foam shipping cradles as they will be needed later in construction.
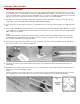
2.
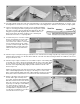
Lightly sand any irregularities or cutting wire marks from the foam wing cores with 220 grit sandpaper used on a long
sanding block.
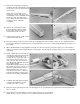
3.
Using a metal straight edge, true up the edges of the ten 1/16"x3"x30" balsa sheets provided for covering the wing. Use a
sanding block for final touch
-
up if necessary.