
User Manual


.
77.
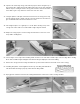
Trim off the excess covering material leaving a 1/8" overlap at the trailing edge. Seal the overlap down with an iron.
78.
Cover the top of the wing in the same manner as described in the above steps 74 through 76. Leave a 3/16" overlap of
covering material on the leading edge of the wing and seal it down with an iron.
Repeat the process from steps 74 through 78 to finish covering the other wing panel.
Covering The Fuselage
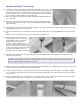
79.
Cover the bottom of the fuselage first. When cutting the material for the bottom allow enough extra material around the
nose, or any other area with compound curves, so you can get a good grip on it with your hand. Start by sealing the
covering to the model at the tail. Work slowly forward with the sealing iron, sealing the covering smoothly to the bottom of
the fuse. When you get to the nose area, work the iron over the covering with one hand while you pull on it with the other.
As the covering becomes pliable from the heat, you can pull it gently around the curve. Work slowly, allowing the heat to do
the work. Do not pull too hard or the covering might tear.
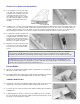
80.
Trim off the excess covering material with a sharp single
-
edge razor blade and reseal the edges with the iron.
81.
Repeat this procedure for covering both sides of the fuselage. Allow about 1/8" to 1/4" overlap onto the top and bottom of
the fuse.
82.
Cover the fuselage top in the same manner as the bottom and sides. Remember to reseal the edges after trimming.
Covering The Tail Surfaces And Ailerons
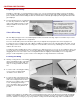
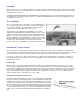
83.
The stabilizer, elevator, ailerons, and fin
should each be covered with two pieces
of material - cover each side separately.
Iron the material from the center out to
avoid trapping air bubbles. Once the
ailerons have been covered, cut away
the material to expose the slot and hole
for the torque rods.