
User Manual


.
COVERING AND FINISHING
Preparing For Covering
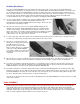
Regardless of what type of covering material you elect to use, a good covering job starts with good surface preparation.
You can't hide poor workmanship with covering material! Fill any small surface gaps with a light-weight filler or spackling
paste. Sand the entire model including the ailerons and tail surfaces, with 220 grit sandpaper, then again with 360 or 400
grit sandpaper.
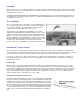
73.
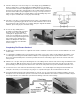
The structure that is to be covered must
be clean, dry, and dust free. Wipe the
entire surface with a tack rag or a cloth
dampened with alcohol to remove all
excess dust.
BUILDER'S TIP:
Before starting the actual application
of the covering material, use your
wife's or mom's (ask first) favorite
vacuum cleaner with the soft brush
attachment and vacuum the entire
model and the work bench. This
greatly helps eliminate the dust
particles tnat get under the covering.
Select A Covering
All of the Ninja prototypes were covered with Sig Supercoat Iron
-on Plastic Covering. Supercoat is ideal for slope soarers
because of its light weight and ease of application.
The color scheme that is pictured on the label is quite easy to duplicate and only requires two rolls of Sig Supercoat
Covering. The colors needed are two rolls of Black. In addition you will need one roll of Sig Supertrim Cub Yellow, one roll
Dark Orange, and one roll Waco Red. The canopy was covered in Silver, however any contrasting color can be used and
still have the same effect.
You will notice in the following photos of the covering process, that we prefer to use a "sock" on our sealing iron. This is not
necessary, but is a personal preference. A sock helps eliminate the unsightly small scratches that can be caused from the
dragging the iron across the surface of the covering material. We also highly recommend that you use a temperature
gauge to set the temperature of your iron to the exact setting the covering manufacturer recommends.
Covering The Wing
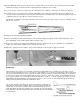
74.
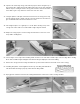
Start by covering the back of the trailing
edges, including the insides of the wing
tip and torque rod assembly, with 1/2"
strips of covering material cut from the
roll.
75.
Cover the ends of the wing tips making
sure to run the covering material
"around the corner" about 1/8".
76.
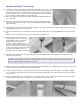
Cover the bottom of the wing first and
then the top of the wing. This leaves the
front seam overlapped on the bottom
where it is less visible. Cut the covering
to size, allowing approximately 1"
excess around the edges. Lay it down
and smooth out as many wrinkles as
possible.
Using your hot sealing iron, carefully iron the covering material from the center of the wing panel out towards the wing tip,
and then out towards the wing root. This is to help avoid trapping air bubbles under the covering. Work slowly and allow
the iron to shrink the covering as you go along. Trim the covering off flush with leading edge and reseal it with the iron.