
User Manual


.
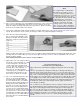
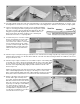
37. Slide the die-cut Lite-Ply fuselage top
rearward, under the rubber bands, until
it snaps into it's proper location between
the fuse sides.
NOTE: The Tee-Lock tabs on the
fuselage top, bottom, and formers are
made slightly oversize and will protrude
past the fuselage sides at this time.
These will be sanded off later after the
fuselage has been completely
assembled .
38.
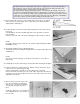
Slide the die-cut Lite-Ply fuselage
bottom rearward, under the rubber
bands, until it snaps into it's proper
location between the fuse sides.
39.
Install fuselage former F-
1 and secure it
in place with a rubber band.
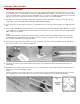
40.
Place the fuselage over the top view to check the overall alignment of the fuselage to make sure it is straight and square.
Use a 90 deg. triangle to verify that the sides are perpendicular. Correct if necessary by gently twisting the fuselage before
proceeding.
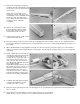
41.
When satisfied with the fuselage alignment, tack glue all of the TeeLock tabs (except the very last one on the bottom at
former F-1) from the outside using medium viscosity C/A glue. This will keep the fuselage square as you proceed with the
final gluing.
42.
Again, using medium viscosity C/A glue,
carefully glue all the parts permanently
to each other from the inside of the
fuselage. Be sure to glue both sides of
each former to the top, bottom, and
sides of the fuselage. Do not remove
the rubber bands until all the glue joints
have completely dried.
NOTE: When gluing the bottom sheet in
place between formers F-1 and F-
2, you
will have to gently bow the bottom so
that it follows the curve of the fuse
sides. Bow it into position so that it fits
perfectly flush with the fuselage sides
and hold securely while gluing with C/A.
43.
Install the die-cut Lite-Ply stab support
so that it is flush with the top of the
fuselage sides. Glue securely.
44.
Make two canopy side rails from scrap 1/16" birch plywood. Use the pattern that is provided on the plan and glue them in
place as shown.
45.
Glue in place the preshaped balsa nose block and the 3/8"x3/4"x1-1/2" balsa fill-in.
NOTE: The top of the nose block has more curvature than the bottom of the block.