
User Manual


.
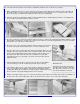
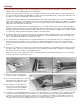
73. Disassemble the wing panels and cut
off the dowel pin so that only 3/4" sticks
out of the left wing panel W1A rib.
Round the end of the dowel pin with
sandpaper.
STABILIZER AND ELEVATOR
74.
Use a modeling knife or a jig saw to cut
all of the tail surface parts (S-1, S-2, S-
3, FG, RG-1, and the Dorsal Fin) out of
the 1/4" printed balsa sheet. Be sure to
cut just outside of the line.
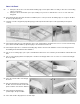
75.
Sand stab parts S-1, S-2, and S-
3 down
to the line with a sanding block.
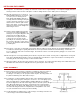
76.
Pin S-1, S-2, and S-3 in place over the
stabilizer plan.
77.
Cut to length the 1/4"x5/16" balsa
leading and trailing edge pieces. Glue
and pin in place over the plans.
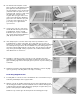
78.
Cut pieces of 1/8"x1/4" balsa for the
stab cross braces.
79.
Glue and pin the 1/8"x1/4" balsa cross
braces in place over the plans.
80.
Block sand both sides of the stabilizer
to smooth out any rough areas. Be sure
to sand the printing off the wood.
81.
Using a sanding block, sand a curve
into the ends of the leading edge sticks
to blend into the shape of the stab tips.
Then sand the corners of both the
leading edges and the tips round. Don't
round the corners of the trailing edge of
the stab.
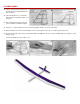
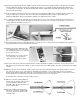
82.
Two 12" long pieces of 1/4"x2" balsa
tapered stock are provided for making
elevators. Cut one of the elevator
patterns from the plan and trace the
outline onto both pieces of tapered
stock. Cut the elevators to shape.
83.
Join the elevators together by gluing them to the 1/4" dia.x5" long birch dowel elevator joiner. Pin straight and flat on the
building board until dry. Block sand the elevators flat and smooth taking care that the 1/4" leading edge thickness is
maintained.
The stabilizer and elevators are now ready to cover.