
User Manual

.
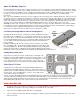
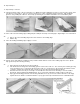
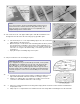
INSTALLING EASY HINGES
Using a No.11 X-Acto blade (or similar) cut a slot approximately 1/2" in depth
and slightly wider than the hinge. After all slots have been cut, insert an Easy
Hinge halfway into each slot in one of the pieces to be hinged. Then carefully
slide the matching model part onto the other half of the hinges. You'll find it
easiest to slide the part onto the hinges at an angle, one hinge at a time.
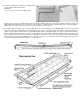
At this point the surface to be hinged is attached but not glued. Align the two
surfaces and adjust the gap between them as required. For best control
response, the gap should be as small as possible but big enough to allow the
control surface to move to the maximum deflection that you will require. Place
three or four drops of any brand of cyanoacrylate adhesive (thinnest variety)
directly onto the Easy Hinge in the gap.
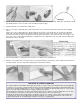
You will notice that the glue is quickly wicked into the slot as it penetrates
both the wood and the hinge. Continue this process, gluing the same side of
all of the hinges. Then turn the surfaces over and repeat the gluing process
on the other side of each hinge. After the glue has cured, approximately three
minutes, the joint can be flexed. You may notice a slight stiffness in the joint.
This can be eliminated by flexing the surface to full deflection each direction a
couple of dozen times. Don't worry about shortening the life of the hinge as
they are almost indestructible.
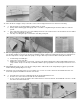
AT THIS POINT YOU WILL NEED THE FUSELAGE COMPLETED THROUGH STEP 73.
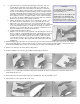
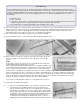
32.
(NOTE: Picture 32 shows the fuselage bottom block in place on the fuselage but it is best NOT to have it installed when
Step 32 is done. Access to the dowels is,much easier when it is not in the way.)
a. Set the wing in the fuselage saddle. If it does not fit the saddle exactly, sand as required to make it fit.
b. Hold the wing in position and mark the dowel holes in the wing by punching through the holes in F-
2 with a 1/4" drill,
a piece of tubing or a rod.
c. Drill the holes in the wing out oversize - about 9/32" diameter - to allow some "wiggle" room during the final
positioning and gluing in of the dowels. Dig out a little foam just behind the leading edge so the glue will form a
"collar" to lock the dowel to the balsa.
d. Put a piece of wax paper over the face of F-2 and insert the dowels through the paper into F-2.
e. Coat the holes in the wing with Kwik-Set Glue and put enough extra glue in the holes to fill the gap between the
oversize holes and the dowels. Don't overdo the amount of glue.
f. Put the wing in place and secure it in position with masking tape. Hold the fuselage vertically to keep the glue from
running out of the dowel holes. Allow the glue to set up firm, but not fully cure, just in case it may have stuck the
wing to the fuselage in some leaky spot. Remove the wing. If the dowel holes are not completely filled with glue, fill
them. If necessary, now that the dowels are set in place, you can cut away the wood around them to provide room
for filling any remaining crack with glue.
33. a. Put the wing on the fuselage again with a piece of wax paper between it and the fuselage at the back.
b. Epoxy the wing bolt anchor blocks in place against the fuselage sides.
34. a. Locate the positions of the wing bolt anchor blocks on the bottom of the wing. (Remember that the wing bolt holes
are drilled at an angle so that the heads of the bolts will end up flush with the surface of the bottom of the wing.
b. Drill a hole through the wing and on through the anchor blocks with a No.7 drill. (13/64" is the nearest inch size
equivalent.)
c. Run a 1/4-20 tap through the hole to cut threads in the wing bolt anchor blocks.
d.
Remove the wing and drill out the holes in the wing only with a 1/4" diameter drill to pass the nylon wing bolts.