
User Manual


.
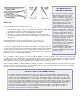
WHY MODELS MUST BE
INDIVIDUALLY BALANCED
It is impossible to produce a kit that
will automatically have the correct
Center of Gravity (C.G.) position.
Balsa wood varies in weight and it is
easily possible for wood in the tail to
be an ounce or more heavier or
lighter than average. One ounce of
extra weight in the tail has to be
countered by about 3 ounces in the
nose. Don't pile a lot of fillercoat or
finish, use excess glue or make large
fillets on the tail surfaces. The motor
you choose, whether or not a muffler
is fitted, the size and placement of
your radio equipment, etc. all affect
the balance. If you use an unusually
heavy motor or muffler you may have
to carry the battery in the radio
compartment instead of the nose or
even weight the tail. Don't consider
that whatever C.G. the model builds
out to as "good enough". Check
carefully and make whatever
adjustments that are required. With
the C.G. properly located, a Sig
design should fly with only minor trim
changes required.
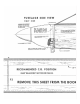
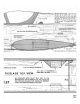
Balancing
The recommended Center of Gravity locations are:
Test Fly with the balance point located anywhere between the leading edge at
the wing tip and 1/2" back from the leading edge at the wing tip.
Sport Fly at 1/2" back from the Leading Edge at the wing tip.
Aerobatics - If your model will spin in both directions at 1/2" it need not be
moved back any further. Some models need the balance point at 3/4" back for
full response.
Flying with the balance point any farther back than 1" from the tip is not
recommended unless you are an expert flier, with a purpose for doing so.
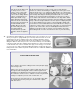
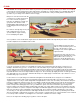
For the first test flight, balance the Kougar by suspending it on the finger tips placed
on the bottom of the wing on the first mark. Balance with an empty fuel tank, but with
all other equipment installed and the model completely finished and painted. Add
lead to the nose, if necessary, to get the model to hang level. Be sure and fasten the
weight securely. Do not attempt flight tail heavy.
The "Test Flying" position is on the nose heavy side. When slightly nose heavy, the model is more stable and less likely to stall
or snap roll from over-elevating. It also cuts down reaction of the model to control movements and this is good during test and
practice flights, to help prevent overcontrolling. After the model has been test flown and initial trimming accomplished you may
want a little quicker response. Move the balance back slowly and check results in the air.
Some aerobatic capability is sacrificed with the forward C.G. positions, so for making deliberate snap rolls and spins a position
farther back may be required. Move the C.G. back slowly and check results and control response in the air at a good altitude.
Don't move the C.G. back any farther than necessary.
BALANCE IS PART OF THE TRIMMING PROCESS
The balance point we arrived at for this design is a good place to start when trimming out the model for top
performance. However, it should not be considered the final and irrevocable location. Individual models built
from the same kit are slightly different from each other. The incidence may be changed a bit, a small or large
engine selected, the total weight varies - even the skill of the pilot has bearing on just what should be the exact
C.G. point. For example, when slightly nose heavy, the model is more stable and less likely to stall or snap roll
from over-elevating. This also cuts down the reaction of the model to control movements which is good during
test and practice flights to help prevent overcontrolling. But later, if extra sensitivity and quick reactions are
desired for aerobatic performance, a position farther back may be desirable. So try different positions, but
make the changes gradually, checking results and the effect of the change control responses and the
performance of the model in the air at a good altitude.