
User Manual


.
Stik-Tite Water-Slide
Cut out the decals with a pair
of sharp scissors. Leave
1/32" to 1/16" of clear edge
around the decal. Round
corners when cutting. Wet the
surface on which the decal
will be placed with soapy
water (dishwater detergent).
Place the decal on the model
and squeegee the water from
underneath with a balsa
paddle. Allow to dry. This
procedure will prevent air
from being trapped
underneath as is possible
when the decals are applied
dry.
Dip the decals in water for a few seconds, remove and allow the
moisture to soak into the backing to completely loosen the glue. Don't
slide the decal off too soon, it may tear. Slide about 1/4" of decal at the
bottom over the edge of the backing and align on the surface. Hold decal
and carefully slide away the backing from underneath. Use a small
paddle of 1/8" sheet balsa about 3/8" wide as a squeegee to remove
excess water from under the decal. Hold down one edge with a similar
paddle while squeegeeing to prevent the decal from being moved. Allow
plenty of time for the glue under the decal to dry before wiping away the
excess glue remaining on the surface of the model with a damp cloth.
The decals are fuel-resistant with most fuels but will dissolve in dope or
cement. Do not try to dope over decals. Some types of clear fuel proofer
may be used over decals to increase durability but test them before
applying. Leave about 1/16" of clear top coat around the decal stars
when cutting them out of the sheet. Round corners to prevent tearing.
96.
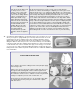
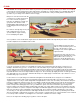
Assemble the tank hardware as shown in the photo. Two vent pipes are used
when your engine is equipped with a pressure tap. Run a line from one to the
muffler tap. Put a piece of tubing on the other, running outside the cowl for
filling. Pump fuel into this until it overflows into the muffler line. Then plug the
filling hole with a 4-40 bolt. If pressure is not used, install only one vent. Fill by
removing needle valve line, pumping into it until fuel runs out the vent. Bring it
out the bottom of the cowl so raw fuel can't spray on the canopy. You can also
use pressure on a single vent tank by filling through the needle valve line and
letting the line to the muffler top be the overflow vent. See "TIPS ON TANKS" for
more information.
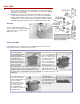
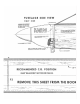
CUTTING HOLES IN THE COWL
These pictures show other cowlings but the same principles apply
to the Kougar cowl.
Drill a series of holes, about 1/8" nearly touching each other. Cut
through the wall remaining with a knife. A slit through the back
behind the motor will aid removal. Cut the hole for the head with
the carburetor off of the motor so it will be out of the way and then
enlarge as required to pass the carb, needle valve, etc.
The best way to open up the hole is to go around the edges with
an "applepeeling" motion, paring off a small amount of plastic
with each stroke.