
User Manual

.
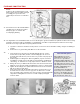
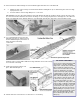
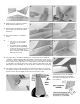
NOTE: Photos 78 and 79 show the Kavalier fuselage, but the procedure is exactly the same for the Kougar.
78.
Practice installing the tank to make sure that it can easily be passed from the radio compartment of through the tank cap
hole in the firewall. Modify anything that interferes with easy placement and removal of the tank.
79.
Glue scrap blocks on each side of the tank and at the rear end to hold it in position. Don't get the blocks too tight, just
enough to keep the tank from rattling around. The tank will need to be removable after the fuselage top is on by pulling on it
from the bottom side. Hold the tank in place with temporary scrap crosspieces across the bottom and the back. They can be
broken out when necessary to take out the tank. Or, you can stuff paper or foam rubber and the battery under it for support.
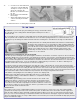
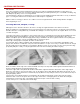
This is a good time, while access to the nose is open, to install the radio equipment and the pushrods for the steerable nose
wheel and throttle. SIGSH559 cable and tubing pushrods are recommended. The nose compartment can be oilproofed at
this time by painting it with warmed Sig Epoxy Glue (See Paragraph No. 43).
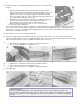
80.
a. Reach through the top and epoxy in the triangular firewall braces that were cut to fit previously in Step 62c.
b.
Cut a top triangular brace to fit and epoxy in place.
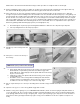
81.
Sand the top of the fuselage level and
smooth.
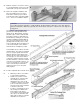
82.
Glue pieces of 1/8" sheet to the top of
the fuselage.
STOP! At this point you will need the tail parts.
83.
a. Fit the plastic turtle deck and canopy to the fuselage. The canopy must be
trimmed down as required along the bottom to fit down snugly on the
plastic turtle deck. Temporarily tape the tail, plastic turtle deck and canopy
in place on the fuselage.
b. Outline the position of the plastic turtle deck and canopy on the top of the
fuselage with pencil.
c. Round the comers of the fuselage with a modeling knife. Note that the
fuselage cannot be rounded quite as much next to the canopy as it can
elsewhere, because the canopy is close to the fuselage edge.
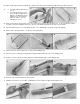
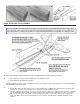
84. Pin 1/8" square balsa pieces to the top as mounting rails for both the canopy and turtle deck. Allow for the thickness of the
parts.
85.
Taper the 1/8" sq. pieces so the canopy will fit snugly down on them.
86.
Paint the canopy before gluing it on (see "FINISHING THE PLASTIC") but do not leave it laying around painted. Put it on
soon as the paint is dry. The rest of the model should be completely finished before the canopy is attached. Sigment glue,
used sparingly, will fasten the canopy to the gluing rails. "Super" cyanoacrylate type glues may also be used. Careful! Too
many fumes from the glue trapped inside may fog the canopy. Put a ventilation hole into the cockpit floor and preceed
slowly.