
User Manual

.
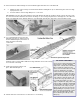
72.
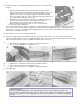
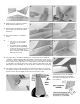
Saw a notch in the bottom triangle stock, flush with the plywood doubler to accomodate F
-
IB.
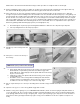
73.
a. Sand the bottom of the fuselage smooth and level with the sanding block. (As is shown being done to the fuselage
top in picture No. 79.)
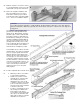
b. Cover the bottom of the fuselage with pieces of 1/8" sheet.
IMPORTANT! Leave the sides pinned down to the board until after the bottom sheeting is glued on and is dry. If the sides
are removed from the board before the bottom sheeting is on, the fuselage may twist if one side happens to be a different
grain of wood than the other. After the bottom is on, it will remain perfectly true and can be removed from the board.
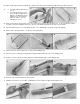
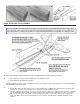
74.
Use scrap triangular stock to brace the
wing bolt anchor blocks, which have just
been installed during the performance of
Steps 32 and 33 of the wing
construction.
STOP! Don't proceed any further with the fuselage until it has been used for Steps
32, 33 and 34 on the wing.
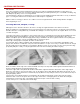
OIL PROOF YOUR MODEL!
One of the most destructive things that
can happen to a model is allowing
engine oil to soak into bare, untreated
balsa or plywood. It will cause glue
joints to loosen and results in a steady
increase in weight. An oil soaked
model cannot be properly repaired or
re-painted after a crackup, since glue
and finish will not hold. Cover all wood
parts of the model and put on enough
coats of finish so that oil cannot soak
in. Don't leave any exposed wood on
the outside. Around the nose and
engine compartment, apply extra effort
at oil proofing. Coating the firewall and
front joints with epoxy glue is best, but
several extra coats of dope or paint
will also do the job. Take special care
during building to use plenty of epoxy
glue to attach the firewall and coat the
back of the firewall and the firewall
braces with the glue. Fill any cracks
with epoxy.
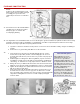
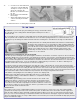
75.
Fit the 3/4"x3" bottom front block in
place, with firewall taped on.
76.
Hollow out the block to make more room in the nose for a battery.