
User Manual

.
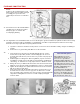
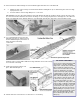
62.
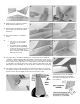
Notch out the plywood doubler and side as required to pass the motor mount blind nut later when the sides are joined.
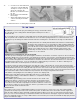
63.
a. Using the pattern, drill 1/4" holes
in F-2.
b. Check the dowels in the holes.
They should fit snugly but not so
tight as to be difficult to remove.
Sand the holes as required to
make the dowels come out
without a lot of force.
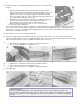
64.
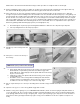
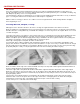
At this point check the top view plan of the rear of the fuselage and look ahead to picture No. 71. They show the bevel that
should be cut into the triangular stock now so the rear ends will fit together when the sides are joined later.
65.
Glue F
-
2 and F
-
3 in place on a side with epoxy glue. Use a 900 triangle to get them exactly perpendicular.
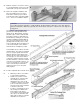
66.
Pin the side on the top view plan
-
see the end of the instructions.
67.
Join the other side to F
-
2 and F
-
3. Pin securely to the building board.
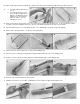
68.
Glue F
-
4 in place, holding the fuselage pinched together while pinning the sides to the building board.
69.
Continue on back along the fuselage, gluing in F
-
5 and pinning the sides to the building board.
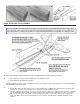
70.
Pinch the sides together at the back. Glue and pin.
71.
Add FB to the back of F
-
3. The edges of FB will have to be beveled to fit against the triangular stock.