
PIPER J-3 CUB Kit Manual


.
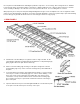
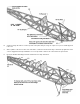
E. Thread the wing ribs over the spars. If any of the spar holes are too tight, do not
try to force the rib onto the spar but enlarge the hole slightly so that it will slip
over the spar easily. For spars which may have a natural bow, the height of the
spar holes should be increased so that the spar can be accomodated in the rib
with the rib sitting flat on the building surface.
F.
Use 1/16" scrap balsa scabs under each rib, front and rear, on the flat bottom
before the upward curve starts. This will bring the rib-spar assembly on a level
with the trailing edge planking.
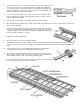
G.
Place the rib
-
spar assembly over the plans, align the ribs and pin down.
H.
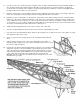
Glue ribs with Sig Super Weld to the 1/8"x3/8" shaped trailing edge and to the 1/4"x1/2" piece that forms the front of the
aileron cavity in the wing.
I.
Glue the "A" ribs in place in the ailerons between the 1/4"x1/2" aileron leading
edge piece and the 1/8"x3/8" shaped trailing edge. Use temporary scabs of 1/16"
scrap balsa under the front of the A ribs to bring them level with the trailing edge
plankin. (See Aileron Rib Cross-section).
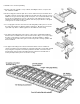
J.
Add the 5/16" square leading edge.
K.
Glue in the 1/8"x1/4" top front spar with Super Weld.
L. Install all W-3 half ribs by inserting sideways under the top front spar and twisting into place on the leading edge and the
top front spar. The last W-3 rib at the wing tip must be modified slightly to fit over W-8 and is not installed until W-8 is in
place.
M.
Bevel the edge of the 1/16" sheet trailing edge top planking so that it will fit
snugly against the trailing edge bottom planking and glue in place.
N.
Glue the preassembled wing tip assembly (Paragraph A in this section) in place.
Block up with scrap balsa to the level of the 1/4" ends of the main and rear spar
and cement tip to them as well as the leading and trailing edge.
O.
Insert the top front spar into W-8 and taper W-
8 so that the 1/16" top planking will
join smoothly when installed, a matter of cut and try.