
PIPER J-3 CUB Kit Manual


.
Die-cut parts are marked with letters indicating the particular component - "F" for fuselage, "W" for wing and "S" for stabilizer.
Leave the parts in the sheet until needed for construction so that they will not be lost or broken. Remove the pieces from the
sheets carefully. If difficulty is encounted, do not force the part from the sheet. Use a modeling knife to cut it free.
Wax paper may be used to protect the plan during building when the glue used is an aliphatic resin such as Sig Bond, a white
variety such as Sig Superweld or Sig Epoxy. If a model cement like Sig-
Ment is selected, use plastic wrap to protect the drawing
because this type of glue will dissolve the wax out of the wax paper and not set up properly.
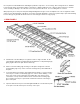
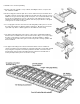
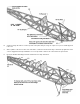
1. WING PANELS
A.
Laminate two 1/8" thick W-6 pieces together to make a single 1/4" thick. Do the
same with W-7 and W-8. Assemble W-6, W-7 and W-8 into a complete wing tip by
gluing together flat on the plan. Remove when dry.
B.
Pin the 1/16"x3/4" trailing edge sheeting over the plans and glue the 1/8"x3/8"
shaped trailing edge on top of the 1/16"x3/4" sheeting in the position indicated on
the plans.
C. Look at the Aileron Construction View and the Aileron Rib Cross-section. Note the
1/8"x1/4" piece of balsa - indicated by gray tone on the isometric drawing - on the
back of the 1/4"x1/2" piece that forms the leading edge of the aileron. This is
cemented on 1/16" up from the bottom. Pin the 1/4"x1/2" aileron leading edge
piece and the 1/4"x1/2" piece just ahead of it that forms the back of the wing in
place on the plan.
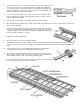
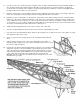
D. Taper the main and rear spars from full height at Rib W-
4 to 1/4" tall at the tip ends
of the spars. Take all of the taper off on the top of the spars.