
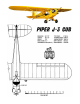
PIPER J-3 CUB Kit Manual


.
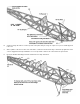
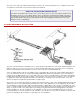
The drawing shows a convenient way to make a "Z" bend in the end of a wire for easy connection of a pushrod or R/C link
to a nylon bellcrank. The pushrod may be threaded through the ribs before the bellcrank is bolted in place. Soldered
connections to the bellcrank are not recommended because the nylon can be damaged by the heat of the iron. The
pushrods for the fuselage are pieces of firm 1/4" square balsa. The 1/16" wire ends are wrapped with thread and coated
with glue. A variety of quickly detachable pushrod retainers are available from the Sig Catalog for hooking the pushrods to
the servos. Avoid metal to metal contact in linkages because this may produce harmful radio interference. Fuselage
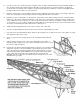
pushrods may also be of the nylon tubing type if desired. Pushrods should be installed before covering the fuselage.
Openings around the exit point for the pushrod may be framed with scrap balsa pieces to provide a place to fasten the
covering material. Plastic tubing pushrods may require supporting crosspieces at one or two places in the fuselage to hold
them in the best operating position and keep them from flexing excessively during operation.
The switch may be mounted wherever convenient on the side of the model, preferably the side away from the engine oil.
For the best scale appearance it could be mounted internally on a small scrap block with an operating wire protuding
through a small hole in the side or bottom.
The receiver battery pack should be wrapped in foam rubber sheet, held on with rubber bands and placed as far forward
as possible, under the tank. It is a good idea to put the package in a small plastic bag, taped shut around the battery cable
to protect the battery from accidental fuel leakage.
The receiver should be similarly wrapped up in foam rubber to protect it from engine vibration. Cover it with a plastic bag
also. Stow this package under the servos or ahead of them if there is room available. Make certain that the receiver will
stay in place during acrobatic maneuvers.
11. PRE-FLIGHT
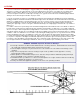
Set the model up on a table in a level attitude. With a straight edge held along the bottom of the stabilizer, use ruler
measurements to insure that the wing incidence is the proper amount. The bottom of the wing at the cabin brace wire
plywood piece should be 1/8" higher than the bottom of the wing trailing edge. If the wing incidence is not correct, adjust
by adding shims under the leading or trailing edge as required. These corrections should be done before the model is
covered.
The following control surface movements are recommended for test flying. All measurements are taken at the trailing edge
of the control surface. After test flying, you may want to increase or decrease the surface movements to suit your own
preferences.
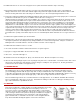
RECOMMENDED CONTROL SURFACE MOVEMENTS
Elevator 1/2" up and 1/2" down
Ailerons 3/8" up and 3/8" down
Rudder 1" each way
Be certain to carefully range check your radio equipment and see how it operates with the engine running before
attempting test flights. A lot of problems can be avoided if the engine has been well broken-in and idle adjustment
perfected on a test block or in another airplane before installation in the model.
A properly balanced and aligned model with a reliable engine and radio is assured of successful test flights.
12. BALANCING
The Center of Gravity position shown on the plan is the rearward limit. Do not balance any farther back than this point
even if lead must be added to the nose. Trying to fly with the C.G. too far back is much more dangerous than the slight
increase in wing loading caused by adding nose weight. Balance with an empty fuel tank. For test flights it is
recommended that the C.G. be positioned 1/2" to 3/4" ahead of the plan location. When slightly nose heavy the model is
much more stable and less likely to stall or snap roll. The reaction to control movements is also less sensitive with a
forward C.G. so it is not easy to overcontrol. Some aerobatic ability may be sacrificed with a forward C.G. so you may
wish, after test and familiarization flights, to move, it rearward. Do this gradually and check results and control response in
the air at a good altitude.