
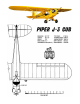
PIPER J-3 CUB Kit Manual


.
The mist coat of clear forms a barrier between the wet, heavy coat of clear and the trim colors, so that the heavy coat of
clear will not soften the trim colors and cause them to bleed and run.
"DKM" STIK-TITE PRESSURE SENSITIVE DECALS
Cut out the decals with a pair of sharp scissors. Leave about 1/32" to 1/16" of clear edge around the decal.
Round the corners as you are cutting. Wet the surface on which the decal will be placed with soapy water
(use dishwasher detergent). Place the decal on the model and squeegee the water from underneath with a
balsa paddle. Allow to dry. This procedure will prevent air from being trapped underneath as is possible
when the decals are applied dry.
10. RADIO EQUIPMENT INSTALLATION
The most convenient method of installing servos is on the plastic mounts which most of the radio equipment makers offer
with their outfits or as an accessory. These are screwed to hardwood mounting rails for fuselage servos or to plywood
plates for mounting in the wing. Instructions for the use of these mounts are included with them.
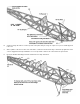
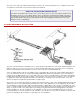
Servos for which plastic mounts are not available can be screwed directly to at least 3/8" square hardwood rails placed
across the cabin, three abreast, as shown in the drawing. With rubber grommets installed in the servo mounting holes,
mark the spots for drilling pilot holes for screws. Space the servos at least 1/8" apart and do not have them contacting the
hardwood mounting rails except on the grommets. Using a washer on the wood screws, mount the servos to the rails. Do
not tighten the screws down against the grommets since this will cause vibration to be transferred to the servos. The
washer should just rest against the grommet without compressing it.
The aileron servo should be mounted in an opening cut in the bottom of the center section planking between the main spar
and the rear spar on a 1/8" plywood plate glued to the top center section planking. The servo will protrude into the cabin
since the wing is not deep enough to fully accomodate it within. If a plastic aileron servo mount is not available, the servo
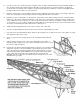
can be screwed to hardwood scabs glued to the top center section planking. The pushrod from the aileron bellcrank in the
wing is 1/16" wire. Certain servos may require re
-positioning of the plywood bellcrank mounting platform in the wing to
obtain a straight run to the servo output arm so it is advisable to set up your servo installation and check it out before
covering the wing. Do not make large holes in the wing ribs to pass the aileron servo pushrods. Sharpen a 1/16" wire and
punch holes through the ribs in the places required by your servo installation.