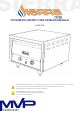
COUNTERTOP ELECTRIC OVEN OPERATION MANUAL SRPO-24E CAUTION: Improper installation, adjustment, alteration, service or maintenance can cause property damage, injury or death. Read the installation, operating and maintenance instructions thoroughly before installing or servicing this equipment. FOR YOUR SAFETY: Do not store or use gasoline or other flammable vapors or liquids in the vicinity of this or any other appliance.
of 11 INSTALLATION INSTRUCTION .................................................................................................................................. 3 1.1 Clearance around equipment ................................................................................................................ 3 1.2 Installation .............................................................................................................................................. 3 1.3 Electrical ...................
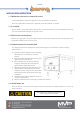
of 11 INSTALLATION INSTRUCTION 1.1 Minimum clearance around the unit From combustible construction: Right side, Left side and Back: 6” (152mm) From non-combustible construction: Right side, Left side and Back: 3” (76mm) 1.2 Location Due to the heat a countertop oven may produce, it must be placed on a non-combustible surface. Do not store combustible materials on top of the oven. 1.
of 11 Initial heating of the oven may generate smoke or fumes and must be done in a well ventilated area. For initial heating of the new oven, follow the steps below: 1. Place the oven in a well ventilated area. 2. Open the oven doors and remove any instructions and all materials shipped within the unit. Make sure that the oven cavity is empty and the baking decks are properly installed. 3. With the oven doors open, turn the temperature knobs to 400° F (205° C) for one hour. Close the oven door.
of 11 OPERATING INSTRUCTIONS Only Pizza or Bread should have direct contact with the stone decks. All other food products must be placed in a pan or container to avoid direct contact with the ceramic decks. 2.1 General Baking • • • • • • • • Preheat the oven by setting the thermostat to the desired temperature. When the thermostat light goes out and has cycled three times, the oven is ready for use. These ovens have been designed to bake both fresh and frozen products.
of 11 2.3 Special Features • Timer: is provided to give an audible signal at the end of a preset time up to 15 minutes The Timer does not control the oven. 2.4 Cleaning • • Periodic cleaning is suggested to keep your oven in good shape. When cleaning the stainless steel, always wipe in the direction of the grain. Allow oven and unit to cool down From time to time the spillage should be scraped out.
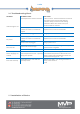
of 11 2.6 Troubleshooting Chart PROBLEM Indicator light is out No power Oven too Hot PROBABLE CAUSE Set temperature has been reached SOLUTION Take no action. The thermostat has turned off the power to the heat control switches, indicator lamps, contactors and heating elements. When oven starts to cool, all functions will be restored. Power supply fuses or circuit breakers are blown or have been tripped Replace fuse or reset circuit breaker Power cord is unplugged Plug in power cord.
of 11
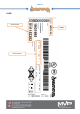
of 11 WIRING DIAGRAM POWER SUPPLY MODEL WATTS VOLTAGE PHASE AMPS SRPO-24E 3600 220/240 1 16.
of 11 LABEL Serial Number MODEL Electrical Data
of 11 IMPORTANT FOR FUTURE REFERENCE Please complete this information and retain this manual for the life of the equipment. For Warranty Service and/or Parts, this information is required. Model Number (514) 737-9701 (888) 275-4538 service@mvpgroupcorp.com 5659 Royalmount Ave Montreal, QC, Canadá H4P 2P9 (786) 600-4687 (844) 218-8477 service@mvpgroupcorp.