Instruction Manual Revision A.
Worldwide Locations to Serve You CORPORATE HEADQUARTERS 5 Harris Court, Building L Monterey, CA, 93940 USA Phone (831) 373-0200 (800) 866-0200 Fax (831) 373-4402 www.sierrainstruments.
Table of Contents Sierra Instruments Contact Information 2 Table of Contents 3 1.0 General Description 5 2.0 Theory of Operation 5 3.0 Cal=Trak Layout 7 4.0 Unpacking Checklist 7 5.0 Warnings 8 6.0 Installation 9 6.1 Attaching and Removing Flow Cells 9 6.2 Connecting the Cal=Trak to a Flow Source 9 6.3 The Cal=Trak Measurement Cycle 9 6.4 Application Precautions 11 6.5 Comparison vs. Calibration, the “4-to-1 rule” 11 7.
12.
1.0 General Description The Sierra Cal=Trak SL-800 is the most accurate commercially available gas flow calibrator. Using near-frictionless piston technology, it combines the accuracy of a primary standard with unequaled speed and convenience. The Cal=Trak consists of two primary sections.
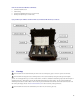
Vent Cylinder Light Emitter Photodiode / Collimator Bypass Valve Piston Inventory Volume Inlet Inlet Filter Figure 1 Idealized Automatic Piston Prover In order to make an intrinsically volumetric device useful for measurement of gases, it is generally necessary to adjust the readings to a standardized temperature and pressure, yielding mass flow. For this reason, we include temperature and pressure transducers to allow computation of standard (mass) flow by the internal computer (Figure 2).
3.0 Cal=Trak Layout 4.0 Unpacking Checklist Your Sierra Cal=Trak has been packaged with care and includes all components necessary for complete operation. Please take a moment to check that you have received the following items. If you believe you have not received a full shipment or if you have any questions, please contact Sierra immediately.
Each of Your Cal=Trak SL-800 Flow Cells Includes • Cal=Trak SL-800 Flow Cell • Leak Test Plug • Certificate of Calibration (behind top cover foam insert) • Warranty Card (behind top cover foam insert) If you purchased your calibrator with the Cal=Trak case, it should look like this when you receive it: 5.0 Warnings The Sierra Cal=Trak is not rated intrinsically safe and is not for use with explosive gasses or for use in explosive environments.
6.0 Cal=Trak Installation 6.1 Attaching & Removing Flow Cells The Sierra Cal=Trak accepts interchangeable cells for different flow ranges. If user tries to enter “Run Menu” prior to installing a flow cell, the unit indicates “No Cell” and returns to the “Main Menu” after a 5 second delay. Attaching Flow Cells 1. Position the selected flow cell into the electronics base opening with its silver Sierra Instruments label facing you. 2.
O utlet B ypass V alve P iston Inlet Figure 3 Basic Piston Prover In real-world applications, there are significant dynamics to consider. At the beginning of a cycle, pressure rises rapidly until the piston accelerates to the speed of the flow stream. Figure 4 is an illustration of a typical Cal=Trak’s internal pressure during a measurement cycle. A near-maximum flow rate is illustrated to accentuate the pressure variations.
6.4 Application Precautions Although the Cal=Trak’s dynamic pressure effects are very small, in some circumstances they may affect the measurement or interact with the device under test. For the above reasons, certain precautions should be observed when using a Cal=Trak. Initial Pressure Pulse The initial pressure pulse is small, about 1% of an atmosphere or less. However, even so small an increase may affect some very sensitive transducers for several seconds.
7.0 Installation Diagrams and Application Guide 7.1 Comparison of Cal=Trak with Piston or Bell Provers Piston or bell provers have a much longer measurement time than the Cal=Trak. For this reason, it is possible to compare them simultaneously, but certain precautions must be observed. When the Cal=Trak begins its cycle, the piston’s weight causes the internal pressure to rise by about 0.001 atmospheres (~0.1 kPa).
Gas Supply Fixed Regulator Adjustable Regulator Stable Pressure > 200 kPa Sonic Nozzle OR Porous Plug Cal=Trak DryCal Piston or Bell Prover Figure 6 Alternative Setup for Piston Provers 7.2 Vacuum Comparison of Cal=Trak with Piston or Bell Provers The Cal=Trak operates similarly in both pressure and suction applications. Sometimes, however, users wish to compare the Cal=Trak under suction (vacuum) conditions. With a piston or bell prover, the setup of Figure 7 can be used.
7.3 Comparison of Cal=Trak with Laminar Flow Element Transfer Standards When the Cal=Trak begins its cycle, the piston’s acceleration causes the internal pressure to spike briefly by about 0.01 atmosphere (~1 kPa). The pressure then remains elevated by about 0.001 atmosphere (~0.1 kPa) due to the piston’s weight. If a simple pressure regulator feeds the test chain, we are simply using the resistance of the entire flow chain to set our flow rate.
7.5 Vacuum Comparison of Cal=Trak with Sonic Nozzle Transfer Standards The Cal=Trak operates similarly in both pressure and suction applications. Sometimes, however, users wish to compare the Cal=Trak under suction (vacuum) conditions. With a calibrated sonic nozzle, a simple setup such as that shown in Figure 10 can be used with the inlet to the Cal=Trak flow cell at atmospheric pressure. There is one precaution, however.
Gas Supply Adjustable Regulator M FC DryCal Cal=Trak Figure 11 Setup for Calibrating MFCs 7.7 Calibration of Mass Flow Meters (MFMs) Mass flow meters can be calibrated with the setup of Figure 12, which is similar to that shown for LFE transfer standards. Again, the flow must not be affected significantly by the Cal=Trak’s cyclic pressure increase.
Variable Area Meter (Rotameter) Fixed Regulator Adjustable Regulator Sonic Nozzle A B Stable Pressure > 200 kPa OR Porous Plug DryCal Cal=Trak Figure 13 Setup for Calibrating Rotameters (Variable Area Flow Meters) 8.0 Operating Instructions Charging the Cal=Trak Battery The Sierra Cal=Trak is powered by an internal lead-acid battery. The battery will power the instrument for 6–8 hours of continuous use and has a typical service life of approximately 2–4 years, depending on use.
Low Battery Indicator A low battery condition is indicated by a “B” appearing in the upper right hand corner of the LCD. The low battery indicator allows the user to connect to an external power source prior to the unit powering down. Time between low battery indication and loss of power varies depending on the current application. 8.1 Cal=Trak Keypad 8.2 How To Use the Cal=Trak Keypad General Menu Navigation Use the Up/Down arrows to navigate between different lines within a menu.
Keypad Function The keypad is used for both numeric and alpha character entry. When pressed, each alphanumeric button will display its corresponding number. If pressed again within two seconds the unit will display the first corresponding letter for that key. Repeat this process for additional letters on the same key. A space may be inserted by pressing the 0 key twice. To go back, use the back arrow. The Cal=Trak will overwrite previous entries. Use the Enter key to lock in any selections.
• Press the Read button to initiate a single reading. • Press the Auto button to initiate multiple readings. • Press the Stop button to stop current flow reading and open valve. • Press the Reset button to clear the display of current data. 8.5 Setting User Preferences The Sierra Cal=Trak offers enhanced electronics options that allow the user to define parameters specific to their application. There are six Setup Menus in all.
Option 3, “Cal. Type” This option changes the sample type being displayed. Toggles between “std.” (standardized or mass flow readings as used by MFM or MFC devices) and “vol.” (volumetric readings as used on PD/rotameters) 8.
Within this menu, use the Fwd and Back arrows to change between different options and to move about within each option, use Up and Down arrows to alter settings. Date and time formats are specified using Setup Menu 5, Date and Time Formats. This guide is written using the factory default settings. Option 1, Date This option allows you to set the date. Option 2, Time This option allows you to set the time. Battery Voltage cannot be adjusted, but is displayed for reference. 8.
will alter the factory-specified low-end flow of that flow cylinder. To calculate the low-end flow of a flow cylinder while using a PTVM other than 1.000, multiply the PTVM by the factory-specified low-end flow of the cylinder in question. The resulting number is the new low-end flow of that cylinder at the manufacturer’s rated accuracy specification.
Cal=Trak calibrator. See Chapter 12-5 Accessories or contact Sierra Instruments for details. Wipe only with a damp cloth and do not spray with liquid solvents or use abrasive cleaners. Any service to the Sierra Cal=Trak must be performed by Sierra maintenance personnel. Current service or calibration information and pricing can be received by contacting Sierra Instruments, Inc. at any of the locations listed on the front cover. Alternatively, you can contact us via our web site www.sierrainstruments.com.
8B If the unit fails the leak test, the display will appear similar to the following picture. Please make a note of the number that is displayed and contact Sierra customer service. 9 Repeat the procedure with the leak test port cap over the opposite port fitting. 10. To stop the leak test at any time press the RESET button. Leak Test Illustration: Leak Test in Progress Inverted Cell Leak Test Plug Leak Test Cable Swagelock Fitting Base 11.
Calibration Includes • Cleaning (if required) • Valve adjustment (if required) • Battery capacity test • Internal computer program upgrade as necessary • Mechanical upgrades as necessary • Run-in test • Dynamic performance test • NIST-traceable calibration certificate 11.3 Returning Your Unit for Calibration or Service Prior to returning your Cal=Trak for service or calibration, please contact Sierra Instruments, Inc. for an RMA number.
11.6 Additional Information Technical Specifications for your Cal=Trak calibrator can be found in Appendix C of this manual. Should you desire more information on Sierra Instruments and our products, you are welcome to visit our website at: www.sierrainistruments.com. Additional information on the Cal=Trak calibration systems are available by clicking on the Cal=Trak photos at the lower left, which will take you to dedicated pages on our flow calibrators.
12.0 Limited Warranty The Sierra Cal=Trak SL-800 is warranted to the original end user to be free from defects in materials and workmanship under normal use and service for a period of 1 year from the date of purchase as shown on the purchaser’s receipt. The Cal=Trak’s battery is warranted for 6 months from the original purchase date. If the unit was purchased from an authorized reseller a copy of an invoice or packing slip showing the date of purchase may be required to obtain warranty service.
Appendix A: Cal=Trak Troubleshooting Guide A-1.0 Unit does not turn on Battery may be deeply discharged or dead. 1 Plug charger into unit 2 Confirm that the Charge LED is lit 3 Wait 10 minutes and try turning unit on again. 4 If the unit still does not work, please contact Sierra. A-2.0 Unit suddenly turns off Battery may not be fully charged. 1 Plug charger into unit. 2 Plug cell into unit. 3 Turn on the Cal=Trak. 4 Enter “Setup Menu – 4” to check battery voltage.
1A The piston is not reaching the bottom in the time allotted by the program. • Push any key to return to the Read Screen. • If you want the Cal=Trak to start taking readings again, press Read or Auto. 1B The piston does not return to the bottom of the cell at all. • The flow rate may be too high for the cell being used, make sure that the flow is in the specified range. • Water vapor may have condensed inside the cell if the cell has been moved from one location to another.
A-12.0 The Cal=Trak does not appear to be sending data through the serial (RS-232) port 1 Review Appendix C: Cal=Soft Software Instructions beginning on page 33 of this Manual. 2 Is the serial cable plugged into the correct COM port and the Cal=Trak? 3 Is cable correct? The cable should be a 1 to 1 connection, not a null modem cable. A-13.0 Resetting the Cal=Trak There is a Hard Reset button recessed on the back left-hand side of the Cal=Trak.
Appendix B: Cal=Trak Specifications Configuration: Interchangeable modular flow cells, all calibrated elements except crystal time base are in cell Base Unit Size 6" W x 10.5" D x 4" H Weight 4.2 lbs 1.9 kg Flow Cells Size 13" H x 4” diameter Weight 5.8 lbs 15.2 cm W x 26.7 cm D x 10.2 cm H 33 cm H x 10.2 cm diameter 2.6 kg Flow Ranges: Model Optimum Flow Range Cal=Trak SL-800-10 5.
Appendix C: Cal=Soft v 2.0 Communication Program 1.0 Introduction This is the second version of the Sierra Cal=Soft concept. It was created to support the new Cal=Trak firmware version 2.03 which began shipping in the first few months of 2008. This program enables the transfer of flow data from your Cal=Trak into an Excel spreadsheet for data series analysis. The data is collected in the program in a convenient format which can generate a Calibration Certificate, if desired.
Introduction This software in combination with a Sierra Cal=Trak can certify flow meters and flow controllers for gases and will generate a calibration certificate. Depending on the capability of your DUT (Device Under Test) this can be done semi or fully automatic. If you connect a Sierra 100 series mass flow controller (MFC) by RS232 and a Cal=Trak by RS232, this software obtains most of its required settings and variables from the 100 series and the certification requires minimal human intervention.
If you use a USB to RS 232 converter, this could be the problem. Sierra has tested the ASUS and CONRAD (Nr. 982417) and BELKIN converters which all worked OK, but we cannot confirm that all converters will function properly. If this does not solve the issues please write down the error. What do you see on the screen? Report what you have tried this far and report to your Sierra agent or e-mail this to: service@sierrainstruments.
Step 1--Enter information about you and the Cal=Trak Company: Enter the name of your Company Reference: Enter your reference number that will be shown on the calibration certificate Project/file number: Enter your internal project number that will be shown on the calibration certificate Date of calibration: Will be automatically filled in here. To enter date manually (Used for certificate data only) type in date.
Reference temperature: Will be selected automatically based in the units selected (Normal= 0C, Standard=21.1C) Reference pressure: Will be selected automatically based in the units selected DUT inlet pressure: enter the inlet gas pressure to the DUT. (Used for certificate data only) DUT outlet pressure: enter the outlet gas pressure of the DUT.
Begin your calibration by defining the flow points that you will measure. These are pre-defined in the program under the heading “%FS” as 0,25,50,75,100. If you want to take data at these 5 points, continue to the next section. If you wish to select alternate flow points, click on the grey box “%FS” and change to another percent as desired. In the example above, the second flow point has been changed from 25 to 20 using this method. You can only measure up to 5 points per calibration.
4.0 Software Troubleshooting Most software problems encountered will fall into one of two areas: Serial Port Selection Issue The Cal=Trak Communications program might be configured for a serial port that you are not connected to. Most modern computers have only one serial port, but many older computers have two 9-pin serial ports. If your computer has two 9-pin ports and you are experiencing difficulty with installation, please switch your serial cable to the other port and test again.