
User manual


GHI Electronics,LLC Embedded Master User Manual
Supported Devices
Postscript.
Note that low cost printers do not have any available scripting. Sometimes these are called
“Windows only” printers. The reason behind the low cost is that the processor on these
printers is very simple, it gets pre-processed data from windows. The printer driver
software is actually what processes the image/text on the host PC and then sends final
data to the printer. These printers can't be used with Embedded Master unless
specifications are provided by the manufacture, which are usually proprietary and very
hard to obtain.
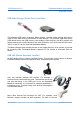
There is an easy way to test any USB printer, including those ones that do not have scripts
support. First, we need the printer connected to a Windows PC with installed drivers.
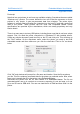
Create any simple document (small text file) on the PC and click print. This will bring up
the “Print” window. On the drop-down menu, select the printer you need to test with
embedded master and then make sure you click the check-box “Print to file” as shown
below.
Click “OK” and windows will prompt for a file name and location. Save the file anywhere
you like. This file contains a processed data for the printer you selected earlier. Now, all we
have to do is transfer the file to the printer using Embedded Master.
Disconnect the printer from the PC and connect it to Embedded Master. The file we
generated earlier can go in a project as a resource, assuming it is not too large, or it can
go on an SD card or USB drive. You can now load the file in RAM and then send it to the
printer.
Rev. 2.06 TFT Page 99 of 102 www.ghielectronics.com