
Scanner User Manual
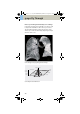
Table Of Contents
- User Documentation
- Scan and Reconstruction
- Dose Information
- Workflow Information
- Application Information
- Head
- Neck
- Shoulder
- Thorax
- Abdomen
- Pelvis
- Spine
- Upper Extremities
- Lower Extremities
- Vascular
- Specials
- Children
- Overview
- Hints in General
- HeadRoutine_Baby
- HeadRoutine_Child
- HeadSeq_Baby
- HeadSeq_Child
- InnerEar
- SinusOrbi
- Neck
- ThoraxRoutine_Baby
- ThoraxRoutine_Child
- ThoraxHRSeq_Baby
- ThoraxHRSeq_Child
- Abdomen_Baby
- Abdomen_Child
- Spine_Baby
- Spine_Child
- ExtrHR_Baby
- ExtrHR_Child
- HeadAngio
- HeadAngio08s
- CarotidAngio
- CarotidAngio08s
- BodyAngio
- BodyAngio08s
- NeonateBody
- syngo 3D
- syngo Fly Through
- syngo Dental CT
- syngo Osteo CT
- syngo Volume Evaluation
- syngo Dynamic Evaluation

syngo 3D
257
Auto Load in 3D and Post-processing Presets
You can activate the Auto load in 3D function on the
Examination card/Auto Tasking and link it to a recon
job.
On the 3D card you have the possibility to create
Ranges Parallel and Radial protocols which can be
linked to a special series name.
– Select the image type
– Select the orientation
– Open the Range function and adapt the range set-
tings (Image thickness, Distance between the
images etc.)
– Hit the link button
– Save the linked preset
Blow-up Mode
With the blow-up mode you display the full screen for
easier visualization by double-clicking in the segment.
C2-025.630.01.01.02_APPLICATIONGUIDE_SPIRIT.book Page 257 Friday, April 8, 2005 9:55 AM