
User Guide


Technical Instructions 599 Series Zone Valve 2-way, 3-way Thermic Actuators
Document Number 155-780
March 15, 2013
Page 4 Siemens Industry, Inc.
Mounting and
Installation Notes
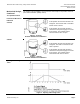
When the STA73U or STP73U Actuators are supplied separately from the valve, they
can be assembled with just a few steps:
1. Remove the black actuator support ring (AL50) from the top of the valve. Discard
the ring; it is no longer needed.
2. Thread the black bayonet nut on the valve and manually tighten by hand as tightly
as possible.
CAUTION:
Do not use pipe wrenches, pliers, or other similar tools to tighten the bayonet
nut or bayonet ring of the actuator. Hand-tighten only.
3. Place the actuator in position on the valve and bayonet nut, and manually tighten
the bayonet ring on the actuator until it clicks twice.
4. Connect to operating voltage only after mounting.
Steps for dismounting:
WARNING:
Disconnect the power supply before proceeding.
1. Disconnect the connection cable.
2. Wait six minutes until the actuator is cooled down.
3. Turn the actuator bayonet ring counter-clockwise for two clicks, to the end position.
4. Lift the actuator off the valve.
When dismounted, the actuator will be set automatically to the original position (factory
setting).
NOTE: Occasionally, the actuator may be released from the valve together with the
bayonet nut stuck in the actuator. To re-use the actuator, the actuator's stem
must be reset to the original position (factory setting). To reset the stem, turn
the actuator upside down and push the stem while simultaneously turning the
bayonet ring counter-clockwise until it latches.
Mounting Positions
Actuators may be installed in any position (360°).
Maintenance
The actuator is maintenance-free.
WARNING:
Disconnect the connecting cable from the operating voltage prior to
replacing. Opening the actuator can cause irreparable damage. It may also
result in injury from the strong, installed spring.