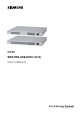
CCTV SISTORE AX9/AX16 (V2.
Liefermöglichkeiten und technische Änderungen vorbehalten. Data and design subject to change without notice. / Supply subject to availability. © 2004 Copyright by Siemens Building Technologies AG Wir behalten uns alle Rechte an diesem Dokument und an dem in ihm dargestellten Gegenstand vor.
Contents Preface......................................................................................................................7 Compliance notice of FCC ........................................................................................7 Important Safeguards ................................................................................................8 1 1.1 1.2 Introduction ...........................................................................................11 Features ...............
3.2 3.3 3.4 3.5 3.5.1 3.5.2 3.5.3 3.5.4 3.5.5 3.5.6 3.6 3.6.1 3.6.2 3.6.3 3.6.4 3.6.5 3.6.6 3.7 3.7.1 3.7.2 3.7.3 3.7.4 3.8 3.8.1 3.8.2 3.8.3 3.8.4 3.8.5 3.8.6 3.8.7 3.8.8 3.8.9 3.9 3.9.1 3.9.2 3.9.3 3.10 3.10.1 3.10.2 3.10.3 3.10.4 3.11 3.12 3.12.1 3.12.2 3.12.3 3.12.4 Turning on the Power..............................................................................24 Initial Unit Setup ......................................................................................24 Quick Setup Screen ............
4.3 4.4 4.5 4.5.1 4.5.2 4.5.3 4.5.4 4.5.5 4.5.6 4.5.7 4.6 4.6.1 4.6.2 4.6.3 4.6.4 Recording Video......................................................................................71 Recording Audio......................................................................................71 Playing Recorded Video .........................................................................72 Camera Buttons (1 to 16)........................................................................72 Display Button ........
Preface Preface Compliance notice of FCC This equipment has been tested and found to comply with the limits for a CLASS A Digital Device, pursuant to part 15 of the FCC rules. These limits are designed to provide reasonable protection against harmful interference when the equipment is operated in a commercial environment.
Preface Important Safeguards WARNING TO REDUCE THE RISK OF ELECTRIC SHOCK, DO NOT REMOVE COVER (OR BACK). NO USER-SERVICEABLE PARTS INSIDE. REFER SERVICING TO QUALIFIED SERVICE PERSONNEL. z Read Instructions z z z z z All the safety and operating instructions should be read before the appliance is operated. Retain Instructions The safety and operating instructions should be retained for future reference. Cleaning Unplug this equipment from the wall outlet before cleaning it.
Preface z Servicing z z z z z z z z z Do not attempt to service this equipment yourself. Refer all servicing to qualified service personnel. Damage requiring Service Unplug this equipment from the wall outlet and refer servicing to qualified service personnel under the following conditions: – When the power-supply cord or the plug has been damaged. – If liquid is spilled, or objects have fallen into the equipment. – If the equipment has been exposed to rain or water.
Preface z Circuit Overloading Consideration should be given to connection of the equipment to supply circuit and the effect that overloading of circuits might have on over current protection and supply wiring. Appropriate consideration of equipment nameplate ratings should be used when addressing this concern. z Reliable Earthing (Grounding) Reliable grounding of rack mounted equipment should be maintained.
Introduction 1 Introduction 1.1 Features Your color digital video recorder (DVR) provides recording capabilities for 9 or 16 camera inputs.
Introduction 1.2 Technical Overview Your DVR can replace both a time-lapse VCR and a multiplexer in a security installation. However, it has many features that make it much more powerful and easier to use than even the most advanced VCR. The DVR converts analog PAL or NTSC video to digital images and records them on a hard disk drive. Using a hard disk drive allows you to access recorded video almost instantaneously; there is no need to rewind tape.
Installation 2 Installation 2.1 Package Contents The package contains the following: z Digital video recorder z Adaptor (including power cord) z Alarm I/O board z Multilingual user’s manual, multilingual RAS software and user’s manual on CDROM z CD-ROM z Multilingual quick reference guide z 19 inch bracket 2.2 Required Installation Tools No special tools are required to install the DVR. Refer to the installation manuals for the other items that make up part of your system. Fig. 2 2.
Installation 2.4 Connecting the Video Source Fig. 4 Video input connectors. Connect the coaxial cables from the video sources to the BNC Video In connectors. 2.5 Connecting the Loop Through Video Fig. 5 Video Loop Through connectors. If you would like to connect your video source to another device, you can use the Loop BNC connectors. NOTE: The Loop BNC connectors are auto terminated.
Installation 2.7 Connecting Audio NOTE: It is the user’s responsibility to determine if local laws and regulations permit recording audio. Fig. 7 Audio In and Out connectors. Your DVR can record audio. Connect the audio source to Audio In. Connect Audio Out to your amplifier. NOTE: The DVR does not have amplified audio output, so you will need a speaker with an amplifier. The audio input can be from an amplified source or directly from a microphone. 2.8 Connecting Alarms Fig.
Installation 2.8.1 AI 1 to 16 (Alarm In) You can use external devices to signal the DVR to react to events. Mechanical or electrical switches can be wired to the AI (Alarm In) and GND (Ground) connectors. The threshold voltage is 4.3V and should be stable at least 0.5 seconds to be detected. See Chapter 3 — Configuration for configuring alarm input. 2.8.2 GND (Ground) NOTE: All the connectors marked GND are common. Connect the ground side of the Alarm input and/or alarm output to the GND connector. 2.
Installation 2.9 Connecting to the RS485 Fig. 10 RS485 connector The DVR can be controlled remotely by an external device or control system, such as a control keyboard, using RS485 half-duplex serial communications signals. The RS485 connector can also be used to control PTZ (pan, tilt, zoom) cameras. Connect RX+ and TX+ of the control system to the RX+/TX+ of the DVR, and RXand TX- to the RX-/TX-.
Installation 2.11 Connecting to the UltraWide SCSI Port Fig. 12 SCSI connector A SCSI port is provided to connect external storage devices for expanded storage. Connect the external SCSI hard disk drive (RAID) cable to the high-density 68-pin female UltraWide SCSI port. The length of SCSI cable should not exceed 1.5 meters. You can connect up to 15 UltraWide SCSI devices with SCSI IDs set to 0, 1, 2, 3, 4, 5, 6, 8, 9, 10, 11, 12, 13, 14 and 15 respectively.
Installation 2.13 Connecting to the USB Port Fig. 14 USB connector. Two USB ports are provided to connect external hard disk drives, CD-RW or flash drive for clip copy or system upgrade. Position the external drive close enough to the DVR so that you can make the cable connections, usually less than 6 feet. Use the USB cable provided with the drive to connect it to the DVR. 2.14 Factory Reset Fig. 15 Factory reset switch. The DVR has a Factory Reset switch to the right of the USB port.
Installation 2.15 Connecting the Power Cord Fig. 16 Power cord connector. Connect the DC power cord of the adaptor to the DVR, and connect the AC power cord to the adaptor and then to the wall outlet. NOTE: The power cord connector locks into position to prevent accidental power loss. Be sure to slide the release away from the socket before removing the plug. WARNING ROUTE POWER CORDS SO THAT THEY ARE NOT A TRIPPING HAZARD. MAKE CERTAIN THE POWER CORD WILL NOT BE PINCHED OR ABRADED BY FURNITURE.
Configuration 3 Configuration NOTE: Your DVR should be completely installed before proceeding. Refer to Chapter 2 - Installation. 3.1 Front Panel Controls Fig. 17 16-Channel DVR front panel. The front panel looks and operates much like a VCR combined with a multiplexer. Many of the buttons have multiple functions. The following describes each button and control. Take a few minutes to review the descriptions. You will use these to initially set up your DVR and for daily operations. 3.1.
Configuration 3.1.5 Sequence Button When in the live mode, pressing the Sequence button displays another full live channel sequentially. When in one of the multi-view formats, pressing this button will cause the DVR to sequence cameras in two sequence modes: “Page” and “Cameo”. In the Page mode, the DVR sequences through user-defined screen layouts (pages). In the Cameo mode, the bottom, right screen to display live cameras sequentially.
Configuration 3.1.12 RW (Rewind) Button Pressing the RW button plays video backward at high speed. Pressing the button again toggles the playback speed from , and . The screen displays , and respectively. Entering Fast Backward Playback mode from Live Monitoring mode can be password protected. 3.1.13 PREV (Previous) Button The PREV button only functions when playback video has been paused. Pressing the PREV button plays video backward image-by-image. 3.1.
Configuration 3.1.19 Enter Button The (Enter) button selects a highlighted item or completes an entry that you have made. It also sets or releases active cameo mode in the live or playback modes. 3.1.20 Up, Down, Left, Right Arrow Buttons These buttons are used to navigate through menus and Graphic User Interface (GUI). They are also used to control Pan and Tilt when in the PTZ mode. The arrow buttons can be used to move the position of the active cameo screen, and also move through screen pages. 3.
Configuration 3.4 Quick Setup Screen Fig. 19 Quick Setup screen. The Quick Setup screen allows you to set up the most commonly used features of your DVR. Use the arrow buttons to move through the options. Pressing the button lets you make your selections. NOTE: If you enter the Quick Setup screen by entering User password, only Password setup will be permitted. z Highlight the box beside Quick Setup and press the button to toggle between On and Off.
Configuration 3.5 Normal Setup Screen Fig. 20 Normal Setup screen. Press the Menu button to enter the setup screen. If the Quick Setup screen appears, turn it off as described above. The Normal Setup screen gives you access to all the DVR’s setup screens. NOTE: Switching between Quick Setup and Normal Setup returns their settings to the factory default settings. 3.5.1 System Information Highlight System Information and press the screen appears. Fig. 21 button.
Configuration Fig. 22 System Information Change screen. z Highlight the box beside Unit ID and press the button. Change the number by highlighting it and using the Up and Down arrow buttons to increase and decrease the number. The Unit ID number is used to identify the unit when it is networked with other DVRs. You cannot use the same number for two or more DVRs that are within the same network. z Highlight the box beside Language and press button. A dropdown menu displays the available languages.
Configuration z Use the arrow keys to highlight the first character you want in the Site Title and button. That character appears in the title bar and the cursor press the moves to the next position. Pressing toggles between the upper and lower case keyboards, backspaces, and deletes entered characters. You can use up to 20 characters including spaces in your title. z Once you have entered your title, highlight Close and press the button.
Configuration 3.5.2 Date/Time Setup Highlight Date/Time in the Main Menu and press the setup screen appears. Fig. 26 CAUTION button. The Date/Time Date/Time setup screen. If you set a date and time that is older than some of your recorded images, any images with dates and times later than the new setting will be deleted. z Highlight the first box beside Date/Time and press the button. The individual sections of the date will highlight. Use the Up and Down arrow buttons to change the number.
Configuration Fig. 27 Holiday Setup screen. z You can save your changes by highlighting OK and pressing the button. Selecting Cancel exits the screen without saving the changes. z Highlight the Time Sync… box and press the button. You can set up time synchronization between the DVR and standard time servers that are available in most time zones and countries or between the DVR and another DVR. Fig. 28 Time Sync screen. z Highlight the box beside Automatic Time Sync and press the button.
Configuration z The box beside Next Synchronization displays the scheduled time for the next synchronization. If you want to synchronize the time instantly, highlight the button. Now… button and press the CAUTION When selecting Now…, any video with a later time and date will be lost if the time and date of a time server is earlier than the last recorded image of the DVR.
Configuration 3.5.3 System Check Screen button. The System Highlight System Check in the Main menu and press the Check setup screen appears. Fig. 29 System Check screen. z Highlight the box under the On/Off heading and press the button. This toggles between On and Off. When it is On, the DVR reports a fault condition if it does not detect any recording or if there is an alarm during the designated time. button.
Configuration 3.5.4 Storage Screen button. The Storage setup Highlight Storage in the Main menu and press the screen appears. The DVR displays the storage status when the installed IDE hard disk drives support the S.M.A.R.T. (Self-Monitoring Analysis and Reporting Technology) monitoring program. Fig. 30 Storage Check screen. When the DVR has more than four storage devices, you can scroll through the list by selecting the Up and Down arrow buttons.
Configuration A “−“ displays when connecting a hard disk drive that was previously used for something else. In this situation, device usage can be changed as desired usages; e.g., Extension to Archive or Archive to Extension. However, data on the device will be lost if the device usage is changed. CAUTION The DVR can be set to react to storage problems by activating an internal buzzer or external alarms, and/or notifying a PC running RAS (Remote Administration System).
Configuration 3.5.5 System Log Screen Highlight System Log in the Main menu and press the screen appears. Fig. 32 button. The System Log System Log screen. The System Log screen displays a record of various events logged by the DVR. The list shows the dates and times the system was turned ON and OFF, power failed, recording was started or stopped, playback was started or stopped, setup changes were made, and data banks were cleared. The events are listed from the most recent to the oldest.
Configuration 3.6 Configuring Input Devices You can configure the video, audio and remote control devices connected to the DVR. Fig. 33 3.6.1 Device menu screen. Camera Setup Screen Highlight Camera in the Main menu and press the screen appears. Fig. 34 button. The Camera setup Camera setup screen. The Camera setup screen displays the camera inputs in groups of four: 1 to 4, 5 to 8, 9 to 12 and 13 to 16. You can turn the camera number on or off and also hide the video from a camera button.
Configuration You can assign titles to each camera by highlighting the camera title box and button. A virtual keyboard allows you to enter camera names. pressing the Selecting the PTZ Device box causes a list of controllable cameras to display. button. You will need to connect Select your camera from the list and press the the camera to the RS485 terminal on the back of the DVR following the camera manufacturer’s instructions. Fig. 35 PTZ Device list.
Configuration 3.6.3 Motion Detector Fig. 37 Motion Detector setup screen. Your DVR has built-in video motion detector. Video motion detection can be turned On or Off for each camera. Highlighting the box under the Sensitivity heading allows you to adjust the DVR’s sensitivity to motion. There are five settings with 1 being the least sensitive and 5 being the most sensitive. You can adjust the minimum number of detection blocks that must be activated to trigger a motion alarm.
Configuration The Motion Detection Zone screen is laid over the video for the selected camera. You can set up motion detection zones by selecting or clearing blocks. NOTE: You can set up motion zones one block at a time in groups of 9 or 16 individual block groups (9- and 16-channel DVR respectively). A block group is positioned within the image area using the Up and Down arrow buttons, and individual blocks within the block groups are selected or cleared using the camera buttons.
Configuration 3.6.4 Alarm Out Setup Screen The Alarm Out setup screen allows you to establish a schedule for each alarm output from the DVR. Fig. 40 Alarm Out setup screen. Each alarm output can be given its own title by highlighting the box under the Title button. A virtual keyboard appears allowing you to heading and pressing the enter the title. button opens a schedule screen. Highlighting the Sched field and pressing the You can schedule alarm output in 30-minute increments from 0:00 to 24:00.
Configuration 3.6.5 Audio Setup Screen Highlight Audio in the Main menu and press the screen appears. Fig. 42 button. The Audio Setup Audio Setup screen. button. This toggles Highlight the box beside Audio Recording and press the between On and Off. When it is On, the DVR also records audio when it is recording video. button. This toggles between On Highlight the box beside Mute and press the and Off. When it is On, the DVR will NOT play live or recorded audio.
Configuration 3.6.6 RS232/RS485 Setup Screen The RS232/RS485 setup screen allows you to set up the RS232 and RS485 ports to communicate with external devices such as modems, remote controls and dome cameras. Fig. 43 RS232/RS485 setup screen. Highlight the field for the settings you wish to make. Select the correct Baud Rate, Parity, Data Bits and Stop Bits for the device you are connecting to the DVR. For RS485, it is possible to select either Remote Control or PTZ Control in the Usage field.
Configuration 3.7 Configuring Recording Settings NOTE: Pressing the REC button on the front of the DVR will cause the red LED above the button to light and indicates the DVR is ready to record. However, this does not mean the DVR is recording. The DVR records video based on the parameters such as schedule and events defined during configuration. The red dot appears on the monitor when the DVR is recording. Your DVR offers a variety of flexible recording modes.
Configuration z Highlight the box beside Field Detect. Pressing the button toggles between On and Off. When set to On, the Field Detection helps prevent shaking in the Simplex mode. It does this by recording odd numbered fields from odd numbered cameras and even numbered fields from even numbered cameras. z Highlight the first box beside Auto Deletion. Pressing the button toggles between On and Off. When set to On, the DVR will delete video recorded prior to the user-defined period.
Configuration z Highlight the box under Quality and press the button. A drop-down list appears. You can select from Very High, High, Standard and Low image quality. All other variables being equal; Very High will require 600% more hard disk space than Standard, High will require 250% more, and Low 30% less. NOTE: Higher quality images require more storage space and will reduce the recording capacity of the hard disk drive. You can set the maximum amount of time-lapse video to be stored.
Configuration NOTE: The Holiday (H) schedule applies to the dates you established as holidays when setting Date/Time. You can save your changes by highlighting OK and pressing the Selecting Cancel exits the screen without saving the changes. 3.7.4 button. Pre-Event Recording Setup Screen Fig. 47 Pre-Event Record Setup screen. When the DVR is in the Event Record mode it is possible to have it record images before the event occurs.
Configuration 3.8 Event Action Setup You can program the DVR to record, activate the alarm output and/or notify the remote site whenever sensor, motion or video loss events are detected. Highlight the Alarm In Event Action, Motion Detector Event Action, or Video Loss Event Action in the Main menu. The following Event Action setup screens will appear. 3.8.1 Alarm In Event Action (Record) Setup Screen The DVR can be set to react to alarm events differently.
Configuration 3.8.2 Alarm In Event Action (Alarm Out) Setup Screen The DVR can be set to react to alarm events differently by activating an internal buzzer or external alarms. Fig. 49 Alarm In Event Action (Alarm Out) setup screen. z Highlight the Sched box and press the button. A schedule screen appears. Set the schedule as described earlier. z Highlight the Alarm-Out box and select either Beep or the alarm output terminal that you want to associate with the sensor.
Configuration 3.8.3 Alarm In Event Action (Notify) Setup Screen The DVR can be set to contact a computer running RAS (Remote Administration System) or send an e-mail (LAN connections) when certain events occur. See the Figure 61 – Callback Center (LAN) Setup screen or Figure 62 – Callback Center (Modem) Setup screen. Fig. 50 Alarm In Event Action (Notify) setup screen. z Highlight the Sched box and press the button. A schedule screen appears. Set the schedule as described earlier.
Configuration z Highlight the Sched box and press the button. A schedule screen appears. Set the schedule as described earlier. z Highlight the Camera box and press the button. A camera selection screen appears. Select the camera number you would like to associate with the camera. NOTE: You can associate multiple cameras with a camera that detects motion. z Highlight the Speed box and select number of images per second you would like to record from the drop-down menu.
Configuration 3.8.6 Motion Detector Event Action (Notify) Setup Screen The DVR can be set to contact a computer running RAS (Remote Administration System) or send an e-mail (LAN connections) when certain motion events occur. See the Figure 61 – Callback Center (LAN) Setup screen or Figure 62 – Callback Center (Modem) Setup screen. Fig. 53 Motion Detector Event Action (Notify) setup screen. z Highlight the Sched box and press the button. A schedule screen appears. Set the schedule as described earlier.
Configuration z Highlight the Sched box and press the button. A schedule screen appears. Set the schedule as described earlier. z Highlight the Camera box and press the button. A camera selection screen appears. Select the camera number you would like to associate with the camera that has lost video. NOTE: You can associate multiple cameras with a camera. z Highlight the Speed box and select number of images per second you would like to record from the drop-down menu.
Configuration 3.8.9 Video Loss Event Action (Notify) Setup Screen The DVR can be set to contact a computer running RAS (Remote Administration System) or send an e-mail (LAN connections) in the case of video loss. See the Figure 61 – Callback Center (LAN) Setup screen or Figure 62 – Callback Center (Modem) Setup screen. Fig. 56 Video Loss Event Action (Notify) setup screen. z Highlight the Sched box and press the button. A schedule screen appears. Set the schedule as described earlier.
Configuration 3.9 Display Setup Highlight the OSD, Main Monitoring or Sport Monitoring in the Main menu, and press the button to set up the on-screen display and camera display on the main monitor or spot monitor. 3.9.1 OSD (On-Screen Display) Setup Screen The DVR can be set up to display Date, Time, Title and Status on screen. Each feature can be turned on or off, and you can adjust the margins. Fig. 57 OSD Setup screen.
Configuration 3.9.2 Main Monitoring Setup Screen You can adjust the display dwell time for each camera displayed on the main monitor. You can also turn camera sequence and event monitoring on and off. Fig. 58 Main Monitoring Setup screen. z Highlight the box beside Sequence Dwell Time and press the button. You can adjust the display dwell time from 3 to 60 seconds. z Highlight the box beside Sequence in Cameo and press the button to toggle between On and Off.
Configuration 3.9.3 Spot Monitoring Setup Screen You can adjust the display dwell time for each camera displayed on the spot monitor. You can also turn event monitoring on and off. Fig. 59 Spot Monitoring Setup screen. z Highlight the box beside Sequence Dwell Time and press the button. You can adjust the sequence dwell time from 3 to 60 seconds. z Highlight the box beside Event Monitoring and press the button to toggle between On and Off.
Configuration 3.10 Network Setup Screen In the Network Setup screen you can set up the DVR for LAN connections. Fig. 60 Network Setup screen. z Highlight the box beside Connection. Press the button to toggle between LAN and Modem. z Highlight the box beside Admin Password and press the button. A virtual keyboard appears. You will first be asked to enter the current password. Then you can enter a new password; you will be asked to confirm the new password before it is accepted.
Configuration NOTE: The transfer speed indicates the image rate transferred to each RAS. If two remote sites (RAS) are connecting to the DVR, the number of images transferred via network will be ‘Transfer Speed x 2’. NOTE: The Transfer Control option will affect the DVR’s recording performance. The number of remote sites (RAS) connected to the DVR does not affect the recording speed. The local recording speed will be affected only by Transfer Speed.
Configuration The factory default LAN settings are: DHCP: Off IP Address: 192.168.1.129 Gateway: 192.168.1.254 Subnet Mask: 255.255.255.0 The factory default IP Port settings are: Admin: 8200 Watch: 8016 Search: 10019 Callback: 8201 NOTE: Do NOT use the same IP port number for two different programs; otherwise, the DVR cannot be connected with a PC running RAS. CAUTION When changing the IP port settings, you must change the IP port settings on a PC running RAS as well. Refer to the RAS manual for details.
Configuration z Highlight the box beside Baud Rate of the RS232 field and press the z z z z 3.10.3 button. A list of baud rates ranging from 300 to 115,200 appears. Highlight the box beside Parity of the RS232 field and press the button. A drop-down list appears. You can select from None, Odd or Even parity. Highlight the box beside Data Bit of the RS232 field. Pressing the button toggles between 7 bit and 8 bit formats. Highlight the box beside Stop Bit of the RS232 field.
Configuration 3.10.4 Callback Center (Modem) Setup Screen Fig. 64 Callback Center (Modem) Setup screen. z If you have a modem connected to the DVR, it can be set up to contact a computer running RAS (Remote Administration System) when an event occurs. z Highlight the box beside Remote Server Phone Number and enter the telephone number of the computer running RAS.
Configuration 3.11 Password Setup Screen An Administrator password is required to turn the system off, enter the setup screen, load default setups, clear all data, change system date and time and change the Administrator password. A User password is required to enter the playback, fast forward playback and fast backward playback modes from the live monitoring mode.
Configuration To lock front panel buttons, highlight Key Lock On and press the button. Once the buttons are locked, pressing any front panel button will cause a password screen to display. You will need to enter the correct password to unlock the keys. The Key Lock password is 4231. You can save your changes by highlighting OK and pressing Cancel exits the screen without saving the changes. 3.12 button.
Configuration 3.12.1 Archive The Archive screen can be used to archive video automatically or manually. Fig. 67 Archive screen. Selecting Update loads the latest information displayed on the Archive screen. Selecting Clear erases all archived data. Selecting Setup displays a screen where you set up archive parameters. Fig. 68 Archive Setup screen. button. This toggles Highlight the box beside End Of Disk and press the between Overwrite and Stop.
Configuration You can save your changes by highlighting OK and pressing Cancel exits the screen without saving the changes. button. Selecting Selecting Manual displays a screen where you set up manual archive parameters. Fig. 69 Manual Archive screen. Highlight the boxes beside From and To and press the archive start and stop times and dates. button to set up the Once you set the archive start and stop times and dates, highlight the Archive Now button.
Configuration 3.12.2 Clip Copy The Clip Copy screen can be used to copy video clips to an external USB hard disk drive, CD-RW drive or flash drive. The copied clips can be viewed on computers running Microsoft Windows 98, ME, 2000 or XP. Refer to the Appendix A — USB Hard Disk Drive Preparation for information on preparing the external drive for clip copy. Fig. 70 Clip Copy screen. To select the data source to back up, highlight the first box on the top and press button.
Configuration button exits the screen and returns to the Clip Copy screen without saving the changes. Fig. 71 USB Device Selection screen. When the selected drive has more than 2 partitions, the following Disk Partition Selection screen appears. If the file system is not FAT16 or FAT32, the TYPE displays NOT Supported. Fig. 72 Disk Partition Selection screen.
Configuration NOTE: During clip copy, you can neither change the system date and time, shut the system down, switch to the Quick Setup mode, clear all data, nor change the system setup from a remote site. CAUTION 3.12.3 Do NOT disconnect the USB cable or the power from the external drive while copying clips.
Operation 4 Operation NOTE: This chapter assumes your DVR has been installed and configured. If it has not, please refer to Chapters 2 and 3. The DVR’s controls are similar to a VCR. As with a VCR, the main functions are recording and playing back video. However, you have much greater control over recording and playing back video. You can establish recording schedules based on time of day and day of the week.
Operation 4.2.1 Active Cameo Mode You can enter the Active Cameo mode by pressing the button in any multi-view format. The grey-highlight box at the bottom of video indicates the active cameo, button and pressing the arrow buttons moves the active cameo. Pressing the while in the Active Cameo mode exits the Active Cameo mode. The active cameo mode will remain in effect for 15 seconds if there is no further action. In Active Cameo mode, press the camera button you want to display as active cameo.
Operation Fig. 74 Preset View screen. You can save camera position settings as “presets” so that you can go directly to desired views. Once you have the camera at the desired settings, press the Search button, and the PTZ Preset dialog box will appear. Select the number you want to assign to the preset and press the button. Use the virtual keyboard to enter the preset name. Press the Menu button to load the PTZ preset and the Preset View dialog box will appear.
Operation 4.5 Playing Recorded Video Once video has been recorded, you can view it by pressing the Play/Pause button. When playing video for the first time, the DVR will display the most recent image. When playing video subsequent times, the DVR will start playing video from the last recalled image. NOTE: If the DVR is set in the Simplex mode, you will need to stop recording before playing back video.
Operation 4.5.7 FF (Fast Forward) Button Pressing the FF button plays video forward at high speed. Pressing the button again toggles the playback speed from , and . The screen displays , and respectively. Entering Fast Playback mode from Live Monitoring mode can be password protected. 4.6 Searching Video Pressing the Search button displays the Search Menu. Fig. 75 Search Menu.
Operation 4.6.2 Date/Time Search Fig. 77 Date/Time Search screen. z Move the cursor over the date and press the button. You can use the Left and Right arrow buttons to highlight the year, month and day. Use the Up and Down arrow buttons to change to the date you want to search for. Once you button. have set the date you want, press the z Move the cursor over the time and press the button. You can use the Left and Right arrow buttons to highlight the hour, minutes and seconds.
Operation NOTE: The time bar is in one-hour segments. If a segment is highlighted, it means that some video was recorded during that hour. However, it does NOT mean video was recorded for the entire hour. Once you have set the date and time you want to search, highlight the GO button button. The selected date and time will display. The Play/Pause, and press the RW, FF, PREV, and Next buttons can now be used to review the surrounding video. 4.6.4 Event Search Fig. 79 Event Log screen.
Operation Fig. 80 Event Search (by Camera) screen. Fig. 81 Event Search (by Event) screen. Highlight the box beside Search by and press the Camera and Event. button to toggle between You can search video from the first to last recorded images, or you can set the start and stop times and dates. When you select the Search by Camera, select the target cameras and event options. When you select the Search by Event, select event options for each device.
Siemens Building Technologies Fire & Security Products SISTORE AX9 AX16_EN.doc 09.
Appendix A — USB-IDE Hard Disk Drive Preparation 5 Appendix A — USB-IDE Hard Disk Drive Preparation 5.1 Preparing the USB-IDE hard disk drive in Windows 2000 NOTE: Preparing a USB-IDE hard disk drive under Windows XP is almost identical to Windows 2000. 1. 2. 3. 4. 5. 6. Connect the USB-IDE hard disk drive to your computer using the USB Cable. Turn on your computer. The USB device icon should display on the Taskbar.
Appendix A — USB-IDE Hard Disk Drive Preparation 5.2 Preparing the USB-IDE hard disk drive in Windows 98 NOTE: Preparing a USB-IDE hard disk drive under Windows ME is almost identical to Windows 98. 1. 2. 3. 4. 5. 6. 7. 8. 9. 10. 11. 12. 13. 14. Connect the USB-IDE hard disk drive to your computer using the USB Cable. Turn on your computer. The Add New Hardware wizard window will appear.
Appendix B — Reviewing Video Clips 6 Appendix B — Reviewing Video Clips NOTE: It is suggested that the computer used for the Player program has at least an 800MHz Pentium III. If your CPU is slower than this, video clips recorded at maximum speed with very high image quality will be played back slowly. Disconnect the external USB-IDE hard disk drive or USB CD-RW drive from the DVR, and connect it to your PC. Double-clicking the target clip starts the Player program.
Appendix B — Reviewing Video Clips The Current Image Information window displays information about the current image. Camera Title displays the camera name of the current image, and Time displays the date and time the image was recorded. The Image Search Slide Bar displays the current playback position. The user can move to another image clicking the mouse and dragging along the slide bar.
Appendix C — Troubleshooting 7 Appendix C — Troubleshooting Problem Possible Solution No Power z Check power cord connections. z Confirm that there is power at the outlet. No Live Video z Check camera video cable and connections. z Check monitor video cable and connections. z Confirm that the camera has power. z Check camera lens settings. Live Video Very Bright If a cable is attached to the “Loop” connector, make certain it is connected to a properly terminated device.
Appendix D — Connector Pin Outs 8 Appendix D — Connector Pin Outs 8.
Appendix E — Connection Diagram 9 Appendix E — Connection Diagram 9.1 Sample I. Connecting the Dome Camera and SISTORE AX9/AX16 RS485/ Alarm I/0 RS485 Remarks z Default interface parameter for CCDA Dome and SIVIS MINI DOME : z Baud Rate: 19200 / Parity: NONE / Data Bit: 8 / Stop Bit: 1 / Usage: PTZ Control 9.2 Sample II.
Appendix E — Connection Diagram 9.3 Sample III.
Appendix F — Recording Table 10 Appendix F — Recording Table 10.1 All 16 Channel Recording Times with 250 GB HDD (Days) Recording Quality (Standard Resolution) Recording Speed Very High (18KB) High (7KB) Standard (3KB) Low (2KB) 60 ips NTSC 2.7 6.9 16.1 24.1 50 ips PAL 3.2 8.3 19.3 28.9 30 ips NTSC 5.4 13.8 32.2 48.2 25 ips PAL 6.4 16.5 38.6 57.9 20 ips 8.0 20.7 48.2 72.3 15 ips 10.7 27.6 64.3 96.5 10 ips 16.1 41.3 96.5 144.7 5 ips 32.2 82.7 192.9 289.4 2.
Appendix G — Screens Map 11 Appendix G — Screens Map 87 Siemens Building Technologies Fire & Security Products SISTORE AX9 AX16_EN.doc 09.
Appendix H — Specifications 12 Appendix H — Specifications VIDEO Signal Format PAL or NTSC (selector switch) Video Input Composite: 9 or 16 looping inputs, 1 Vp-p, auto-terminating, 75 Ohms Monitor Outputs Composite: One, 1 Vp-p, 75 Ohms SVHS: One Video Resolution Standard: 336 x 272 (PAL), 336 x 224 (NTSC) High: 672 x 272 (PAL), 672 x 224 (NTSC) Playback/Record Speed Standard Resolution: 50 ips (PAL), 60 ips (NTSC) (images per second) High Resolution: 25 ips (PAL), 30 ips (NTSC) INPUTS/OUTPUTS Al
Appendix H — Specifications STORAGE Primary Storage EIDE hard disk drive (up to 2) Secondary Storage SCSI hard disk drive (RAID) Backup Storage USB hard disk drive GENERAL Dimensions (W x H x D) 16.9" x 1.7" x 15.7" (430 x 44 x 399 mm) Unit Weight 14.3 lbs. (6.5 kg) Shipping Weight 20.0 lbs. (9.1 kg) Shipping Dimensions 21.3" x 12.1" x 20.
Keyword Index 13 Keyword Index A Active Cameo Mode, 71 AI 1 to 16 (Alarm In), 16 Alarm Button, 22 Alarm I/O Connector, 85 Alarm In Event Action (Alarm Out) Setup Screen, 49 Alarm In Event Action (Notify) Setup Screen, 50 Alarm In Event Action (Record) Setup Screen, 48 Alarm In Setup Screen, 38 Alarm Out Setup Screen, 41 AO 1 and 2 (Alarm Out), 16 ARI (Alarm Reset In), 16 Audio Setup Screen, 42 Event Search, 77 F Factory Reset, 19 Features, 11 FF (Fast Forward) Button, 23, 74 Freeze Button, 22 Front Pan
Keyword Index Q Quick Setup Screen, 25 R REC (Record) Button, 23 Record Mode Setup Screen, 44 Recording Audio, 73 Recording Table, 88 Recording Video, 72 Required Installation Tools, 13 Reviewing Video Clips, 82 RS232 connector, 17 RS232/RS485 Setup Screen, 43 RS485 connector, 17 RS485 Connector Pin Outs, 85 RW (Rewind) Button, 23, 73 S SCSI connector, 18 Search Button, 22 Searching Video, 74 Sequence Button, 22 Sequence Display Setup Screen, 56 Setting Unit for PAL or NTSC, 13 Stop Button, 23, 74 Stora
Issued by SGS Fire & Security Products D-76187 Karlsruhe www.sbt.siemens.com/FSP Document no. A24205-A336-B545 Edition 09.2004 © 2004 Copyright by Siemens Building Technologies AG Data and design subject to change without notice. Supply subject to availability. Printed in the Federal Republic of Germany on environment-friendly chlorine-free paper.