
Technical data


Working with the TS Adapter II
5.4 Connecting the TS Adapter II
TS Adapter II
Manual, 06/2008, A5E00272728-03
37
5.4 Connecting the TS Adapter II
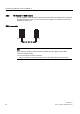
Connecting to the PC
1. When prompted to do so, insert the supplied USB cable onto a USB interface of your PC.
2. Insert the other end of the USB cable onto the USB interface of the TS Adapter II.
Connecting to the automation system
1. Insert the supplied MPI cable onto the TS Adapter II and tighten the screws.
2. Insert the other end of the MPI cable onto the MPI interface of your CPU and tighten the
screws.
Note
The adapter and the S7/C7 system each represent a node.
1. In networks consisting of two nodes (adapter and S7/C7 system), the adapter is
operated directly at the socket of the S7/C7 system.
2. In networks consisting of more than 2 nodes, the adapter is either connected to the
"PG socket" of a PROFIBUS cable connector (SINEC L2 bus connector) using the
supplied MPI cable or connected directly into the ring using a PROFIBUS cable
connector. In this case, the adapter must additionally be supplied with 24 V.
Connecting to 24 V
Wire the supplied 24 V connector as shown in section "Power cord for power supply" and
insert the connector into the TS Adapter II. The supplied MPI cable or the power cord
supplies the voltage to the TS Adapter II. The power cord must be used to supply the voltage
if the CPU that is connected to the TS Adapter II via the MPI cable cannot supply 24 V.
Note
If 24 V are delivered over the MPI cable and the 24 V power cord, the higher voltage
prevails.
Windows cannot detect the TS Adapter II until it is supplied with voltage. When the adapter
is connected initially, the "Found New Hardware Wizard" appears. Select "Install software
automatically (recommended)", then click "Next". Windows will install the pre-installed
TS Adapter II driver (see also section "Installing the software").
Note
Make sure the 24 V supply cable is protected suitably for its cross-section.