
Installation Instructions

Document No. 129-435
Installation Instructions
February 18, 2016
Siemens Industry, Inc. Page 3 of 4
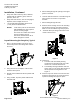
2 × 4-inch Electrical Wall Box Mounting
An ARG70 wall plate adapter is required to mount a
Q-Series CO
2
Room Sensor to a 2 × 4-inch electrical
wall box. The ARG70 must be ordered separately.
1. Place a small screwdriver into the top of the
sensor and press in the locking tab to remove
the cover.
2. Using the two screws provided, fasten wall box
adapter to plaster ring, supplied by others.
3. Flex adapter mask and snap in place inside wall
box adapter.
4. Fasten sub-base, included with the Q-Series
CO
2
Room Sensor, to wall box adapter
assembly with the two screws provided.
5. Pull wires through plaster ring.
6. Follow Drywall Mounting Steps 6 through 11.
The installation is now complete.
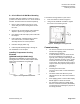
Installing Temperature Sensing
Elements
(QPA2080 and QPA2080D Only)
QPA2080 and QPA2080D are shipped with four
sensing elements: NTC 10K Ohm, Platinum 1000,
Nickel 1000 and Platinum 100 (packaged
separately).
Figure 5. Sensing Element Selections.
To install the sensing element of your choice:
1. Insert the element as shown in Figure 6.
2. Using a small, flat-blade screwdriver, tighten
the sensor’s two mounting screws.
Figure 6. Installing the Sensing Element.
Commissioning
· The sensor’s functions can be checked 30
minutes after applying power.
· Checking the CO
2
function:
In well-ventilated rooms, the sensor shows
the CO
2
concentration of the outside air.
Typically, this is 360 ppm (depending on the
sensor’s measuring accuracy). Also, a basic
functional check can be made by exhaling
on the sensor. Note that the sensor’s rate of
response has been purposely delayed (time
constant t
90
=
5 minutes).
· Checking the VOC function:
Touch the sensor with a cotton ball dowsed
in alcohol.
· Ventilation should start when the preset
switching level of the connected controller is
reached.
· After applying power to sensors with display,
Init will appear for about six seconds.
· See QPA Series Indoor Air Quality Room
Sensors Technical Instructions (CE1N1961)
for information on positioning the jumpers on
the setting elements.