
User Manual


69 / 124
Siemens Synco™ living CE1C2707en
Building Technologies Commissioning the system 23.08.2008
Confirm sub item "Connect device" by pressing the Menu/ok button. You are
prompted to press the binding button on the device to be connected to estab-
lish connection.
The door / window contact is connected by pressing the function button on the
door / window contact for at least one second. After the learning telegrams are
sent, the LED blinks for about 3 seconds.
Successful connection is displayed on the central apartment unit and con-
firmed by a beep. Finish the connection procedure by pressing the Menu/ok
button.
Connect temperature sensor
Inform the central apartment unit that you want to connect a QAA910 room
sensor for temperature display:
Main menu > Commissioning > RF connections
> Temperature display > Temperature X (1 - 3) > Connect device:
Confirm subentry “Connect device“ by pressing the Menu/ok button. To make
the connection, you are then prompted to press the binding button on the
device to be connected.
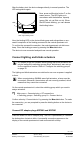
Now, press the function button on the room temperature sensor. The LED
lights up in accordance with the batteries’ capacity (green: Bat. ok,
red: Bat not ok). When it starts blinking, you can release the function button.
A successful connection appears on the display of the central apartment unit
and confirmed with a beep. The LED on the room temperature sensor extin-
guishes. Close the binding process by pressing the Menu/ok button.
Connect fault Inputs
Inform the central apartment unit that a universal input B of a heating circuit
controller or a universal input Xx of a multi-controller or a door / window con-
tact wave AP 260 should be connected as a fault input:
Main menu > Commissioning > RF connections
> Faults > Fault input X (1 - 8) > Connect device:
Confirm subentry “Connect device“ by pressing the Menu/ok button. To make
the connection, you are prompted to press the binding button on the device to
be connected.
If you want to use a universal input B of a heating circuit controller or a univer-
sal input Xx of a multi-controller as a fault input, select it with the channel
selection button (CH) and press the binding button. The LED lights up green.
When it starts blinking, you can release the binding button.
If you want to use a door / window contact wave AP 260 as a fault input, press
the button on the door / window contact for about 1 second. Then, the LED
blinks for a few seconds.