
User Manual

Graphics Builder
Overview
5
A6V11604297_en--_e
69 | 196
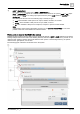
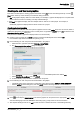
3. Do the following for each component and smart label in the graphic:
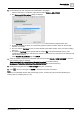
– Select a component or smart label, right-click and select TOOLS > RELATIVIZE.
The Component binding options dialog box displays.
– In the Top Equip section, select the building hierarchy location where the graphic will be used.
By default, the object on which you opened this graphic is selected. Another object can be manually
selected, if necessary.
The tool uses the Top Equip as the root when describing the relative position of the point in the building
hierarchy.
This specific Top Equip will be replaced with the variable $id in the generated binding query. This
variable allows the binding to work when the graphic is opened from any other place in the hierarchy that
has the same structure.
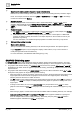
– Select Relative: By navName and click APPLY.
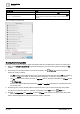
4. Select an updated component or smart label, right-click and select TOOLS > VIEW BINDINGS to view the
type of binding used. For example:
(point or shadowPoint) and navName=="Setpoint for cooling" is a relative binding.
baUniqueId=="9a0cffe8a0088543bfe4734dd93630bff4302fa7" is an absolute binding.
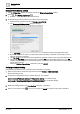
5. Modify the binding directly in the View bindings dialog box, if necessary.
6. Click to save your changes and SAVE to confirm the file name and location.
Note
Once you’re comfortable with the data point binding process, consider using the procedure Modifying the
binding option for multiple points [➙ 178].