
User Manual


+
Picture Editor 179
---------------------------------------------------------------
Case 2: The figures to be marked are situated on a common
background surface.
The method described in case 1 cannot be used here,
since the background figure will be marked as soon as the
left button of the mouse is pressed.
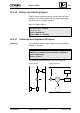
Procedure:
Icon: "Hand" (Keyboard: <H>)
➡ The last graphic figure drawn is marked.
Keep <Alt> pressed
Anchor point of a marking box for all figures to
be marked.
Starting from this anchor point, a movement of the mouse
will produce a "rubber band," which will be stretched to en-
compass the figures to be marked.
Second corner of the marking box
The directional keys can be used for fine posi-
tioning at the second corner
➡ All marked figures are now framed together within a
single marking box with 8 handles (four in the corners
and four on the middle of the sides).
In addition, each separate figure is framed by a dotted-
line rectangle (without handles).
---------------------------------------------------------------
CM2B8523E UNIGYR-VISONIK Insight March 1995