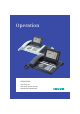
Operation HiPath 4000 OpenStage 40 OpenStage Key Module 40 www.siemens.
Important Information Important Information Q For safety reasons, the telephone should only be supplied with power: • using the original power supply unit. Part number: C39280-Z4-C51x (x: 0=EU, 1=US, 2=UK) or • in a LAN with PoE (Power over Ethernet), which complies with the IEEE 802.3af standard. Never open the telephone or a key module. Should you encounter any problems, contact the responsible service personnel. Use only original Siemens accessories.
Important Information Location of the telephone • • • • • The telephone should be operated in a controlled environment with an ambient temperature between 5°C and 40°C. To ensure good speakerphone quality, the area in front of the microphone (front right) should be kept clear. The optimum speakerphone distance is 50 cm. Do not install the telephone in a room where large quantities of dust accumulate; this can considerably reduce the service life of the telephone.
Contents Contents Important Information . . . . . . . . . . . . . . . . . . . . . . . . . .2 Trademarks . . . . . . . . . . . . . . . . . . . . . . . . . . . . . . . . . . . . . . . . . . . . . . . 2 Location of the telephone . . . . . . . . . . . . . . . . . . . . . . . . . . . . . . . . . . . . 3 Software update . . . . . . . . . . . . . . . . . . . . . . . . . . . . . . . . . . . . . . . . . . . 3 General Information. . . . . . . . . . . . . . . . . . . . . . . . . . . .9 About this manual . . . . . .
Contents Ending a call. . . . . . . . . . . . . . . . . . . . . . . . . . . . . . . . . . . . . . . . . . . . . . Making calls. . . . . . . . . . . . . . . . . . . . . . . . . . . . . . . . . . . . . . . . . . . . . . Off-hook dialing . . . . . . . . . . . . . . . . . . . . . . . . . . . . . . . . . . . . . . . . On-hook dialing . . . . . . . . . . . . . . . . . . . . . . . . . . . . . . . . . . . . . . . . Dialing with DDS keys . . . . . . . . . . . . . . . . . . . . . . . . . . . . . . . . . . .
Contents System-supported conference . . . . . . . . . . . . . . . . . . . . . . . . . . . . . . . 53 Establishing a conference . . . . . . . . . . . . . . . . . . . . . . . . . . . . . . . . 54 Adding a party . . . . . . . . . . . . . . . . . . . . . . . . . . . . . . . . . . . . . . . . . 55 Transferring a conference . . . . . . . . . . . . . . . . . . . . . . . . . . . . . . . . 56 Disconnecting a specific participant from the conference. . . . . . . .
Contents Dialing with Call Charge Assignment . . . . . . . . . . . 79 Dialing with project assignment . . . . . . . . . . . . . . . . . . . . . . . . . . . . . . 79 Call duration display. . . . . . . . . . . . . . . . . . . . . . . . . . . . . . . . . . . . . . . . 80 Privacy/Security. . . . . . . . . . . . . . . . . . . . . . . . . . . . . . 81 Locking the telephone to prevent unauthorized use . . . . . . . . . . . . . . . Activating/deactivating "Do not disturb". . . . . . . . . . . . . . . . . . . . .
Contents Making Calls in an Executive-Secretary Team . .103 Calling an executive or secretary phone . . . . . . . . . . . . . . . . . . . . . . . Calling an executive/secretary phone . . . . . . . . . . . . . . . . . . . . . . Accepting calls for the executive phone at the secretary phone. . . . . Accepting calls for the executive phone when already on a call . . Transferring calls directly to the executive phone . . . . . . . . . . . . . . . . Accepting calls on the executive phone . . . . . . . . . . . .
General Information General Information About this manual This document contains general descriptions of the technical options, which may not always be available in individual cases. The respective features must therefore be individually defined in the terms of the contract. If a particular function on your phone is not available to you, this may be due to one of the following: The function is not configured for you or your telephone. Please contact your system support representative.
General Information Intended use The OpenStage phone is a desktop unit designed for voice transmission and for connection to the LAN. It can also be used as a workstation device. Any other use is regarded as unauthorized. Telephone type The identification details (exact product designation and serial number) of your telephone can be found on the nameplate on the underside of the base unit. Specific details concerning your communications platform can be obtained from your service technician.
Getting to Know Your OpenStage Phone Getting to Know Your OpenStage Phone The following sections describe the most frequently used operating elements and the displays on your OpenStage phone. OpenStage 40 user interface 8 2 3 1 4 5 6 7 1 You can make and receive calls as normal using the handset. 2 The display permits intuitive operation of the phone Æ page 19. 3 You can customize your telephone by assigning phone numbers and functions to the programmable sensor keys Æ page 16.
Getting to Know Your OpenStage Phone Ports on the underside of the phone Power supply unit PC Network switch Headset Key module Handset Properties OpenStage 40 Display type Illuminated display Programmable sensor keys Full-duplex speakerphone function 3-port (10/100) switch Headset Interface for key modules Wall mounting 12 LCD, 40 x 6 characters ; 6 ; ; ; ; ;
Getting to Know Your OpenStage Phone Key modules (optional) Other technical explanations, safety notices, and installation instructions can be found in the relevant documentation. You can download these from the Internet at http://www.siemens.com/enterprise Æ "Downloads"Æ "Installation Guides". In conjunction with a key module, your OpenStage 40 can be configured as an attendant console (ask your service personnel).
Getting to Know Your OpenStage Phone Keys Function keys Key Function when key is pressed s End (disconnect) call Æ page 29. , Redialing Æ page 31. r Button for fixed call forwarding (with red LED key) Æ page 35 O Open mailbox (with red LED key) Æ page 23. N Open the service menu (with red LED key) Æ page 26. Audio keys Key Function when key is pressed o Activate/deactivate headset Æ page 44. p Activate/deactivate microphone (also for speakerphone mode) Æ page 32.
Getting to Know Your OpenStage Phone 5-way navigator Remove the protective film from the ring around the 5-way navigator before using the phone. With this control, you can administer most of the functions featured on your OpenStage phone as well as the displays.
Getting to Know Your OpenStage Phone Programmable sensor keys Your OpenStage 40 has 6 illuminated sensor keys. You can assign functions to them on two levels. Increase the number of sensor keys by adding a key module Æ page 13.
Getting to Know Your OpenStage Phone Keypad In cases where text input is possible, you can use the keypad to input text, punctuation and special characters in addition to the digits 0 to 9 and the hash and asterisk symbols. To do this, press the numerical keys repeatedly. Example: To enter the letter "h", press the number 4 key on the keypad twice. When entering the text, all available characters for this key are displayed. After a short while, the character in focus is displayed in the input field.
Getting to Know Your OpenStage Phone Multi-function keys Key Function during text input ) Write special characters Function when held down Turn ringtone on/off Æ page 110. ( Switch between upper and Turn phone lock on/off Æ page 81. lower-case text and number entry. Text input Enter the required characters via the keypad. Select the functions using the keys d and b. Confirm your entry with i. 10:29 SU 05 . .08.07 : Ma Characters entered OK Cancel Mode abc Save entry. Cancel entry.
Getting to Know Your OpenStage Phone Display Your OpenStage 40 comes with a tilt-and-swivel black-and-white LCD display. Adjust the tilt and contrast to suit your needs Æ page 108. Idle mode Status bar DND SU 05 . 08.07 . : Mirea, Ch. 10:29 Toussaint.
Getting to Know Your OpenStage Phone Explanation of the icons Icon Meaning The ring tone is deactivated Æ page 110. The "Do not disturb" function is activated Æ page 82. The phone lock is activated Æ page 81. Callback requests are active Æ page 41. You received new voice messages Æ page 23. Call forwarding is active Æ page 35.
Getting to Know Your OpenStage Phone Telephony dialogs Connection-dependent conditions and situations, e. g. when your telephone rings, when dialing a number, or during a call, are depicted graphically on the display. Situation-dependent functions that appear on the display automatically can be selected and activated with the 5-way navigator Æ page 15. The scope and type of functions that may be offered automatically varies.
Getting to Know Your OpenStage Phone Appearance during multi-line operation Example: You have pressed a line key. SU 05.08 . . : 10:29 220807 active Last number redial? Saved number redial? Unanswered calls? Selected (used) trunk Possible functions g Additional menu levels are availableÆ page 15 Once you have pressed a line key, saved number redial functions are automatically available.
Getting to Know Your OpenStage Phone Mailbox Depending on your communications platform and its configuration (contact the relevant service personnel), the mailbox key gives you access to messages from services such as HiPath XPressions. The mailbox also keeps track of callbacks. Both voice and fax messages can be stored in the mailbox (if so configured). Signaling New messages are indicated on the display in idle mode Æ page 19; in addition, the mailbox key lights up.
Getting to Know Your OpenStage Phone Callbacks You can request a callback if the internal station called is busy or if nobody answers. This also applies for external calls via ISDN exchanges. This feature saves you from having to make repeated attempts to reach the user. You receive a callback • When the other party is no longer busy • When the user who did not answer has conducted another call.
Getting to Know Your OpenStage Phone Call log Calls to your phone and numbers dialed from your phone are recorded chronologically in the call log, sorted, and divided into the following lists: • Unanswered calls • Incoming calls • Outgoing calls Your phone saves the last 10 unanswered calls, the last 6 outgoing calls, and the last 12 incoming calls in chronological order. Each call is assigned a time stamp. The most recent entry in the list that has not yet been retrieved is displayed first.
Getting to Know Your OpenStage Phone Service menu Press a key on the 5-way navigator and select a menu option from the idle menu Æ page 19. or Press the menu key N and chose a menu option with the 5-way navigator Æ page 15. The menu structure comprises several levels. The first line in this structure shows the menu currently selected while the second line shows an option from this menu.
Making Calls – Basic Functions Step by step Making Calls – Basic Functions Please read the introductory chapter "Getting to know your OpenStage phone" Æ page 11 carefully before performing any of the steps described here on your phone. Answering calls An incoming call will cancel any ongoing telephone setting operations. Answering a call via the handset The phone is ringing. The caller is displayed. ^ Lift the handset. if nec. + or - Set the call volume.
Making Calls – Basic Functions Step by step Switching to speakerphone mode Prerequisite: You are conducting a call via the handset. n ] Hold down the key and replace the handset. Then release the key and proceed with your call. if nec. + or - Set the call volume. US mode If your communication system is set to US mode (contact your service personnel), you do not have to hold down the speaker key when replacing the handset when switching to speakerphone mode. n Press the key shown. if nec.
Making Calls – Basic Functions Step by step Ending a call s Press the key shown. or n Press the lit key. or \ Replace the handset.
Making Calls – Basic Functions Step by step Making calls Off-hook dialing ^ Lift the handset. j Internal calls: Enter the phone number. External calls: Enter the external code and the station number. The connection is set up as soon as your input in complete. On-hook dialing j Internal calls: Enter the phone number. External calls: Enter the external code and the station number. The party you are calling answers via loudspeaker. ^ Lift the handset. or On-hook: Speakerphone mode.
Making Calls – Basic Functions Step by step Redialing a number (saved number) Prerequisite: You have saved a phone number Æ page 43. , Press the key shown. n The key lights up. Speakerphone mode. or ^ Lift the handset. or n Press the key shown. Saved number redial? Select and confirm. The saved phone number is dialed. Redialing a number (last dialed number) The last phone number dialed on your telephone is dialed. ^ Lift the handset. or n Press the key shown.
Making Calls – Basic Functions Step by step Turning the microphone on and off You can temporarily deactivate the microphone on your handset to prevent the other party from overhearing a conversation, for instance, with a colleague in the same room. Prerequisite: You are conducting a call. Deactivating the microphone p Press the key shown. Activating the microphone p Press the lit key. Calling a second party (consultation hold) You can call a second party while a call is in progress.
Making Calls – Basic Functions Step by step Switching to the held party (alternating) Prerequisite: You are conducting a consultation call. Toggle? Release and return? Select and confirm. You are switched to the party on hold. Ending an alternate operation Select and confirm. The active call is disconnected and the held call is restored. Combine the calling parties into a three-party conference Conference? Select and confirm.
Making Calls – Basic Functions Step by step Transferring a call If your call partner wishes to speak to one of your colleagues, you can transfer the call. Transferring with announcement Consultation? Select and confirm. j Enter and confirm the required party’s phone number. Announce the call partner. \ Replace the handset. Your call partner is now connected to the party to whom they wish to speak. Transferring without announcement Start transfer? Select and confirm.
Making Calls – Basic Functions Step by step Call forwarding If your belongs to an ONS group (parallel call Æ page 112), please note the following: Call forwarding can be configured on any phone in the ONS group and will then apply to all phones in that ONS group. Call forwarding between two phones in an ONS group is not possible. Overview of forwarding types You can configure different call forwarding settings for your station.
Making Calls – Basic Functions Step by step Fixed call forwarding (all calls) If you have programmed a destination for fixed call forwarding, forwarding can always be activated and deactivated using the key r. The programmed forwarding destination remains unchanged until you reprogram or delete it. Configuring/modifying a fixed forwarding destination N Open the service menu Æ page 26. Destinations? g Confirm the option shown. Call forwarding? g Confirm the option shown. "Variable call forw.
Making Calls – Basic Functions Step by step Deleting a fixed call forwarding destination You can delete the destination for fixed call forwarding. N Open the service menu Æ page 26. Destinations? g Confirm the option shown. Call forwarding? g Confirm the option shown. Next forwarding type? Confirm the option shown. "Fixed call forwarding" and the forwarding destination are displayed. Delete? Select and confirm. The forwarding destination is deleted.
Making Calls – Basic Functions Step by step Variable forwarding (all calls) In the case of variable call forwarding, programming a forwarding destination activates call forwarding for all calls. If call forwarding is deactivated, the forwarding destination is deleted at the same time. Configuring and activating variable call forwarding c Open the idle menu. Act. FWD-VAR-ALL-BOTH? Select and confirm. or N Open the service menu Æ page 26 Destinations? g Confirm the option shown.
Making Calls – Basic Functions Step by step Additional forwarding types This description applies for the following forwarding types: • Forwarding for intnl • Forwarding for extnl • Call forwarding - busy • Call forward. no reply • Call forward. busy/no reply Programming a forwarding destination activates call forwarding. If call forwarding is deactivated, the forwarding destination is deleted at the same time. Configuring and activating call forwarding N Open the service menu Æ page 26.
Making Calls – Basic Functions Step by step Displays In idle mode (Æ page 19), the following signals remind you that call forwarding is activated: K 100168 r Fixed/variable call forwarding The LED key lights up. The call forwarding icon and the phone number or, if necessary, the name of the forwarding destination are shown. Forwarding for intnl/external r The LED key lights up. K Only the call forwarding icon is displayed.
Making Calls – Basic Functions Step by step Using callback In idle mode Æ page 19, the following signals alert you to the presence of saved callbacks: L 02 O The LED key lights up. The callback symbol and the number of callback requests are displayed. If your belongs to an ONS group (parallel call Æ page 112), please note the following: Callback on busy is only signaled on the busy phone, not in the whole ONS group.
Making Calls – Basic Functions Step by step Checking/deleting a saved callback Prerequisite: You have saved callbacks Æ page 41. c Open the idle menu. Display callbacks? Select and confirm. The newest entry is displayed first. Next callback? Select the displayed function and press the "OK" dialog key to display additional entries. Deleting a displayed entry Delete? Select and confirm. Ending Retrieval N Press the key shown. or Cancel? 42 Select and confirm.
Making Calls – Basic Functions Step by step Storing saved number redial Saving the current phone number Prerequisite: You are conducting a call. The other party’s phone number is displayed. Save number? Select and confirm. Saving any phone number Prerequisite: Your phone is in idle mode Æ page 19. N Open the service menu Æ page 26. Destinations? g Confirm the option shown. Saved number redial? g Select and confirm. New entry? Confirm the option shown. j Enter the phone number.
Making Calls – Convenience Functions Step by step Making Calls – Convenience Functions Answering calls Answering a call with a headset Prerequisite: The headset is connected. o The LED flashes when a call is received. Press the key shown. Conduct call. Ending the call: o Press the key shown. The LED key goes out. Answering a call via a DSS key Prerequisite: You have configured direct station selection keys on your telephone Æ page 16 and Æ page 73. T Press the direct station selection key.
Making Calls – Convenience Functions Step by step Accepting a call for another member of your team If a team member does not answer a call within 15 seconds (system-dependant), the remaining team members hear an alert tone. In idle mode ^T The phone is ringing. "Call for" is displayed on the phone. Lift the handset and press the flashing "Pickup" key. You have now picked up the call. or T Press the flashing "Pickup" key. Speakerphone mode. During calls T Press the flashing "Pickup" key.
Making Calls – Convenience Functions Step by step j Enter the system code for "Display on request" (contact the relevant service personnel if necessary). Enter code! The phone number is displayed once you have entered the code. Picking up a call in a hunt group If configured, you can also be reached using a hunt group phone number. Z Your telephone rings. ^ Lift the handset. Using the speakerphone A colleague addresses you directly over the speaker with a speaker call.
Making Calls – Convenience Functions Step by step Making calls Dialing with a direct station selection key Prerequisite: You have configured direct station selection keys on your telephone Æ page 16 and Æ page 73. S Press the DSS key. ^ Lift the handset. or n Press the key and enter speakerphone mode. For information on the meanings of the LED displays of the DSS keys, see Æ page 16.
Making Calls – Convenience Functions Step by step Displaying additional calls in the list Next call? Select and confirm. Dialing a number from the call log Output? Select and confirm. The party is called. Deleting an entry from the call log Delete? Select and confirm. Ending Retrieval Return? Select and confirm. or N Press the key shown. Using speed dialing Speed dial numbers may contain command or access code sequences and may be linked to other speed dial numbers Æ page 76.
Making Calls – Convenience Functions Step by step Talking to your colleague with a speaker call You can place a speaker call to an internal party using the loudspeaker on their telephone. You can also use the functions under "HiPath 4000 as a entrance telephone system" Æ page 61. Prerequisite: A programmed "Speaker call-two-way" sensor key is configured on your phone. S Press the "COM Spk 2way" programmed sensor key. j Enter the phone number. Z Wait for the tone.
Making Calls – Convenience Functions Step by step During a call Call waiting with a direct station selection key Prerequisite: You have configured direct station selection keys on your telephone Æ page 16 and Æ page 73. The line of the party you wish to call is busy. R Press the DSS key. The called party accepts your waiting call. ^ Lift the handset. or n Press the key and enter speakerphone mode. For information on the meanings of the LED displays of the DSS keys, see Æ page 16.
Making Calls – Convenience Functions Step by step Accepting a second call with a sensor key Z Prerequisite: You are conducting a call "Camp/Overide" is activated. The "Pickup" sensor key is programmed. An alert tone is audible. T The LED on the "Pickup" sensor key flashes. The caller hears the ring tone. Press the key shown. [ You are connected to the call waiting party immediately. The first party is placed on hold. Ending the second call and resuming the first one: s Press the key shown.
Making Calls – Convenience Functions Step by step Using the shift key The sensor key "Split" Æ page 16 (must be configured by the relevant service personnel) can be used for the following functions: • Consultation (return to waiting call or waiting conference) • Alternating • Acceptance of a second call • Acceptance of a group call Second call Z You hear a call waiting tone. Information for the call is displayed. T Press the flashing sensor key "Split". You pick up the waiting call. The LED lights up.
Making Calls – Convenience Functions Step by step System-supported conference You can include up to eight internal and external parties in a system-supported conference. Parties with system phones can perform/use all of the functions listed below at the same time. ISDN phones and external parties are passive participants – they can only be included in the current conference. You can include parties and conferences from a remote system in your conference.
Making Calls – Convenience Functions Step by step Establishing a conference Initiating a conference from a single call [ You are conducting a call. Start conference? Select and confirm. j Call the second party. Inform this party that you are initiating a conference. Conference? Conf. Add to conference? Confirm the option shown. The following message is displayed: „1 is your position“ 1-2-3 This message is then displayed.
Making Calls – Convenience Functions Step by step Adding a party Any party in a system conference can extend the conference by • • • calling a specific party and connecting them connecting a party from a consultation call to the conference, or accepting a second call and connecting the caller to the conference. Calling a specific party and connecting them You intend calling another party and connecting them to the conference. Add to conference? Select and confirm. j Call the new party.
Making Calls – Convenience Functions Step by step Accepting a second call and connecting it to the conference If you receive a second call during the conference Æ page 50, you can connect this party to the conference. Prerequisite: You are conducting a call in a conference and receive a second call Æ page 51. [ You are conducting a call in a conference. Z An alert tone is audible. T Press the sensor key "Pickup". or only if there is no sensor key „Pickup“: Answer camp-on? Select and confirm.
Making Calls – Convenience Functions Step by step Disconnecting a specific participant from the conference You are connected to a conference and wish to disconnect one of the participants. Retrieving a conference and disconnecting specific participants View members? 220870 Next conference party? Select and confirm. 1 Next conference party? The phone number and, if necessary, the name of the conference participant is displayed with the first status number. Confirm to show the next participant.
Making Calls – Convenience Functions Step by step Entering commands using tone dialing (DTMF suffix dialing) After dialing a phone number you can set tone dialing. This allows you to use command entries to control Dualtone Multi-Frequency (DTMF) devices, such as answering machines or attendant systems. N Open the service menu Æ page 26. More features? DTMF suffix dialing? g Select and confirm. Select and confirm. You can now enter commands using the keys 0 - 9, the asterisk key, and the pound key.
Making Calls – Convenience Functions Step by step System-wide parking On HiPath 4000 systems, you can park up to ten internal and/or external calls and retrieve them on another phone.
Making Calls – Convenience Functions Step by step If you cannot reach a destination ... Call waiting (camp-on) Prerequisite: An internal station is busy. It is important that you reach the station. Camp-on? Select, confirm and briefly wait. Z Your colleague hears a warning tone during the call. If their phone has a display, your name and phone number is displayed. To camp on, you must have received the correct authorization. Camp on is not possible if the called party has donot-disturb activated.
Making Calls – Convenience Functions Step by step HiPath 4000 as an entrance telephone system (two-way intercom) You can place a speaker call to an internal party on HiPath 4000 using the loudspeaker on their telephone to establish a connection. You can initiate a speaker call from a consultation call.
Making Calls – Convenience Functions Step by step System-wide speaker call You can place a speaker call from your phone to any internal party with a telephone equipped with speakerphone mode or a loudspeaker. Speaker call to a variable destination Prerequisite: The "Speaker call-one-way" sensor key is programmed. ^ Lift the handset. or j n Press the key and enter speakerphone mode. Enter the system code for "Speaker call-one-way" (contact the relevant service personnel if necessary).
Making Calls – Convenience Functions Step by step Speaker call to a fixed destination S The system code for "Speaker call-one-way" and the destination number are programmed on a repdial key Æ page 74. Press the programmable repdial key. A connection to the destination loudspeaker is immediately established. The other functions correspond "Speaker call to a variable destination" Æ page 62.
Making Calls – Convenience Functions Step by step S Press the programmable repdial key. A connection to the destination loudspeaker is immediately established. ^ The called party can accept the connection by lifting the handset. n or S If the called party presses the speaker key or the line key (if configured), the connection is lost.
Making Calls – Convenience Functions Step by step Announcement (broadcast) to all members of a line trunk group You can use this function to send an announcement to all members (10 - 40) of a line trunk group. Z Once you have activated the group call, you will hear a confirmation tone. You can then begin the announcement. ^ Lift the handset. or j n Press the key and enter speakerphone mode.
Making Calls – Convenience Functions Step by step Using call forwarding Please note the description for programming call forwarding Æ page 35. Automatically forwarding calls The relevant service personnel can configure different call forwarding settings in the system for internal and external calls and activate these settings for your station.
Making Calls – Convenience Functions Step by step Forwarding calls for other stations You can save, activate, display and deactivate call forwarding for another phone, fax or PC station from your own phone. You must have the PIN of the other station or have "Call forwarding for other stations" access rights. In both cases, the relevant service personnel for your system will provide assistance.
Making Calls – Convenience Functions Step by step Saving a call forwarding destination for fax/ PC/busy station and activating call forwarding N Open the service menu Æ page 26. Destinations? Forwarding station No.? g Confirm the option shown. Select and confirm. j Enter the code for the call forwarding type you wish to set. Codes are assigned by the relevant service personnel.
Making Calls – Convenience Functions Step by step Displaying/deactivating call forwarding for another phone N Open the service menu Æ page 26. Feature settings? g Select and confirm. Forwarding station No.? Select and confirm. Variable call forw.? Confirm the option shown. j Enter the number of the other telephone. Completed? Confirm the option shown. j Enter the PIN (only applicable if your station does not have "Call forwarding for other stations" access rights).
Making Calls – Convenience Functions Step by step Displaying/deactivating call forwarding for fax/PC/busy stations N Open the service menu Æ page 26. Feature settings? Forwarding station No.? g Select and confirm. Select and confirm. j Enter the code for the call forwarding type you wish to set. Codes are assigned by the relevant service personnel.
Making Calls – Convenience Functions Step by step Leaving/rejoining a hunt group Prerequisite: A hunt group is configured for the team. You can leave the hunt group at any time, for example, when you leave your workstation. When you are present, you can join it again. You can still be reached via your own phone number even when you are not in the hunt group. N Open the service menu Æ page 26. Feature settings? g Select and confirm. Join hunt group? Select and confirm.
Programming Sensor Keys Step by step Programming Sensor Keys You can program frequently used functions or phone numbers onto the sensor keys on your OpenStage 40 Æ page 16. The available functions are offered while the sensor key is being programmed. Saving a function to a sensor key N Open the service menu Æ page 26. Key function? Select and confirm. S Press the programmable sensor key. Change? Confirm the option shown. Select the required function.
Programming Sensor Keys Step by step Configuring repdial/direct station selection keys Please refer to the notes on Æ page 16. Prerequisite: You have programmed a sensor key with the function "Repdial" or "Direct station select" Æ page 72. Defining the phone number S Press the required repdial/DSS key. Enter new number? Confirm the option shown. j Enter the number Completed? Confirm the option shown. Your entry is saved. Defining a label Use Destination Number? Confirm the option shown.
Programming Sensor Keys Step by step Additional repdial key functions Prerequisite: You have defined a phone number for a repdial key and are still in the menu Æ page 73. Entering an automatic consultation call Enter Consult? Select and confirm. "RF" appears in the display. j Add the destination number. If you press this key during a call, a consultation call is immediately set up. The first party is placed on hold, the number of the saved destination is dialed.
Programming Sensor Keys Step by step Changing the label on a sensor key You can also subsequently change the label specified when programming a selected dialing/DSS key. Change label S Press the required repdial/DSS key. Edit Label? Select and confirm. Create Personal Label? Select and confirm. j Enter text via the keypad Æ page 17. Backspace? Confirm the option shown. Deletes characters to the left. Save? Select and confirm. Your entry is saved. Delete? Select and confirm. Deletes the label.
Saving Speed Dial Numbers and Appointments Step by step Saving Speed Dial Numbers and Appointments Central speed dial numbers Speed dial numbers are configured by your service personnel. Speed dial numbers are saved in the system. Your service personnel will provide you with the central speed dial directory, for example, in print form. Making calls using speed dial numbers Æ page 48. Speed dialing with extensions Speed dial numbers with sequences are configured by your service personnel.
Saving Speed Dial Numbers and Appointments Step by step Individual speed dial numbers You can program the keys 0 to 9 with ten frequently used phone numbers. N Open the service menu Æ page 26. Destinations? g Confirm the option shown. Speed dial features? Select and confirm the option shown. j Press the required speed dial key. If the key is already in use, the programmed phone number appears on the screen. j Enter the phone number. Save? Confirm the option shown. Your entry is saved.
Saving Speed Dial Numbers and Appointments Step by step Appointments function You can configure your phone to call you to remind you about appointments. To do this, you need to save the time you want the call to be made. You can do this for the next 24 hours. Saving appointments N Open the service menu Æ page 26. Reminder? Select and confirm. The display indicates whether a reminder has already been saved. New reminder? For the first appointment: Confirm the option shown.
Dialing with Call Charge Assignment Step by step Dialing with Call Charge Assignment You can assign external calls to certain projects. Prerequisite: Project numbers (1 - 5) are configured for certain projects and you have an account code (project code) for the project. Dialing with project assignment N Open the service menu Æ page 26. j Enter a service code between 61 (for project number 1) and 65 (for project number 5). j Enter the PIN. or N Open the service menu Æ page 26.
Dialing with Call Charge Assignment Step by step Call duration display Call duration display is configured by the relevant service personnel. The display can show either call duration or call charges. It can also be switched off. The call duration appears in the first line of the display on the right as HH:MM:SS and in 24-hour format. It is shown 10 seconds after the call starts. The call charge display feature must be requested from the network operator and configured by the relevant service personnel.
Privacy/Security Step by step Privacy/Security Locking the telephone to prevent unauthorized use You can prevent unauthorized parties from using your phone during your absence. You can see whether the function is activated or deactivated from the corresponding icon in the status bar on the display Æ page 20. Prerequisite: You have received a personal identification number (PIN) from the relevant service personnel. Locking the telephone to prevent unauthorized use N Open the service menu Æ page 26.
Privacy/Security Step by step Activating/deactivating "Do not disturb" You can activate the do not disturb function if you do not want the receive any calls. Internal callers hear the ring tone and the message "Do not disturb". External callers are redirected to the attendant console. The relevant service personnel can set forwarding destinations for do not disturb so that internal and external calls can be forwarded.
Privacy/Security Step by step Activating/deactivating "Speaker call protect" You can block speaker calls to your phone. If a caller attempts to contact you via a speaker call, the connection is established as a normal call. N Open the service menu Æ page 26. Feature settings? g Select and confirm. Speaker call protect? Select and confirm. The display shows whether "Speaker call protect" is activated or deactivated. Activate? Confirm the option shown. or Deactivate? confirm the option shown.
Privacy/Security Step by step Identifying anonymous callers (trace call) You can have the carrier identify malicious external callers. You can save the caller’s station number during the call or for 30 seconds after the call ends. However, it is essential that you do not replace your handset during this time. N Open the service menu Æ page 26. More features? Call tracing? g Select and confirm. Select and confirm. After you have finished tracing the call, the data is stored on the carrier’s system.
Using Other Functions Step by step Using Other Functions Using another telephone in the same way as your own You can log on to another phone in the HiPath 4000 system using your personal identification number (PIN). This also applies to telephones in networked HiPath 4000 systems, for example, at other company sites).
Using Other Functions Step by step In your local HiPath 4000 system: j Enter your internal PIN. or In your local system and other HiPath 4000 systems in the network: j Enter the two-digit node ID of your local HiPath 4000 system (ask the relevant service personnel). Enter code! j ( Enter your own phone number and press the pound key. j ( Enter the network-wide PIN and press the pound key. Making a call after successful logon You will hear the dial tone. "Please dial" appears in the display.
Making Calls via Multiple Lines Step by step Making Calls via Multiple Lines Line keys The programmable sensor keys on multi-line phones function as line keys. Each key that is assigned the function "line" is handled as a line. This means up to six lines can be configured. A distinction is drawn here between primary and secondary lines. Each of these line types can be used on a private or shared basis Æ page 88. Line keys are configured by the relevant service personnel.
Making Calls via Multiple Lines Step by step Primary line All multi-line telephones have a primary line. This line can be reached in the usual manner via your public phone number. Incoming calls are signaled on this line. To avoid conflict between the individual multi-line phones, you can configure the functions "Do not disturb" and "Call forwarding" exclusively for the primary line. Secondary line The secondary line on your phone is used as a primary line by another subscriber in the system.
Making Calls via Multiple Lines Step by step LED with line keys LED S Off T Flashing[1] R On Meaning – The line is in idle mode. – Incoming call on the line – Hold reminder is activated – The line is on "Hold". – The line is busy. [1] In this manual, flashing sensor keys are identified by this icon, regardless of the flashing interval. The flashing interval represents different statuses, which are described in detail in the corresponding sections of the manual.
Making Calls via Multiple Lines Step by step Answering calls with line keys If several calls arrive at the same time, you can answer calls as normal in the sequence in which they are offered. However, you can also answer calls preferentially. Prerequisite: The relevant service personnel have defined the sequence in which incoming calls should be routed to line keys. Answering calls in the sequence in which they are offered Your telephone rings (call). The caller ID is displayed.
Making Calls via Multiple Lines Step by step Deactivating/activating ringing (call) If you are making a call on one line, ringing for other incoming calls can disturb your current call. If ringing (call) is deactivated, your telephone will no longer ring. Incoming calls are then only signaled when the corresponding line key flashes. Ringing with a programmed sensor key S To deactivate ringing: press the "Ringer Off" sensor key. The LED lights up. The phone does not ring for incoming calls.
Making Calls via Multiple Lines Step by step Dialing with line keys Your phone can be configured with automatic or selectable line seizure. The relevant service personnel define whether a line should be automatically seized when the handset is lifted or speakerphone mode is activated, and which line this should be. The display "Please select a line" prompts you to seize a line when you lift the handset or press the speaker key. Dialing with automatic line seizure ^ Lift the handset.
Making Calls via Multiple Lines Step by step Saved number redial for a specific line If this type of saved number redial is configured on your system, you can save a phone number for subsequent redial on a particular trunk Æ page 94. The saved phone number is dialed using the line key and the saved number redial key. ^ Lift the handset. or n Press the key shown. Please select a line Display. S Press the applicable line key. The LED lights up. , Press the key shown.
Making Calls via Multiple Lines Step by step Saving phone numbers for "Redial on a line" Prerequisite: "Saved number redial with saved number" is configured, not "Saved number redial with last number dialed". Saving the dialed phone number or a caller’s phone number You have called a party on a particular line and this call is still in progress. Or, you were called by another party whose phone number is displayed, and this call is still in progress. , Press the key shown.
Making Calls via Multiple Lines Step by step Accessing the mailbox Example: The LED of the programmed sensor key "MBLN" lights up when new messages that have not yet been retrieved are in the mailbox. R Press the key shown. Responding to a callback request MatthewsCall N Thur 29.01. A callback request is displayed. 1:12 p.m. Output? Select and confirm. The party is called on the relevant line. Next entry More than one entry is available. Next entry? Select and confirm. The next entry is displayed.
Making Calls via Multiple Lines Step by step Identifying the line used If several lines are occupied at the same time, you can determine which one you are currently using for a call. With a programmed sensor key S Press the "Line in Use" programmable sensor key. Via the menu N Open the service menu Æ page 26. More features? Show used line? g Select and confirm. Select and confirm. The line number and status of the line currently in use are displayed Æ page 22.
Making Calls via Multiple Lines Step by step Ending the connection on a line key n Press the key shown. The LED goes out. or \ Replace the handset. Entering a call on a line (three-party conference) Prerequisite: A call is in progress on one of the lines. The line key LED lights up. R Press the line key. You and the parties already connected can hear the conference. All three parties can speak with one another. The LED remains lit.
Making Calls via Multiple Lines Step by step Via the menu N Open the service menu Æ page 26. More features? g Privacy off? Select and confirm. Select and confirm. Other parties can now join the call. Blocking other parties from joining a call If your phone is not already set to block other parties from joining, you can make this setting manually. This block applies to the current or the next call. [ You are already conducting a call on one line. or ^ Lift the handset.
Making Calls via Multiple Lines Step by step Third-party monitoring During a call, a predefined party can be prompted to join the call as a "witness" using the "Slnt Mon Req" programmed sensor key. Your call partner is not informed that a "witness" is joining the call. The "witness" cannot participate in the call; they can only hear what is being said. When configuring and using third-party monitoring, please note the applicable data protection regulations.
Making Calls via Multiple Lines Step by step Holding and re-accepting a call on a line key Prerequisite: You have accepted a call on a line key (Æ page 90) or you are conducting a consultation call. S Briefly press the line key you are currently using, or Hold? Select and confirm. The line key where the call is on hold flashes slowly. The call can be continued on any phone in the team where the LED for this line key is flashing. Re-accepting T Press the blinking line key. Proceed with your call.
Making Calls via Multiple Lines Step by step Accepting a specific held line A colleague in an open-plan office has parked a call on a line key and requests that you accept the call. You do not have access to this line. ^ Lift the handset. Direct call pickup? Select and confirm. j Enter the phone number of the phone where the call is parked. In this way you can accept the call.
Making Calls via Multiple Lines Step by step Ring transfer If you temporarily leave your workstation or do not wish to be disturbed, you can transfer incoming calls to your line to another destination. A "RTRLN" (ring transfer/line) sensor key can be programmed for each line. Activating S Press the "RTRLN" programmable sensor key. The LEDs on your phone and on the destination phone light up. When you receive a call, the line key flashes but the phone does not ring.
Making Calls in an Executive-Secretary Team Step by step Making Calls in an ExecutiveSecretary Team An executive-secretary team is configured by the relevant service personnel and may include up to four executive and up to two secretary telephones. For information on the meanings of the LED displays of the DSS keys, see Æ page 16.
Making Calls in an Executive-Secretary Team Step by step Accepting calls for the executive phone at the secretary phone When a call is received for the executive phone, the secretary phone rings. ^ Lift the handset. or n Press the key and enter speakerphone mode. Accepting calls for the executive phone when already on a call You are conducting a call. The executive phone receives a call. [ Ask your call partner to wait. T Press the "Pickup" programmed sensor key.
Making Calls in an Executive-Secretary Team Step by step Transferring calls directly to the executive phone When the secretary is out of the office, calls for the executive can be transferred directly to the executive phone. This transfer can be made on the secretary phone or on the executive phone. S Activating: Press the "RT Executive" programmable sensor key. The LED lights up. Deactivating: R Press the "RT Executive" programmable sensor key. The LED goes out.
Making Calls in an Executive-Secretary Team Step by step Using a second (executive) telephone Prerequisite: A second phone is configured for the executive. A "Group Park" sensor key is programmed on the first and second executive phones. Parking a call on the first phone: S Press the "Group Park" programmable sensor key. The LED lights up. Continuing a call on the second phone: ^ Lift the handset. T Press the "Group Park" programmable sensor key.
Making Calls in an Executive-Secretary Team Step by step Using signal call If a "Buzz" programmed sensor key is configured on your executive phone, you can press a key to send a signal call to a specific destination phone (e.g. to a secretary phone). On the destination phone, the phone number of the transmitting phone is also briefly displayed for the signal call. You can press the programmed sensor key in idle mode and while on a call (once or several times).
Individual Phone Configuration Step by step Individual Phone Configuration Display Adjusting the display to a comfortable reading angle You can swivel the display unit. Adjust the display unit so that you can clearly read the screen. Illuminated display During operation and when entering a number, the display automatically lights up. The display lighting switches off automatically a few seconds after finishing the last action.
Individual Phone Configuration Step by step Audio settings Optimize the audio settings on your OpenStage for your environment and according to your personal requirements. Adjusting the ring volume + or - Press one of the keys in idle mode Æ page 19 or while a call is in progress. m Ringer volume? Confirm the option shown. + or - Raise or lower the volume. Keep pressing the key until the desired volume is set. i Save. Adjusting the ring tone + or - Pressing one of the keys in idle mode Æ page 19.
Individual Phone Configuration Step by step Setting the volume of the alert tone + or Warning tone? f The alert tone is output, for example when you receive a second call while a call is in progress. Pressing one of the keys in idle mode Æ page 19. Select and confirm. + or - Modify the volume. Keep pressing the key until the desired volume is set. i Save. Setting rollover volume + or - Pressing one of the keys in idle mode Æ page 19. Rollover Volume? f Select and confirm.
Testing the Telephone Step by step Testing the Telephone Testing functionality You can test and determine your phone’s functionality: • Are all LED keys working? • Is the display working? • Do all keys work? • Are the speaker, handset, ring volume, ring tone, alert tone and speakerphone mode functioning correctly? The following may be checked by service personnel: • Device ID for the phone, • software versionOpenStage • Line power level Prerequisite: The phone is in idle mode Æ page 19.
Special Parallel Call (ONS) Functions Step by step Special Parallel Call (ONS) Functions If your phone is part of an ONS group (ONS = "One Number Service"), you can be reached on all other phones in this group as well as on your own phone. To set up an ONS group, contact your service personnel. An ONS group may consist of up to three phones (phone numbers). ONS group A (master) B C Up to one group member can be an external phone (such as a mobile phone).
Fixing Problems Step by step Fixing Problems Responding to error messages on the screen Possible cause: Time exceeded Maximum input time exceeded. Handset not replaced. Possible response: Make entries more quickly, avoid long pauses between key presses. Possible cause: Please try later System is overloaded, no line free, queue full. Possible response: Wait and try again later. Possible cause: Currently not accessible a) Function is currently not available.
Fixing Problems Step by step Possible cause: Not authorized or Not allowed a) Disabled function selected b) Incorrect PIN entered. Possible response: a) Apply for authorization for disabled function from relevant service personnel. b) Enter correct PIN. Not available Possible cause: Incomplete phone number entered, star or hash key not pressed. Possible response: Enter phone number or code correctly or as instructed. protected Possible cause: Data transfer in process.
Fixing Problems Step by step Troubleshooting Pressed key does not respond: Check if the key is stuck. Telephone does not ring: Check whether the "Do not disturb" function is activated on your telephone Æ page 82. If so, deactivate it. You cannot dial an external number: Check whether your telephone is locked. If the phone is locked, enter your PIN to unlock it Æ page 81. The displayed time is incorrect: The time is corrected automatically over night after 24 hours at the latest.
Index Index Numerics 5-way navigator .......................................... 15 A Accept call (executive-secretary) ........................... 104 Alternating ................................................... 33 Answering calls with line keys .......................................... 90 Audio controls ............................................ 14 Audio keys ................................................... 14 Automatic call forwarding ......................... 66 Automatic consultation ........
Index K Key modules ............................................... 13 Keypad ......................................................... 17 Privacy .......................................................... 81 Private line ................................................... 88 Programmable sensor keys ...................... 16 L R LED line key ..................................................... 89 LED display direct station selection keys ................. 16 function keys ............................
Index U Unanswered calls ...................................... 25 User interface ............................................. 11 User support ................................................. 9 V Variable call forwarding ............................. 38 Variable forwarding types ......................... 39 Voicemails ............................................. 23, 94 Volume set .............................................................
All Service Menu Functions All Service Menu Functions N Open the service menu and d, b select a function. Alternatively, you can use service codes (see table), e.g. 2 1 for "Second call on/off". 1 Destinations 1 2 3 4 5 6 7 Set up call forwarding Save speed dial number Redialing Repdial DSS Save forwarding station no. Call log 1 2 3 4 5 6 7 2 Relay 3 Use speed dialing Prog. feature key Second call Do not disturb on/off Spk.
Copyright © Siemens Enterprise Communications GmbH & Co. KG 11.09.07 Hofmannstr. 51, D-81359 Munich Reference No.: A31003-S2000-U105-1-7619 The information provided in this brochure contains merely general descriptions or characteristics of performance which in case of actual use do not always apply as described or which may change as the result of further development of the products. An obligation to provide the respective characteristics shall only exist if expressly agreed in the terms of the contract.