
Instruction manual

Installation en
15
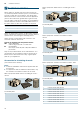
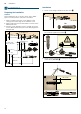
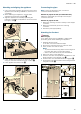
Attaching and aligning the appliance
1. First, remove the protective foil from the back of the
appliance and, following installation, remove the foil
completely.
2. When attaching the appliance, ensure that it
engages firmly with the brackets. «
3. Align the appliance horizontally by turning the
brackets. If required, the appliance can be moved to
the right or left. ¬
4. Firmly tighten the screws for the brackets. When
doing so, hold the brackets securely in place. ®
5. Firmly tighten the knurled nuts. ¯
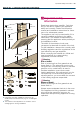
Connecting the pipes
Note: If using an aluminium pipe, smooth the
connection area beforehand.
Exhaust-air pipe Ø 150 mm (recommended size)
Attach the exhaust-air pipe directly to the air-pipe
connector and seal.
Exhaust-air pipe Ø 120 mm
1. Attach the reducing connector directly to the air-pipe
connector.
2. Attach the exhaust air pipe to the reducing
connector.
3. Seal both joints appropriately.
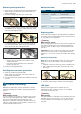
Attaching the flue duct
:Warning
Risk of injury!
From sharp edges during installation. Always wear
protective gloves while installing the appliance.
1. Separate the flue ducts.
To do this, remove the adhesive tape.
2. Remove the protective foil from both flue ducts.
3. Push one flue duct into the other.
Notes
– To prevent scratches, lay paper over the edges of
the lower flue duct to protect the surface.
– Slots of the inner flue duct point downwards.
4. Place flue ducts on the appliance.
5. Push the inner flue duct upwards and attach it to the
fixing brackets on the left and right. ¨
6. Press the flue duct downwards until it engages. ©
7. Screw the flue duct to the sides of the fixing bracket
using two screws. ª
'
(
)
*
[
$
%
&