Built-in oven HN878G4.
en Table of contents no i t cur t sen I 8 Intended use . . . . . . . . . . . . . . . . . . . . . . . . . . . . . 4 ( Important safety information . . . . . . . . . . . . . . . 5 General information Microwave . . . . . . . Steam. . . . . . . . . . . Meat thermometer . Cleaning function . . . . . . . . . . . . . . . . . . . . . . . . . . . . . . . . . . . . . . . . . . . . . . . . . . . . . . . . . . . . . . . . . . . . . . . . . . . . . . . . . . . . . . . . . . . . . . . . . . . . . .
en Intended use P Dishes . . . . . . . . . . . . . . . . . . . . . . . . . . . . . . . . . 34 Information on the settings . . Selecting a dish . . . . . . . . . . Baking sensor . . . . . . . . . . . Applying settings for dishes . . . . . . . . . . . . . . . . . . . . . . . . . . . . . . . . . . . . . . . . . . . . . . . . . . . . . . . . . . . . . . . . . . . . . . . . . . 34 . 34 . 35 . 35 J Tested for you in our cooking studio . . . . . . . . 36 Do not use silicone moulds . . . . . .
Important safety information (Important safety information General information no i t amro f n i y t e f as t na t ropmI : Warning – Risk of fire! Combustible items stored in the cooking compartment may catch fire. Never store combustible items in the cooking compartment. Never open the appliance door if there is smoke inside. Switch off the appliance and unplug it from the mains or switch off the circuit breaker in the fuse box. Risk fire! is created when the appliance ■ A of draught door is opened.
en Important safety information Risk Food of fire! may catch fire. Never heat food in heat-retaining packages. Do not leave food heating unattended in containers made of plastic, paper or other combustible materials. Do not select a microwave power or time setting that is higher than necessary. Follow the information provided in this instruction manual. Never use the microwave to dry food. Never defrost or heat food with a low water content, e.g. bread, at too high a microwave power or for too long.
Causes of damage : Warning – Risk of injury and risk of fire! Flammable liquids can catch fire in the cooking compartment when it is hot (explosion). Do not fill the water tank with any flammable fluids (e.g. alcoholic drinks). Only fill the water tank with water or with the descaling solution that is recommended by us. Meat thermometer : Warning – Risk of electric shock! The insulation of an incompatible meat thermometer may be damaged.
en Environmental protection Microwave Caution! ■ Creation of sparks: Metal – e.g. a spoon in a glass – must be kept at least 2 cm from the cooking compartment walls and the inside of the door. Sparks can irreparably damage the glass on the inside of the door. ■ Combining accessories: Do not combine the wire rack with the universal pan. Sparks may be created if they are inserted directly on top of one another. Only insert them into their own shelf level.
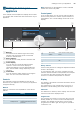
Getting to know your appliance *Getting to know your appliance Note: Depending on the appliance model, individual details and colours may differ. In this chapter, we will explain the displays and controls. You will also find out about the various functions of your appliance. In the control panel, you can use the various buttons and the rotary selector to set the required function of the appliance. The current settings are shown on the display.
en Getting to know your appliance Countdown If you have started your appliance without a cooking time, you can see how long the operation has already been running for at the top right in the status bar. If you had set a cooking time and it was deleted, the countdown applies the time that has already elapsed and continues to count down from this time. You can therefore always check how long the operation has already been running.
Getting to know your appliance en ; & . Pizza setting 30-275 °C Intensive heat 30-300 °C Slow cooking 70-120 °C $ ' R ˆ , Bottom heating 30-250 °C Drying 30-150 °C For preparing pizza and dishes which require a lot of heat from underneath. The bottom heating element and the ring heating element in the back panel heat up. For dishes with a crispy base. The heat is emitted from above and more intensively from below.
en Accessories _Accessories Your appliance is accompanied by a range of accessories. Here, you can find an overview of the accessories included and information on how to use them correctly. Inserting accessories The cooking compartment has five shelf positions. The shelf positions are counted from the bottom up. se i r os ec A Accessories included Your appliance is equipped with the following accessories: Wire rack For ovenware, cake tins and ovenproof dishes. For roasts and grilled food.
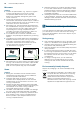
Accessories When inserting the wire rack, ensure that the catch tappet ‚ is at the rear and is facing downwards. The lettering "microwave" must be at the front and the outer rail must face downwards ¾. D D When inserting baking trays, ensure that the catch tappet ‚ is at the rear and is facing downwards. The sloping edge of the accessory ƒ must be facing forwards towards the appliance door.
en Before using for the first time KBefore using for the first time Before you can use your new appliance, you must make some settings. You must also clean the cooking compartment and accessories. 1. Use the rotary selector to set the current time. 2. Touch the Æ arrow Setting the date The default date is 1.1.2014.
Operating the appliance 1Operating the appliance You have already learnt about the controls and how they work. Now we will explain how to set your appliance. You will learn about what happens when you switch the appliance on and off, and how to select the operating mode. en Selecting an operating mode When you select an operating mode, the appliance must be switched on. ecna i l p a eh t gn i t arepO Switching the appliance on and off Before you are able to set the appliance, you must switch it on.
en Time-setting options Rapid heat up You can use the c button to heat up the cooking compartment particularly quickly. The rapid heat up function is not possible for all types of heating. Suitable types of heating: : % & OTime-setting options Your appliance has different time-setting options.
Time-setting options Cooking time If you set the cooking time for your meal, the operation stops automatically once this time has elapsed. The oven stops heating. The maximum setting you can apply is 23 hours and 59 minutes. Prerequisite: A type of heating and a temperature have been set. For example: Setting for 4D hot air, 180 °C, cooking time 45 minutes. 1. Press the will be ready at 10:15, but you would like it to be ready at 12:45 instead. 1. Touch the "End y" field. The end time is displayed.
en Childproof lock AChildproof lock Your appliance is equipped with a childproof lock so that children cannot switch it on accidentally or change any settings. kco l f o rpd l i hC Activating and deactivating You can activate and deactivate the childproof lock when the appliance is switched on or off. In each case, press the / button for approx. 4 seconds. A confirmation note appears in the display and the / symbol appears in the status bar.
Microwave Changing the time You can change the time in the basic settings. For example: Changing from summer to winter time. 1. Press the menu button. 2. 3. 4. 5. The operating modes menu opens. Touch "Settings". Touch the arrow Æ to move to "Clock". Use the rotary selector to change the time. Press the menu button. "Save" or "Discard" appears on the display. Power cut Following a long power cut, the settings for initial use are shown in the display. Reset the language, time and date.
en Microwave ( * Grill, large area Grill, small area 1. Press the menu button. The operating modes menu opens. 2. Select the "Microwave combination" operating mode. A type of heating, temperature, microwave output setting and cooking time are suggested. 3. Touch the appropriate field and use the rotary selector to set the required values. 4. Press the Start/Stop button to start. The cooking time starts counting down. touch the appropriate field and enter a cooking time. The operation starts again.
Steam `Steam With some types of heating, you can prepare food with steam assistance. In addition, the Dough proving and Reheating types of heating are available. mae tS : Warning – Risk of scalding! When you open the appliance door, hot steam can escape. Steam may not be visible, depending on its temperature. When opening, do not stand too close to the appliance. Open the appliance door carefully. Keep children away.
en Steam Prove dough Dough will prove considerably more quickly using the "Dough proving R" type of heating than at room temperature and does not dry out. Use the information in the tables to select the appropriate setting. ~ "Tested for you in our cooking studio" on page 36 Do not use distilled water, highly chlorinated tap water (> 40 mg/l) or other liquids. Only use cold, fresh tap water, softened water or uncarbonated mineral water.
Steam 9. Slowly push the control panel downwards and then towards the rear until it is closed completely. The water tank has been filled. You can start operations with steam. Refilling the water tank If the water tank runs dry during a steam operation, a message appears on the display prompting you to fill up the water tank. Notes ■ Steam-assisted operations continue without adding steam.
en Meat thermometer @Meat thermometer The meat thermometer Plus makes precise cooking possible. It measures the temperature inside the food. Once the set temperature has been reached, the appliance automatically switches itself off. re t emo reh t t aeM Meat: For large pieces of meat, insert the meat thermometer at an angle from above as far as it will go into the meat. For relatively thin pieces of meat, insert the meat thermometer from the side at the thickest point.
Sabbath mode Once the set core temperature in the food has been reached An audible signal sounds. The oven stops heating. You can unplug the meat thermometer from the socket. The. symbol goes out. 1. Press the On/Off button. 2. 3. Changing the core temperature You can change the core temperature at any time. 4. Cancelling Unplug the meat thermometer from the socket. 5. 6. : Warning – Risk of burns! The cooking interior and the core temperature probe become very hot.
en Cleaning agent heating elements. Always allow the appliance to cool down. Keep children at a safe distance. Area Cleaning Appliance exterior Stainless steel Hot soapy water: front Clean with a dish cloth and then dry with a soft cloth. Remove flecks of limescale, grease, starch and albumin (e.g. egg white) immediately. Corrosion can form under such flecks. Special stainless steel cleaning products suitable for hot surfaces are available from our after-sales service or from specialist retailers.
Cleaning function en .Cleaning function the cleaning function are listed in the table for special accessories. ~ "Accessories" on page 12 Your appliance is equipped with the "Self-cleaning" and "Descaling" operating modes.You can use the "Selfcleaning" operating mode to clean the cooking compartment effortlessly. You can use the "Descaling" operating mode to remove limescale from the evaporator.
en Cleaning function Once the cleaning function has ended Once the cooking compartment has cooled down, use a damp cloth to wipe off the ash that has been left behind in the cooking compartment, in the accessories, on the shelves and around the appliance door. Wipe the pull-out rails with a damp cloth. Then slide the pull-out rails in and out several times. After cleaning, some discolouration may remain on the pull-out rails. This has no effect on performance.
Rails en 3. Use the hook to attach the rear holder into the upper hole ‚ and push it into the lower hole ƒ (fig. #). pRails With good care and cleaning, your appliance will retain its appearance and remain fully functional for a long time to come. This will tell you how to remove the shelves and clean them. s l i aR D Detaching and refitting the rails E : Warning – Risk of burns! The rails become very hot. Never touch the hot rails. Always allow the appliance to cool down.
Appliance door en qAppliance door With good care and cleaning, your appliance will retain its appearance and remain fully functional for a long time to come. This will tell you how to clean the appliance door. Removing and fitting the door panels To facilitate cleaning, you can remove the glass panels from the appliance door. r o d e c na i l p A Removing the door cover The stainless-steel inlay in the door cover may become discoloured. To carry out thorough cleaning, you can remove the cover.
Appliance door : Warning – Risk of serious damage to health! If the screws are loosened, the safety of the appliance can no longer be guaranteed. Microwave energy may escape. Never loosen the screws. Do not unscrew the four black screws (fig. &). 5. Press the front panel down until it clicks audibly into place (fig. %). 6. Open the appliance door again slightly and remove the tea towel. 7. Screw both screws back in on the left and right. 8.
en Trouble shooting 3Trouble shooting information. ~ "Tested for you in our cooking studio" on page 36 If a fault occurs, there is often a simple explanation. Before calling the after-sales service, please refer to the fault table and attempt to correct the fault yourself.
Customer service The appliance will not start and "Cooking compartment too hot" appears on the display The cooking compartment is too hot for the selected dish or type of heating en Allow the cooking compartment to cool down and start again -------- Maximum operating time exceeded Your appliance automatically ends the operation if no duration has been set and the setting has not been changed for a long time. The point at which this occurs depends on the temperature or grill setting that has been set.
en Dishes PDishes temperature. When opening, do not stand too close to the appliance. Open the appliance door carefully. Keep children away. You can use the "Dishes" operating mode to prepare a wide variety of food. The appliance chooses the optimal setting for you. To achieve good results, the cooking compartment must not be too hot for the type of food you have selected. If it is, a message will appear on the display. Allow the cooking compartment to cool down and start again.
Dishes Categories Food Vegetables Menu Baked goods Side dishes Bread, bread rolls Cake Meat, poultry Fish Reheat, crisp up Defrosting food Baking sensor en Applying settings for dishes You will be guided through the entire setting process for your chosen food. Always touch the "Next" field. 1. Press the menu button. The operating modes menu opens. 2. Select the "Dishes" operating mode. The first category appears in the display. 3. Use the rotary selector to select the required 4. 5. 6. 7.
en Tested for you in our cooking studio JTested for you in our cooking studio Here, you can find a selection of dishes and the ideal settings for them. We will show you which type of heating and temperature are best suited to your dish. You will get information on suitable cooking accessories and the height at which they should be placed in the oven. You will also get tips about cookware and preparation methods.
Tested for you in our cooking studio Baking tins Dark- coloured metal baking tins are most suitable. Tinplate baking tins, ceramic dishes and glass dishes extend baking time and mean that the baked item will not brown evenly. If you wish to bake using these baking tins/dishes and using top/bottom heating, slide in the tin/dish at level 1. The baking tins must be resistant to heat and steam for use in steam-assisted baking.
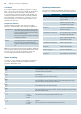
en Tested for you in our cooking studio Dish Accessories/cookware Biscuits baking tray Shelf position 3 Small Cakes 12-cup-tin 3 Puff pastry slices baking tray 3 Puff pastry slices baking tray 3 Jam tarts 12-cup-tin 3 Meringue baking tray 3 Pavlova baking tray 3 Soufflé 1,2L-soufflé dish 2 Soufflé 1,2L-soufflé dish 2 Soufflé individual moulds 2 Choux pastry baking tray 3 Choux pastry baking tray 3 Meat Pie rectangular pie tin 2 Meat Pie rectangular pie tin 2 Yor
Tested for you in our cooking studio Small baked items stick to one another during baking. The cake is too dry. The cake is generally too light in colour. The cake is too light on top, and too dark underneath. The cake is too dark on top, and too light underneath. Cakes baked in a tray or tin are too brown at the back. The whole cake is too dark. The cake is unevenly browned. You were baking on several levels. The items on the top baking tray are darker than those on the lower baking tray.
en Tested for you in our cooking studio roasting dish, it will need a little more liquid than if cooked in glass cookware. The steam evaporates in the cookware when roasting. Carefully pour in more liquid if required. Shiny roasting dishes made from stainless steel or aluminium reflect heat like a mirror and are therefore not particularly suitable. The meat cooks more slowly and will not brown so much. Use a higher temperature and/or a longer cooking time.
Tested for you in our cooking studio Types of heating used: ■ : 4D hot air ■ 4 Circulated air grilling en The levels of steam intensity are indicated as numbers in the table: 1 = Low 2 = Medium 3 = High ■ ■ ■ Dish Accessories/cookware Shelf position Type of heating Temperature in °C Steam in- Cooking tensity time in mins.
en Tested for you in our cooking studio Dish Accessories/cookware Turkey, crown, 3 kg wire rack Shelf position 2 Turkey, thighs wire rack 2 Turkey, whole, 4-8 kg***** wire rack 2 Turkey, whole, 7 kg wire rack 2 Meat dishes Meat loaf cookware, uncovered 2 Meat loaf, 1 kg cookware, uncovered 2 Meat loaf, 1 kg cookware, uncovered Temperature in °C 140-150 Steam in- Cooking tensity time in mins.
Tested for you in our cooking studio Grilling Here, you can find information on grilling poultry, meat and fish, as well as toast. You can find the ideal settings for certain dishes in the settings tables. Grilling with circulated air Circulated air grilling is very well suited to the preparation of whole poultry, fish, and also meat, e.g. roast pork with crackling. Poultry For duck or goose, pierce the skin on the underside of the wings. This allows the fat to run out.
en Tested for you in our cooking studio double the quantity equates to roughly double the cooking time. types and additional information. ~ "Meat thermometer" on page 24 Always use heat-resistant cookware that is suitable for use in microwaves. Roasting dishes made from metal or Römertopf dishes are only suitable for roasting without using the microwave. Observe the notes on cookware suitable for microwaves.
Tested for you in our cooking studio Types of heating used: ■ 4 Circulated air grilling ■ ( Grill, large area en The levels of steam intensity are indicated as numbers in the table: ■ ■ ■ 1 = Low 2 = Medium 3 = High Dish Accessories/cookware Shelf position Type of heating Temperature in °C / MW power Grill setting in watts Steam in- Cooking time tensity in mins.
en Tested for you in our cooking studio Dish Accessories/cookware Poultry Chicken drumstick, 150 g wire rack each Chicken drumstick, 150 g wire rack each Chicken breast, boned, wire rack 150 g each Shelf position Type of heating Temperature in °C / MW power Grill setting in watts Steam in- Cooking time tensity in mins.
Tested for you in our cooking studio Convenience products Here, you can find the ideal settings for preparing chilled and frozen food. Only use original accessories supplied with your appliance. These have been tailored to the cooking compartment and the operating modes of your appliance. Tips ■ The cooking result greatly depends on the quality of the food. Pre-browning and unevenness may already be present on the packaged product. ■ Do not use frozen products that are heavily frosted.
en Tested for you in our cooking studio Types of heating used: ■ : 4D hot air ■ % Top/bottom heating ■ ; Pizza setting ■ , coolStart function The levels of steam intensity are indicated as numbers in the table: ■ ■ ■ 1 = Low 2 = Medium 3 = High Dish Accessories/cookware Shelf position Type of heating Temperature in °C MW power in watts Steam in- Cooking tensity time in mins.
Tested for you in our cooking studio Microwave Preparing food in a microwave is ideal if time is of the essence. Place the cookware onto the wire rack. Always use heat-resistant cookware that is suitable for use in microwaves. Observe the notes on cookware suitable for microwaves. ~ "Microwave" on page 19 Slide the wire rack in at the indicated shelf position with the imprint "Microwave" facing the appliance door and the outer rail facing downwards.
en Tested for you in our cooking studio Dish Cookware Shelf position Type of heating MW power in watts Cooking time in mins.
Tested for you in our cooking studio Save energy with Eco heating types When cooking food, you can save energy using the energy-efficient heating types "Hotair Eco" and "Top/ bottom heating Eco". Place the food into the empty cooking compartment before it has heated up. Otherwise, energy optimisation will not have any effect. Always keep the appliance door closed when cooking. Remove unused accessories from the cooking compartment. This will allow you to achieve ideal cooking results and save energy.
en Tested for you in our cooking studio Dish Accessories/cookware Shelf position Type of heating Temperature in °C Cooking time in mins. Fish Fish, braised, whole 300 g, e. g. trout cookware, covered 2 190-210 25-35 Fish, braised, whole 1,5kg, e. g.
Tested for you in our cooking studio Type of heating used: en . Slow cooking ■ Dish Cookware Shelf posi- Type of tion heating Searing time Temperain mins. ture in °C Cooking time in mins. Poultry Duck breast, 400 g Cookware, uncovered 2 6-8 90* 45-60 Chicken breast fillet, 200 g each Cookware, uncovered 2 5-7 90* 30-60 Turkey breast, boned, 1 kg Cookware, uncovered 2 . . . 8-10 90* 150-210 Cookware, uncovered 2 .
en Tested for you in our cooking studio Recommended setting values In the table, you can find settings for drying various foodstuffs. The temperature and cooking time are dependent on the type, moisture, ripeness and thickness of the food to be dried. The longer you leave the food to be dried, the better it will be preserved. The thinner the slices are, the quicker the drying process will be and the more aromatic the dried food will remain. Setting ranges are indicated for this reason.
Tested for you in our cooking studio influenced by room temperature, the number of jars, quantity, heat and quality of the jar contents. The specifications are based on 1-litre round jars. Before you switch off the appliance or change the cooking mode, check whether the contents of the jars are en bubbling as they should. The bubbling process starts after approx. 30-60 minutes. Type of heating used: ■ : 4D hot air Dish Cookware Shelf posi- Type of tion heating Temperature in °C Cooking time in mins.
en Tested for you in our cooking studio Dish Accessories/cookware Shelf posi- Type of tion heating Temperature in °C Bread rolls Bowl 2 35-40 Cooking time in mins. 30-40 Universal pan 3 35-40 15-25 Defrosting Use the "Microwave" operation mode to defrost frozen fruit, vegetables, poultry, meat, fish and baked items. Remove the frozen food from its packaging and place it onto the wire rack in cookware suitable for microwave use. Observe the notes on cookware suitable for microwaves.
Tested for you in our cooking studio Dish Accessories/cookware Shelf posi- Type of tion heating Whole pieces of meat, e.g. joint (raw meat), 1.5 kg* Cookware, uncovered 2 Ý Meat, in pieces or slices, e.g.
en Tested for you in our cooking studio Caution! Creation of sparks: Metal – e.g. a spoon in a glass – must be kept at least 2 cm from the cooking compartment walls and the inside of the door. Sparks can irreparably damage the glass on the inside of the door. Reheating Using heating type "Reheating", food is reheated gently using steam. It tastes and looks as though it has been freshly prepared. Even baked items from the day before can be re-crisped.
Tested for you in our cooking studio en Dish Accessories/cookware Shelf posi- Type of tion heating Temperature in °C Bakes, 400 g, e.g. lasagne, potato gratin Pizza, cooked Cookware, uncovered 2 Ý - MW power in Cooking watts time in mins. 600 5-10 Wire rack 2 Q 170-180* - 5-15 Dishes, frozen Plated meal, 1 portion Cookware, covered 2 - 600 11-15 Soup, stew, 200 ml (stir well) Cookware, covered 2 - 900 2-4 Side dishes, 500 g, e.g.
en Tested for you in our cooking studio Types of heating used: ■ : 4D hot air ■ % Top/bottom heating ■ ; Pizza setting ■ & Intensive heat The levels of steam intensity are indicated as numbers in the table: ■ ■ ■ 1 = Low 2 = Medium 3 = High Dish Accessories/cookware Shelf posi- Type of tion heating Temperature in °C Steam in- Cooking tensity time in mins.
Tested for you in our cooking studio Preparing food with a microwave When preparing food in a microwave, always use cookware which is heat-resistant and suitable for microwave use. Observe the notes on cookware suitable for microwaves. ~ "Microwave" on page 19 If you place your cookware onto the wire rack, slide the wire rack in with the imprint "Microwave" facing the appliance door and the outer rail facing downwards.
6
%6+ +DXVJHUlWH *PE+ &DUO :HU\ 6WU 0QFKHQ *(50$1< VLHPHQV KRPH FRP .