>HQ@ ,QVWUXFWLRQ PDQXDO +% % %XLOW LQ RYHQ
Ú Table of contents e[nuoIrs]ctimanul Important safety information .................................................... 2 Causes of damage .............................................................................4 Your new oven............................................................................ 4 Control panel .......................................................................................4 Function control knob ........................................................................
Children must not play with, on, or around the appliance. Children must not clean the appliance or carry out general maintenance unless they are at least 8 years old and are being supervised. Keep children below the age of 8 years old at a safe distance from the appliance and power cable. Always slide accessories into the cooking compartment correctly. See "Description of accessories in the instruction manual. Risk of fire! ■ Combustible items stored in the cooking compartment may catch fire.
Risk of burns! ■ The cooking compartment will become very hot during the Self-cleaning cycle. Never open the appliance door or move the locking latch by hand. Allow the appliance to cool down. Keep children at a safe distance. ■ ; The appliance will become very hot on the outside during the Self-cleaning cycle. Never touch the appliance door. Allow the appliance to cool down. Keep children at a safe distance.
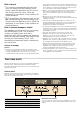
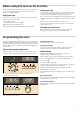
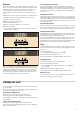
Function control knob Temperature control knob The function control knob is used to select the type of heating. The temperature control knob is used to select the temperature and the grill power or cleaning level. Setting Û Zero setting : 3D hot air Use The oven is off. For cakes and pastries. You can bake cakes and pastries on three levels. A fan located on the rear wall of the oven disperses the heat evenly. Setting Meaning 30-270 Temperature range The oven's temperature in ºC.
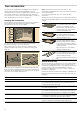
Your accessories The accessories supplied with your appliance are suitable for making many meals. Ensure that you always insert the accessories into the cooking compartment the right way round. Note: Accessories may deform as they heat up. This deformation will disappear when they cool. This does not affect the normal operation. There is also a selection of optional accessories, with which you can improve on some of your favourite dishes, or simply to make working with your oven more convenient.
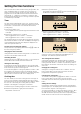
Before using the oven for the first time In this section, you can find out what you must do before using your oven to prepare food for the first time. First read the section on Safety information. Setting the time Heating the oven To remove the "new" smell, heat the oven empty with the door closed. The most effective option is to heat the oven for one hour with the top and bottom heating elements % set at 240 ºC. Check that no packaging has been left inside the oven.
Setting the time functions This oven has various time functions. Using the 0 button, the menu is displayed and you can step from one function to another. The time symbols remain lit up while settings are programmed. The arrow N shows the selected time function. Using the @ or A buttons it is possible to change the time function that has already been set, as long as the time symbol is indicated by the arrow N. 3. Press the 0 button twice. The display panel will show ‹:‹‹.
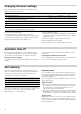
End time The oven allows you to set the time when you want the food ready. The oven switches on automatically and switches off at the set time. E.g. the food may be placed in the oven in the morning and the oven set so that it is ready at midday. Ensure that the food will not go off if it is in the oven for too long. Example in the picture: It is now 10:30 am, the cooking time is 45 minutes and the oven should switch off at 12:30 pm. 1. Set the function control knob. 2. Set the temperature control knob. 3.
Changing the basic settings This oven has different basic settings. The settings can be adapted to the user's own needs. Basic setting Selection ‹ Selection ‚ Selection ƒ Selection „ ™‹‹ Display brightness - low medium* high ™‹‚ Duration of signal after the cooking time or the - approx. 10 sec. approx. 2 min* approx. 5 min. ™‹ƒ Time indicator only when working** always* - ™‹„ Time until a setting is applied - approx. 2 sec. approx. 5 sec* approx. 10 sec.
Before using the self-clean function Setting The oven must be empty. Remove accessories, pans, guides or left and right hand side rails. See the Cleaning and Care chapter to release the guides or left and right hand side rails. Once the cleaning level has been selected, set the oven. 1. Select the Self-cleaning x function with the function control knob. 2. Select the cleaning level with the temperature control knob.
Care and cleaning If cleaned and properly cared for, your oven will keep its bright appearance and operating performance for many years to come. Advice on how to care for and clean your oven is provided below. Zone Cleaning products Inside the oven Hot water with a little soap or water and vinegar: Clean with a dishcloth. Notes ■ Different colours may be seen in your front panel due to the various materials used in its manufacture, such as glass, plastic and metal.
Install the wire shelves or rails Hanging the door 1. First insert the shelf or the rail in the rear groove by pushing it Rehang the door by following the same steps but in reverse order. 2. then insert it in the front groove (figure B). 1. When refitting the door, check that both hinges are back slightly (figure A) $ % positioned exactly inside their respective openings (picture A). 2. The bottom groove of the hinges must fit snugly on both sides.
3. Completely remove the door base (figure C). Installing When installing the glass, check that the phrase "right above" on the bottom left-hand side is upside down. & 1. Insert the interior glass, tilting it upwards and then inserting it downwards (figure A). $ 4. Remove the two clips from the top of the glass (figure D). To do this, slightly press down on the clip with your thumb and pull on the tab with your index finger (figure E). ' ( 2.
Troubleshooting Quite often, when there is a malfunction, it is usually a small irregularity which is easy to rectify. Before contacting the Technical Assistance Service, try to determine the cause of the fault using the following table. Troubleshooting table Fault Possible cause Solution/advice The oven does The fuse has not work. blown. Power cut. 0 lights up on Power cut. Check the condition of the fuse in the fuse box. Check that the light in the kitchen and other household appliances are working.
After-sales service Our after-sales service is there for you if your appliance needs to be repaired. We will always find the right solution in order to avoid unnecessary visits from a service technician. Please note that there will be a fee for a visit by a service technician in the event of a malfunction, even during the warranty period. E number and FD number Please find the contact data of all countries in the enclosed customer service list. When calling us, please give the product number (E no.
Accessory Water sponge cake Level Temperature Cooking time, in °C minutes wire shelf + black enamel baking tin 2 165-175 35-45 Traditional Spanish sponge cake, 3 eggs wire shelf + black enamel baking tin 1 160-170 45-55 Apple tart universal deep tray 170-180 65-75 3 Pastries and biscuits flat oven tray 3 130-140 20-30 Nut triangles flat oven tray 3 185-195 35-45 Butter buns (12 buns) flat oven tray 3 170-180 20-25 Swiss roll flat oven tray 3 160-170 15-20 Fairy cakes flat
Tested for you in our cooking studio Here you will find a selection of dishes and the ideal settings for them. We will show you which type of heating and which temperature are best suited for your dish. You can find information about suitable accessories and the height at which they should be inserted. There are also tips about cookware and preparation methods. Trays put in the oven at the same time are not necessarily ready at the same time. In these tables you will find numerous tips for your dishes.
Dish Accessories Level Type of heating Temperature Cooking time, in °C minutes Puff pastry Universal tray 3 : 190-200 25-35 Universal tray + oven tray 3+1 : 190-200 30-40 2 oven trays + universal tray 5+3+1 : 170-180 35-45 Meringue (preheat for 10 minutes) Universal tray 3 : 80-90 180-210 Butter cookies (preheat) Universal tray 3 % 150-160 20-30 Universal tray 3 : 140-150 20-30 Universal tray + oven tray 3+1 : 140-150 25-35 2 oven trays + universal tray 5+3+1 :
Grilling Always use the grill with the oven closed. For grilling, preheat the oven for about 3 minutes before the food is placed inside the oven. In so far as it is possible, use pieces of the same thickness. This will help them brown evenly and remain juicy. Salt the fillets after grilling. Turn the pieces after Z the time has elapsed. Place the pieces directly on the wire shelf. If only one piece is prepared, it is best if placed in the centre of the wire shelf.
Cooking a meal With the 3D : Hot air function a complete meal can be prepared in the oven. The heat of the oven is used to the maximum. Smells or flavours are not transferred with hot air. Place the pan on a wire shelf. Meal Cookware Level Temperature in °C Cooking time, Notes minutes Boneless leg of lamb, rolled, 1.3 kg, medium well and roast potatoes Open pan 1 180 100 Tart Corrugated tart baking tin, Ø 31 cm.
Special dishes 3. Pour the mixture into jars or bowls and cover them with At low temperatures, a good creamy yoghurt and a spongy yeast dough can be obtained. 4. Preheat the oven as instructed. transparent film. First remove accessories and wire shelves or left and righthand side rails from inside the oven. 5. Now, place the bowls or jars on the bottom of the oven and Making yoghurt Leaving yeast dough to rise 1. Boil 1 litre of milk (3.5 % fat) and allow it to cool to about 1.
Jam making For cooking, the jars and the elastic bands must be clean and in perfect condition. Whenever possible, use jars of equal sizes. The values in the tables are given for round 1-Litre jars. Caution! 3. Place a cover and wet elastic band on each jar. 4. Close the jars with clamps. Do not place more than six jars in the oven at the same time. Do not use larger or taller jars. Their lids could explode. Setting Only use fruit and vegetables that are in good condition. Clean them well. 1.
Acrylamide in food Acrylamide is produced particularly in cereal and potato products prepared at high temperatures, e. g., chips, toast, rolls, bread and pastries (biscuits, spiced biscuits, Christmas biscuits). Tips for preparing food with a low acrylamide content General Baking ■ Keep the cooking time to a minimum. ■ Brown the food, making sure it is not overtoasted. ■ Large, thick pieces of food contain a low acrylamide content. With top and bottom heat max. 200 °C With 3D Hot air max. 180 °C.
Dish Accessories and tins Level Type of heating Temperature Time in in °C minutes Flat yeast cake Universal tray 3 % 160-180 30-40 Universal tray 3 : 150-170 30-45 Universal tray + oven tray 3+1 : 160-170 30-40 Wire shelf + 2 springform tins Ø 20 cm. 1 % 190-210 70-90 2 wire shelves + 2 springform tins Ø 20 cm.
Siemens-Electrogeräte GmbH Carl-Wery-Straße 34 81739 München Germany *9000974312* 9000974312 00 940210