SpeedStream® 2614 4-Port DSL/Cable Router User Guide Part No.
TABLE OF CONTENTS 1 Introduction . . . . . . . . . . . . . . . . . . . . . . . . . . . . . . . . . . . . . . . . . . . . . . . . . . . . . . . . . 1-1 About the SpeedStream 2614 . . . . . . . . . . . . . . . . . . . . . . . . . . . . . . . . . . . . . . . . . . . . . . . . . . . . . 1-1 Features and Benefits . . . . . . . . . . . . . . . . . . . . . . . . . . . . . . . . . . . . . . . . . . . . . . . . . . . . . . . . . . . 1-1 Applications . . . . . . . . . . . . . . . . . . . . . . . . . . . . . . . . .
5 Configuring Printer Services . . . . . . . . . . . . . . . . . . . . . . . . . . . . . . . . . . . . . . . . . . . 5-1 Install the Print Server Program . . . . . . . . . . . . . . . . . . . . . . . . . . . . . . . . . . . . . . . . . . . . . . . . . . . . . . . 5-1 Configure the Printer Port . . . . . . . . . . . . . . . . . . . . . . . . . . . . . . . . . . . . . . . . . . . . . . . . . . . . . . . . . . . 5-4 Windows 95/98/NT/ME . . . . . . . . . . . . . . . . . . . . . . . . . . . . . . . . . . . . .
CHAPTER 1 INTRODUCTION Congratulations on your purchase of the SpeedStream 2614 DSL/Cable Router. Siemens is proud to provide you with a powerful yet simple communication device for connecting your local area network (LAN) to the Internet. About the SpeedStream 2614 The SpeedStream 2614 provides Internet access to multiple users by sharing a single-user account.
Applications The SpeedStream 2614 by Siemens provides many advanced features and functionality: • LAN Access – The SpeedStream 2614 provides connectivity to 10/100 Mbps devices, making it easy to create a network in small offices or homes. • Internet Access – This device supports Internet access through an xDSL, cable, ISDN or PSTN connection.
CHAPTER 2 INSTALLING THE SPEEDSTREAM 2614 Before installing the SpeedStream 2614 DSL/Cable Router, verify that you have all the items listed under “Package Contents,” and that you have all the necessary cabling. If any of the items are missing or damaged, contact Technical Support (see Appendix A, “Troubleshooting”). After installing the SpeedStream 2614, refer to the subsequent chapters for additional instructions: • Chapter 3, “Configuring the SpeedStream 2614” to configure the router settings.
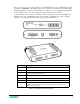
These ports can auto-negotiate the operating speed to 10/100 Mbps, the mode to half/full duplex, and the pin signals to MDI/MDI-X, allowing these ports to be connected to any network device with straightthrough cable. The ports can be connected directly to a computer or to a server equipped with an Ethernet network interface card, or to a networking device such as an Ethernet hub or switch. • (1) RJ-45 WAN port for connection to an xDSL or cable modem.
System Requirements You must have access to a network that meets the following minimum requirements: • Internet access from your local telephone company or Internet Service Provider (ISP) using an xDSL modem, cable modem, ISDN TA, or PSTN analog modem. You may also have access over the telephone system to an analog modem at another site. • A computer using a fixed IP address or dynamic IP address assignment via DHCP, as well as a Gateway server address and DNS server address from your service provider.
Figure 2-2. Connecting the SpeedStream 2614 Caution Do not plug a phone jack connector into any RJ-45 port. This may damage the SpeedStream 2614. Instead, use only twisted-pair cables with RJ-45 connectors that conform to FCC standards. The four LAN ports on the SpeedStream 2614 can auto-negotiate the connection speed to 10 Mbps Ethernet or 100 Mbps Fast Ethernet, and can negotiate the transmission mode to half-duplex or fullduplex.
If Internet services are provided through an xDSL or cable modem, use unshielded or shielded twistedpair Ethernet cable with RJ-45 plugs to connect the broadband modem directly to the WAN port on the SpeedStream 2614. Use either straight-through or crossover cable depending on the port type provided by the modem (see Appendix B, “Cables”). For ISDN or PSTN service, attach the access device to the RS232 serial port on the SpeedStream 2614 4. Connect a printer.
7. Configure the SpeedStream 2614. Configure the SpeedStream 2614 as detailed in Chapter 3, “Configuring the SpeedStream 2614.”. 8. Configure TCP/IP. Configure the TCP/IP protocol on your network computers as detailed in Chapter 4, “Configuring Client TCP/IP.” If TCP/IP is not on your system, this chapter also includes installation instructions. 9. Install the Printer Port Monitor and configure printer services.
CHAPTER 3 CONFIGURING THE SPEEDSTREAM 2614 Before you can configure the SpeedStream 2614 DSL/Cable Router, the TCP/IP protocol must be installed on all computers on your network. If you need to install TCP/IP, refer to Chapter 4, “Installing and Configuring TCP/IP.” After TCP/IP is installed and configured on your network computers, you can configure the SpeedStream 2614 from any Java-supported Web browser, including Internet Explorer or Netscape Navigator, versions 4.0 or above.
client filtering, and various other settings. • Tools – Reset the SpeedStream 2614, restore the factory settings, or upgrade on-board firmware. • Help – View descriptions of menu items, troubleshooting tips, glossary of terms, and contact information for SpeedStream support, driver updates, Web site, and FTP site.
Configuration Changes Configurable parameters are available by means of dialog boxes or drop-down lists. After you change a configuration, be sure to click the Enter button at the bottom of the page to confirm the new setting. To ensure proper screen refresh after a command entry, configure Internet Explorer 5.0 as follows (other browsers or later browser versions may vary somewhat): 1. From the browser menu bar, click Tools. 2. On the Tools menu, click Internet Options. 3.
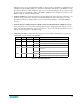
The Status screen provides the following information: Field Description Internet Displays WAN connection type and status. Gateway Displays system IP settings, as well as DHCP, NAT, Firewall and Printer status. Information Displays the number of attached clients, the firmware versions, the physical MAC address for each media interface, and the hardware version and serial number. Security Log Displays any illegal attempts to access your network.
2. On the Simple Setup menu, click Set Time Zone. 3. On the Set Time Zone screen, select the correct time zone in the drop-down list box. 4. Click Enter to save the setting and continue. Configure the WAN Connection You must specify the WAN connection type required by your Internet Service Provider (ISP): • Dynamic IP Address - IP address is obtained automatically. • Static IP Address - Your ISP has assigned you a static (or fixed) IP address.
Static IP Address (Fixed IP) If your selected Static IP Address as your WAN connection type, the Simple Setup | WAN | Fixed IP screen displays when you click More Configuration. 1. In the IP address assigned by your ISP boxes, enter your IP address. 2. In the Subnet Mask boxes, enter the subnet mask for the SpeedStream 2614: 255, 255, 255, 0 3. In the ISP Gateway Address boxes, enter the gateway address of your ISP.
fill in the relevant fields under Secondary Dial-up. Figure 3-3. Simple Setup | WAN | Dial-up Modem 1. In the Check if you only use a dial-up modem to connect to the Internet checkbox, click to select it if the serial port is used for primary Internet access. If not selected, this connection will only be used for backup access if the primary WAN link fails. 2. In the Dial-Up Service Phone Number boxes, enter the access phone numbers provided by your ISP. 3.
address for you to use, select Yes and enter the designated IP address and subnet mask. Advanced Setup Procedures After completing the Simple Setup menu options, you will next move to the Advanced Setup options. You may also go directly to any of these screens by clicking that option on the main menu.
Enable Firewall Protection From the Advanced Setup | Firewall screen, you can enable the SpeedStream 2614 firewall to block common hacker attacks, including IP Spoofing, Land Attack, Ping of Death, IP with zero length, Smurf Attack, UDP port loopback, Snork Attack, TCP null scan, and TCP SYN flooding. The firewall does not significantly affect system performance, so we advise leaving it enabled to protect your network users.
information. 4. Click Copy to to enter that information in the Public Port boxes on the designated line. Network Address Translation (NAT) Network Address Translation, or NAT, is automatically enabled when you enable multi-user Internet access or enable the Virtual Server function. NAT provides multiple users with access to the Internet via a single user account, or maps the local address for an IP server (such as Web or FTP) to a public address.
3. Click in the box to the right of Copy to and select the line number to which the system will enter that information. 4. Click Copy to to enter that information in the Public Port boxes on the designated line. If an application still cannot function correctly after enabling multiple ports via the Special Application screen, you may need to use the Virtual DMZ Host option to open the client computer for full Internet access. (Refer to the “Miscellaneous Services” section for instructions.
a DMZ host. Caution: Adding a client to the DMZ (demilitarized zone) may expose your local network to a variety of security risks. Use this option as a last resort only! System Tools From the Tools screen, you can manage additional features and functions of the SpeedStream 2614. • Change Password – Set a new password or change the existing one. • Set Time Zone – Choose the local time zone. • Reset Router – Reboot the router and retain all your configuration settings.
Reset Router On the Tools menu or screen, click Reset Router to reboot the router and retain all your configuration settings. Restore Factory Defaults On the Tools menu or screen, click Restore Factory Defaults to reboot the router, overwriting your configuration settings with those of the factory defaults. Update Firmware On the Tools menu or screen, click Update Firmware to download the newest version of the firmware from the SpeedStream support Web site.
CHAPTER 4 INSTALLING AND CONFIGURING TCP/IP To access the Internet through the SpeedStream 2614 DSL/Cable Router, you must configure it and your network computers with same IP subnet. Manually configure the IP address for client computers or obtain it automatically from the SpeedStream 2614’s DHCP service. The default network settings for the SpeedStream 2614 are: IP Address: 192.168.254.254 Subnet Mask: 255.255.255.
Figure 4-2. Select Network Protocol 6. The TCP/IP protocol will be listed in the Network window. Click OK to complete the install procedure, and restart your computer to enable the TCP/IP protocol. Configure TCP/IP for the SpeedStream 2614 When TCP/IP is installed on your computer, follow these instructions to configure it for the SpeedStream 2614: 1. On the Windows taskbar, click Start | Settings | Control Panel. 2.
4. Click OK and reboot your system to implement the changes. Figure 4-3. TCP/IP Properties Sheets Manual IP Configuration 1. On the IP Address tab, select Specify an IP address. Select the IP address based on the default network 192.168.254.X, where X is from 1 to 253. Enter 255.255.255.0 for the subnet mask. 2. On the Gateway tab, add the IP address of the SpeedStream 2614 (default address is 192.168.254.254) in the New gateway box; then click Add. 3.
However, if the following message appears, there may be something wrong in your installation procedure: Pinging 192.168.254.254 with 32 bytes of data: Request timed out. 2. If the request times out, confirm the following items in sequence: • Is the Ethernet cable correctly connected between the SpeedStream 2614 and your computer? The LAN LED on the SpeedStream 2614 and the Link LED of the network card on your computer must be on.
CHAPTER 5 CONFIGURING PRINTER SERVICES The SpeedStream 2614 printer server supports Windows 95/98/NT/2000/ME and Unix platforms. To configure print services for devices attached to the SpeedStream 2614: 1. Install the print server program from the SpeedStream 2614 CD-ROM. 2. Configure the SpeedStream 2614 printer port for your operating system. Install the Print Server Program 1. Insert the installation CD into your CD-ROM drive.
specified location. Figure 5-2. Choose Destination Location 4. Select the folder to contain the program icons; then click Next. Figure 5-3.
5. Enter the printer port name that will identify the port monitor in your system; then click Next. Figure 5-4. Select Port Name 6. When the setup program finishes installing the port monitor, select Yes, I want to restart my computer now; then click OK. Figure 5-5. Reboot 7. Reboot your computer; then configure the SpeedStream 2614 printer port for your system as described in the following section.
Configure the Printer Port After you install the print server program, locate the instructions below that are specific to your operating system: Windows 95/98/NT/ME, Windows 2000, or Unix. Windows 95 / 98 / NT / ME 1. On the Windows desktop, double-click My Computer | Printers | Add Printer. Figure 5-6. Printers 2. Follow the prompts to add a Local printer to your system. Figure 5-7.
3. Select the port you want to use with this printer; then click Next. Figure 5-8. Select Printer Port 4. Follow the prompts to complete the SpeedStream 2614 printer port configuration. The printer type you specified will now be added to your Printers menu. Windows 2000 1. On the Windows 2000 desktop, double-click My Computer |Printers | Add Printer. Figure 5-9.
2. Select Local printer; then click Next. Figure 5-10.
3. Select the printer port; then click Next. Figure 5-11. Select Printer Port 4. Follow the prompts to complete the printer port configuration. The printer type you specified will now be added to your Printers menu. Unix Systems Follow the traditional configuration procedure on Unix platforms to set up the SpeedStream 2614 print server. The printer name is “lp.
Appendix A TROUBLESHOOTING This section describes common problems you may encounter and their possible solutions. Use the panel indicators to monitor and identify problems with the SpeedStream 2614. If you cannot resolve any connection problems after checking the indicators, refer to the following table. Symptom Action LED Indicators Power LED is Off Link LED is Off • External power supply has failed or is disconnected.
Symptom Action Printer Server The printer cannot • print or prints garbage Make sure the parallel cable between the SpeedStream 2614 and printer is connected and is in good condition Table A-1. Troubleshooting Chart Technical Support Before contacting Technical Support, please refer to the previous Troubleshooting table.
Appendix B CABLES Ethernet Cable Cable Types and Specifications Cable Type Max. Length Connector 10BASE-T Cat. 3, 4, 5 100-ohm UTP 100 m (328 ft) RJ-45 100BASE-TX Cat. 5 100-ohm UTP 100 m (328 ft) RJ-45 Table B-1. Cable Types and Specifications Twisted-pair Cable Caution: DO NOT plug a phone jack connector into any RJ-45 port. Use only twisted-pair cables with RJ-45 connectors that conform with FCC standards.
RJ-45 Pin Numbering Straight-Through Cable Crossover Cable End 1 End 2 End 1 End 2 1 (TD+) 1 (TD+) 1 (TD+) 3 (RD+) 2 (TD-) 2 (TD-) 2 (TD-) 6 (RD-) 3 (RD+) 3 (RD+) 3 (RD+) 1 (TD+) 6 (RD-) 6 (RD-) 6 (RD-) 2 (TD-) Pins 4, 5, 7 and 8 are not connected. Pins 4, 5, 7 and 8 are not connected. Table B-2. RJ-45 Pin Numbering RJ-45 Pin Assignments All LAN ports on the SpeedStream 2614 support automatic MDI/MDI-X configuration.
DB-9 Port Pin Assignments EIA Circuit CCITT Signal Description Gateway’s DB9 DTE Pin # Computer DB9 DTE Pin # Modem DB25 DCE Pin # Signal Direction DTE-DCE CF 109 DCD (Data Carrier Detected) 1 1 8 <------ BB 104 RxD (Received Data) 2 2 3 <------ BA 103 TxD (Transmitted Data) 3 3 2 ------> CD 108.
Serial Port to 25-Pin DTE Port on Computer SpeedStream 2614’s 9-Pin Serial Port Null Modem Computer’s 25Pin DTE Port 1 DCD 11 8 DCD 2 RXD 23 3 TXD 3 TXD 32 2 RXD 4 DTR 48 20 DTR 5 SGND 520 7 SGND 6 DSR 67 6 DSR 7 RTS 4 RTS 8 CTS 5 CTS 9 RI 22 RI Table B-7. Serial Port to 25-Pin DTE Port on Computer Printer Port Pin Assignments The DB-25 parallel port on the SpeedStream 2614’s rear panel is used to connect the SpeedStream 2614 to a printer.
DB-25 Printer Port Pin Assignments Pin Signal Name Direction 1 -Strobe To printer 2 +Data 0 To printer 3 +Data 1 To printer 4 +Data 2 To printer 5 +Data 3 To printer 6 +Data 4 To printer 7 +Data 5 To printer 8 +Data 6 To printer +Data 7 To printer 10 9 - ACK To print server 11 + Busy To print server 12 + Paper End To print server 13 + Select To print server 14 - Auto Feed No connection 15 - Error To print server 16 - Init To printer 17 - Select No connecti
APPENDIX C Specifications WAN Interface 10BASE-T, 1 RJ-45 port (1) DB-9 RS-232 port for PSTN/ISDN connections LAN Interface 10BASE-T/100Base-TX (4) RJ-45 ports Printer Interface Parallel (1) DB-25 printer port Management Web management interface Advanced Features Dynamic IP Address Configuration – DHCP, DNS Firewall – Client privileges, hacker prevention and logging, NAT Virtual Private Network – PPTP, L2TP, IPSec Backup Internet Connection – Dial-on-demand via secondary WAN port Print server Internet
Temperature Operating 32 to 104°F (0 to 40°C) Storage -40 to 158°F (-40 to 70°C) Humidity 5% to 95% (noncondensing) C-2