
Operating Instructions and Installation Instructions


11
en
Electrical connection
Connect to a 230 V AC power supply only.
■ Only connect the appliance to a socket with earthing
contact installed according to regulations. Do not use
multiway adaptors or push-on terminal strips.
If necessary, fit the appliance with a longer cable.
■ Do not connect the appliance to the earthed socket until it
is mounted on the wall and filled with water.
■ This appliance complies with EC directive No. 76-889-EEC
for interference suppression and supplementary directive
No. 82/499.
Exchanging the connecting cable
The connection cable may only be replaced by one of our
authorized customer service representatives in order to
avoid potential sources of danger.
■ The plug must be removed from the mains before
replacement.
VI.
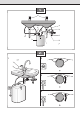
Startup
Attention!
Fill the appliance with water first.
Raise the safety valve before start up (see “Maintenance for
the customer”, page 12).
1 Pull out the power plug or disconnect the fuse.
Fill the appliance, with the hot-water tap fully open, until
the water comes out bubble-free.
First heat-up
2 Turn the temperature selector switch to position “O”.
Insert the power plug.
3 Turn the temperature selector switch to position “III”.
Monitor the heating-up process.
Check the temperature (approx. 75 °C).
4 Turn the temperature selector switch to position “e”.
VII.
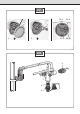
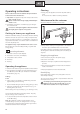
Limitation of the water temperature
1 Insert the screwdriver into gap a and remove cover b.
2 Remove temperature selector pin c and set to the required
temperature:
C ≈ 35 °C
B ≈ 45 °C
A ≈ 55 °C
O ≈ 75 °C
Replace cover b.
VIII.
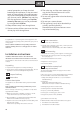
Maintenance for the qualified
professional
If water is constantly dripping out of the safety valve, it prob-
ably requires cleaning. Before servicing the safety valve, the
inlet to the water heater must be blocked.
■ Shut off the safety valve 2.
■ Open the hot-water tap (to eliminate water pressure in
the heater).
To clean the pressure control valve
■ Unscrew the exchangeable cartridge 3.
■ Rinse the valve seat and gaskets with cold, clean water.
■ Screw the exchangeable cartridge 3 firmly back in.
■ Open the safety valve 2.
■ Check for leakage.
To clean the pressure reducing valve
■ Mark the position of the adjusting screw 4.
■ Turn the adjusting screw 4 counter-clockwise until the
turnstop is reached (to decompress the spring).
■ Unscrew the screw cap 5.
■ Use pliers to remove the cartridge 6 of the pressure
reducing valve and rinse with cold, clean water.
■ Screw the cartridge 6 back on.
■ Screw on the screw cap 5.
■ Turn the adjusting screw 4 clockwise until the original,
marked position is reached.
If water still drips from the safety valve, replace the cartridge.
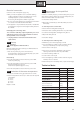
Technical data
DG10
Capacity
[l] 10,0
Rated output
[kW] 2
Rated voltage
[V] 230
Rated pressure
[MPa (bar)] 0.9 (9)
Weight (filled)
[kg] 18
Heat-up time
from 12 °C to 60 °C [min] 17
from 12 °C to 75 °C [min] 22
Energy efficiency class
A
Hot water heating energy
efficiency
[%]
35.2
Load profile
XXS
Annual energy consumption
[kWh] 524
Daily energy consumption
[kWh] 2.461
Sound power level
[dB] 15