
Operating Instructions
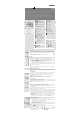

Timer to extended presence or absence (RDG1..0KN only)
The Comfort and Economy modes can be temporarily extended by 0.5 to 9.5 hours using the timer.
1.
To set the timer, press and hold the operating mode button.
While holding the button, turn the rotary knob clockwise or counterclockwise as required.
a) Turn the rotary knob clockwise to extend Comfort mode.
Display:
0...+9:30
b) Turn the rotary knob counterclockwise to extend Economy mode.
Display:
0...–9:30
2. Release the operating mode button and the mode is temporarily changed, indicated by
symbol.
•
After the temporary timer has elapsed, the thermostat will resume operation in the operating mode
according to schedule via bus (if available). Without schedule:
– when extended Comfort mode ends new operating mode = Economy
– when extended Economy mode ends new operating mode = Comfort
•
If Economy mode cannot be selected via the operating mode button (P02 ≠ 2), Protection mode will
be used for extended absence instead.
•
The temporary timer function is aborted whenever a new setting is made.
Temporary timer to extend the Comfort mode
When the operating mode is Economy (commanded by schedule via KNX or by en external signal. e.g.
keycard)
, it can be set back to Comfort temporarily by pressing the operating mode button.
The symbol will appear.
Pressing the operating mode button again will stop the timer.
This function is only available when parameter P02 = 1. Duration: * P68 = 0...360 min, factory setting = 0 min.
* Needs to be configured by your HVAC installer.
Humidity control (RDG165KN only)
Humidity in the room is controlled by shifting temperature setpoint and release of external equipment
(dehumidifier / humidifier). When the relative humidity in the room exceeds the limitation (max. or
min.), the
symbol displays and the thermostat controls the humidity in the room.
•
Set the maximum humidity limitation via P21; Set the minimum humidity limitation via P22.
•
Relative humidity value (% r.H) displays when P07=5 (factory setting).
Reminder clean filter and display of external faults
FIL *
AL1 *
AL2 *
AL3 *
This message reminds you to clean
the filter on your HVAC equipment.
It will appear after
_______ "fan operating hours" and disappear when the thermo
-
stat is set to Protection.
These fault messages tell you an external fault has occurred *:
AL1 : _______________________ AL2 : __________________________
AL3 : _______________________
* Needs to be configured by your HVAC installer
Button lock
•
If the button lock function is enabled (parameter P14 = 2), then pressing the
right button for 3 seconds will lock or unlock the buttons respectively
.
Locked buttons are indicated with the key symbol .
•
If "Auto lock" is configured (P14 = 1), the thermostat will
automatically lock the
buttons 10 seconds after the last adjustment.
Commissioning (by qualified HVAC installer)
To adapt the thermostat to your system and optimize the control performance, a number of control
parameters can be adjusted. This can be done during operation, either via the buttons on the
thermostat or via a commissioning tool.
Control parameters
If you wish to change control parameters, proceed as follows:
1. Press left and right buttons simultaneously for at least 4 seconds.
2. Release them and, within 2 seconds, press the right button again until "P01" is displayed.
3. Select the required parameter by turning the rotary knob.
4. Press button
(OK). The current value of the selected parameter starts blinking
and can be changed
by turning the rotary knob.
5. Press button (OK) to confirm the adjusted value, or (Esc) to cancel the change.
If you wish to adjust additional parameters, repeat steps 3 through 5, or press (Esc) to leave the
parameter setting mode.
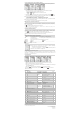
Parameter list
No.
Description
Factory setting
Setting range
Adj.
P01
Control sequence
2-pipe / 2-stage:
1 = cooling only
4-pipe:
4 = H and C
0 = Heating only
1 = Cooling only
2 = H/C changeover, manual
3 = H/C changeover, automatic
4 = Heating and cooling
P02
Mode selection via operating mode
button
1
1 = Auto** / Comfort / Protection
2 = Auto** / Comfort / Economy /
Protection
P03
Mode selection via fan mode button
0 = Auto / Manual
0 = Auto / Manual
1 = Manual
2 = Auto / Manual / Protection
P04
Selection of °C or °F
0 = °C
0 = °C
1 = °F
P05
Sensor calibration
0.0 K
-3...+3 °C
P06 Standard temperature display 0 = Room temp. 0 = Room temperature
1 = Setpoint
P07 Additional user information 0 = No display
(RDG1..0KN)
5 = Humidity
(% r.H,
RDG165KN only)
0 = No display
1 = Room Temperature in °C / °F
2 = Outside temperature (via bus)
3 = Time of day (12h, via bus)
4 = Time of day (24h, via bus)
5 = Humidity (% r.H, RDG165KN only)
P08
Comfort basic setpoint
21 °C
5 ... 40 °C
P09
Minimum setpoint limitation in
Comfort mode
5 °C
5 ... 40 °C
P10
Maximum setpoint limitation in
Comfort mode
35 °C
5 ... 40 °C
P11 Setpoint for heating in Economy mode
(WheatEconomy)
15 °C OFF, 5 °C…WcoolEconomy
P12 Setpoint for cooling in Economy mode
(WcoolEconomy)
30 °C OFF, WheatEconomy…40 °C
P13
***
Electric heater in cooling mode ON OFF = Disabled
ON = Enabled
P14
Button lock
0 = Disabled
0 = Disabled
1 = Automatic
2 = Manual
P15 Fan stage in dead zone (Comfort)
(RDG16..KN)
0 = Disabled 0 = Disabled
1 = Low speed (heating and cooling)
2 = Low speed (cooling only)
P21 Maximum setpoint limitation for
humidity (RDG165KN only)
50 OFF, 20…90%
P22 Minimum setpoint limitation for
humidity (RDG165KN only)
OFF OFF, 20…90%
P23
Calibration humidity (RDG165KN only)
0
-10…10%
**
When no time schedule via KNX exists, then Auto is equal to Comfort.
***
Parameter P13 is only displayed with application 2-pipe with el. heater.
All temperature settings can be made in increments of 0.5 °C.
Please record all changes you make!
Siemens Building Technologies
Subject to change
CE1B3191en
2014-12-01