
User Manual


Scheduler
Modifying the Schedule default
5
A6V11938631_en--_a
29 | 36
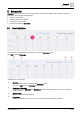
Adding a switching point
Use this procedure to add a new change of value or setting to the schedule.
1. While in Edit mode, click on the day and time where the switching point is needed.
A new switching point displays.
2. Enter or select the value of the switching point.
3. Click Save to save the new switching point.
NOTE: Cancel discards all changes since the last save.
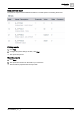
Modifying a switching point
①
Modify the time
Drag the switching point to the desired time. Use the up-and-down arrows to adjust the time in one-
minute increments.
Click Save.
②
Delete the switching point
Click the value of the point, and then click to remove the current switching point.
Click Save.
③
Command controls
Click the switching point to select it and click on the value to open the modification controls. Enter a
new value (analog object) or select a new setting (binary or multistate object). For analog objects, the
minimum / maximum range for the object displays above this field.
Click Save.
④
Return to default
Select Return to default to return the object to the Schedule default.
Click Save.
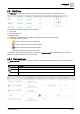
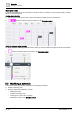
5.3 Modifying the Schedule default
The Schedule default is the value to which the schedule controls the referenced object when either of the
following situation occurs:
● A switching point is not in control. This would happen on any day during the period of time before the first
switching point is scheduled to occur.
● A switching points value is set to Return to default.
Modifying the Schedule default
Use this procedure to modify the default value or setting for switching points that are added to the schedule.
1. While in Edit mode, click Options in the heading.
The Options dialog box displays the current Schedule default.