
Operating Instructions


Trends
6
Example: Analyze Trend Data
37
Siemens Desigo™ CC Getting Started
A6V10415475_en_a_21
Building Technologies 2015-06-30
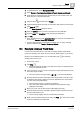
4. In System Browser, select Management View.
5. Select Project > Field Networks > [Network Type] > Hardware > [Device].
6. Under [Device], find the data point whose trend you want to track in the new
trend view (do not click the data point).
7. Drag-and-drop the data point to Trends.
8.
(Optional)
Repeat Steps 5 through 7 to add other data points to the trend view.
9. Click Save As .
The Save Object As dialog box opens.
10. Select the [folder] where you want to save the trend view definition.
11. Type the name and description for the new trend view definition.
12. Click OK.
In the System Browser under Application View, the new trend view definition is
saved under
Trends > Trend View Definitions.
For each data point that you included in the trend view, an online Trendlog
object is created under
Trends > Online Log Objects.
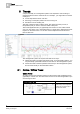
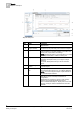
6.4 Example: Analyze Trend Data
In a trend view, the data shown in the chart is normally updated automatically
(continuous scrolling of the trend curves to show the latest values). If you need to
perform a more detailed analysis, you can temporarily stop
this automatic
scrolling of the trend curves.
A trend view is open.
1. Click Stop .
This stops automatic scrolling of the data in the chart, and suppresses the
symbol to update trend view.
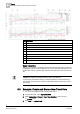
2. In the trend view, move your cursor over the left or right slider (dark grey area)
of the time range scrollbar.
The mouse pointer changes shape and the tooltip displays.
3. Press the left mouse button and drag the time-range sliders to the left or right
to define the time range to display in the chart (this defines how compressed
your view of the trend data will be).
The time range change is continuously displayed.
The x-axis of the chart is adjusted to display the selected time range
(displayed in the slider).
4. Move your cursor over the time range scrollbar (light grey area).
5. Press the left mouse button and slide to the left or right to shift the trend view
forward or backward in time.
The time range displays with the corresponding trend data.
6. When you have finished analyzing the data, click Run to resume the normal
continuous updating of the trend data.