
Operating Instructions


4
Graphics
Creating a Graphic
28
Siemens Desigo™ CC Getting Started A6V10415475_en_a_21
Building Technologies 2015-06-30
Enable/disable
On/Off
Out of service
Override/Release
Reset value for equipment runtime
Set a new point value
Toggle alarmable/not alarmable status
Upload
Display of Properties on a Graphic
Properties display on a graphic in one of two ways—automatically or manually.
They display automatically when a property goes into an off-normal state. The
Status and Command window displays the icons associated with the properties
in an off-normal state on the graphic. You expand the icon view to display the
detailed property information and the command options.
The Status and Command window(s) display manually when you right-click an
object in a graphic that has data points associated with it. You can display
multiple Status and Command windows in Graphics.
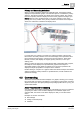
When a Status and Command window displays on the graphic, a connection line
displays between the window and its associated objects on the canvas. The
connection line between the Status and Command window and the object(s)
remains intact, even when the window is moved around on the canvas.
Properties and commands also display in the Operation and Extended Operation
tabs of the Contextual pane for the selected object.
4.3 Creating a Graphic
You want to create a graphic.
1. In System Browser, select Application View, and then navigate to and click on
Graphics.
The Graphics Viewer displays in the Primary pane and you are in
Operating mode.
2. From the Graphics toolbar, click Edit .
3. From the Graphics toolbar, click Create New , and select New Graphic.
A blank, tabbed untitled canvas displays in the Graphics Editor work area.
4. Create and design the graphic as necessary.
5. From the Graphics toolbar, click Save As .
The Save As dialog box displays.
6. Navigate to and then click on the graphic folder you want to save the graphic
in.
7. In the Name field, type a name for your graphic, and then click Save.
The graphic is saved as a .CCG file. Additionally a .CCBAK back-up file is
created and a .PNG