
User Manual


O
perating Step
-
by
-
Step
Reports
2
98 | 352 A6V10415471_en_a_40
box. However, if the configured email address is deleted or the recipient is
deleted in the Address Book, the entries for a report definition display in
red. For more information, see the Automatic Update of Configured Email
Addresses.
3. Select the required contacts by selecting the check box preceding each
contact.
4. Click OK.
a The selected contacts are displayed in the Destination field in the Report
Output Definition dialog box. A semicolon (;) separates multiple contacts.
5. In the Report Output Definition dialog box, do one of the following:
– Select All documents in one email.
– Select Document(s) per mail and configure the number of documents to be
sent.
The default option is one document per email.
6. Select the Enter custom file name option to add the file name. The default is
Use report name as file name.
7. Select the Append date/time to file name check box to add the date and time to
the file name when saved.
8. Click Add.
a The selected format, destination, and file name are added to the Output
Definition list.
9. Click OK.
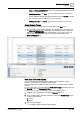
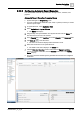
a The configured Report Output Definitions display in the Report Output group
box.
Configure Report Output as a Printer
w You have selected the required format (PDF, XLS, or CSV) in the Report
format list in the Report Output Definition dialog box. (Refer steps 1 to 5 in
Configuring Report Output as a File [➙ 96])
w You have configured the server printer for printing reports.
1. Select PDF in the Report format list.
NOTE: The destination type printer is not available for XLS or CSV printing.
2. Select Printer in the Destination types list.
3. Select the required printer from Printer drop-down list. If server printer is not
configured the Printer drop-down list is empty.
4. Select the option to print either All or First number of pages.
NOTE 1: By default, the first 100 pages are printed. You can edit the default
and add the number of pages to be printed.
NOTE 2: Content that is printed depends on the sorting you applied on the
table.
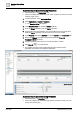
5. Click Add.
a The selected format and destination are added to the Output Definition list.
6. Click OK.
a The configured Report Output Definitions display in the Report Output group
box.
When executed, the file is sent to the configured printer for printing.