
User Manual


Operating Step
-
by
-
Step
Reports
2
A6V10415471_en_a_40 97 | 352
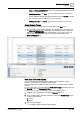
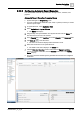
11. Select the required report format (PDF, XLS, CSV, or XML) in the Report
format list.
12. Select File in the Destination types list.
13. From the File drop-down list, select the destination folder where you want to
save the file.
a The File drop-down list displays all the report output folders that you have
configured.
14. Select Enter custom file name to add the file name. The default option is Use
report name as file name.
15. Do one of the following:
– Select the Append date/time to file name check box to add the date and
time to the file name when saved.
NOTE: The Create new/overwrite existing file and Append data options
become unavailable when you select the Append date/time to file name
check box.
– Select the Append data option button to append data in the same folder but
creating new document with incremental number.
– Select Create new/overwrite existing file to create a new file or overwrite
the existing file with the same file name.
16. Click New.
a The selected format, destination, and file name are added to the Output
Definition list.
17. Click OK.
a Configured Report Output Definitions display in the Report Output group box.
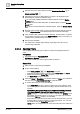
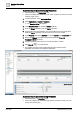
Configure Report Output as an Email
w You have selected the required format (PDF, XLS, or CSV) in the Report
format list in the Report Output Definition dialog box. (Refer steps 1 to 5 in
Configuring Report Output as a File [➙ 96])
w You have configured contact list using the address book.
1. Select Email in the Destination types list.
2. Click Select Contacts.
a The Email Contacts dialog box displays all the configured contacts.
NOTE: If there is a change in the configured email address of a recipient in
the Address Book, it is automatically reflected in the Report Output group