
User Manual


Operating Step
-
by
-
Step
Reports
2
80 | 352 A6V10415471_en_a_40
– Time Filter [➙ 95]: Displays data that matches with the specified date/time
value.
– Row Filter [➙ 96]: Displays the number of rows specified.
– Graphics Filter [➙ 96]: Displays the graphics and viewports of the object
that is passed as the name filter to the report.
2. Save the report definition by clicking Save .
a The report is configured according to the specified filters.
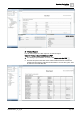
4 – Configure Report Output
w You have a configured report that has the required elements, filters, and layout.
You now want to set a destination to route the report output.
1. Click the Settings tab and in the Report Output group box click Dialog Launcher
.
a The Report Output Definition dialog box displays.
2. Configure the destination (File [➙ 96], Email [➙ 97], or Printer [➙ 98]) to which
you want to route the report output as well as specify the file format (PDF, XLS,
CSV, or XML) in which the report output can be generated.
a The report output is configured to either a file, email, or printer.
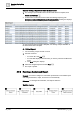
5 – Configure Automatic Report Execution
w There is at least one report definition available under System Browser >
Reports, for which a Report Output Definition is configured.
1.
(To run the report automatically from the Extended Operations tab)
Select the
report definition from System Browser and from the Extended Operations tab,
click Execute.
2.
(To run reports automatically from macros, reactions, or graphics)
Select either
of the following options:
– Macro [➙ 99]
– Reactions [➙ 100]
– Graphics [➙ 100]
a The report executes in the background when triggered.
There is no visual indication that the report is being generated. On successful
execution, the report is routed to the destination configured in the Report
Output Definition such as email, printer, or folder.
NOTE:
If you have not configured the destination in the Report Output Definition, the
report is routed to the path specified in the Location supervised folder under