
User Manual


Operating Step
-
by
-
Step
Scheduling
2
A6V10415471_en_a_40 71 | 352
3. Make the required updates to the Text Group and to the values displayed in the
Command Table Action List.
4. Click Save .
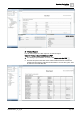
Create a Weekly BACnet Schedule Entry
1. Select Applications > Schedules > BACnet Schedules.
2. Open the schedule to which you want to add a new weekly schedule entry.
3. Navigate to the Day/Week view, right click and select Add Weekly Entry.
4. Click the Schedule Entries tab and enter values into the relevant fields.
5. Click Save .
Delete a Weekly BACnet Schedule Entry
1. Select Applications > Schedules > BACnet Schedules.
2. Open the schedule with the weekly schedule entry you want to delete.
3. In the Day/Week view, click the weekly schedule that contains the entry you
want to delete.
The details display in the Schedule Entries tab.
4. In the Schedule Entries tab, locate the entry you want to delete and click Delete
.
NOTE: You cannot delete the entry for the beginning and end of day. You can
delete default entries at other times, as long as there are still entries at
beginning and end of day. You can also replace the entry at beginning or end
of day with a non-default entry.
5. Click Save .
Modify a Weekly BACnet Schedule Entry
1. Select Applications > Schedules > BACnet Schedules.
2. Open the schedule you want to modify.
3. Select the weekly schedule you want to modify.
NOTE: Weekly schedules are highlighted with a blue bar on the left side of the
entry.
4. In the Schedule Entries tab, modify the Time and Value fields.
5. Click Save .
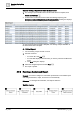
Add a BACnet Exception with Entries
1. Select Applications > Schedules > BACnet Schedules.
2. Open the schedule to which you want to add an exception.
3. Right-click inside the schedule in the Day/Week view and click Add Exception.
4. Click the Exceptions tab and enter the details for the exception.
5. Click Save .
6. To add new exception entries click the Exception Times expander and click
New.