
User Manual


Operating Step
-
by
-
Step
Scheduling
2
66 | 352 A6V10415471_en_a_40
Prerequisites:
● System Browser is in Application View.
Steps:
1 – Create Schedule Entries
w You have created a BACnet schedule containing a data point that you want the
weekly occupancy schedule to control. It is available in Schedules > BACnet
Schedules in the System Browser.
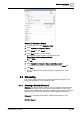
1. Select Applications > Schedules > BACnet Schedules > [BACnet schedule].
2. Select the Schedule Entries tab and click New to add a new entry.
3. Specify the time from when you want to start executing the schedule, for
example, 6:00:00 AM, and select the Default check box.
NOTE: Leaving an entry set to Default means the schedule will command all
objects to the Schedule Default.
4. Click New to add a second entry.
5. Specify the end time to stop the schedule execution, for example, 6:00:00 PM,
and change the Default check box to OFF.
6. Click Save .
a The system saves the schedule settings.
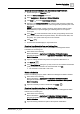
2 – Create a Holiday Calendar and Add Entries
1. From the Scheduler toolbar, click New .
2. Click New BACnet Calendar.
3. In the Calendar Entries section, click New.
4. In the Calendar Time Period section, select the Date range option and specify
the start and end dates for the calendar in the Start date and End Date fields.
5. Enter a name and the field device on which you want to save the calendar and
click Save .
a The system adds the calendar to the BACnet Calendars node in the Application
view.
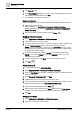
3 – Create an Exception
1. In System Browser, select Applications > Schedules > BACnet Schedules >
[BACnet schedule].
2. Navigate to the Day/Week view, right-click the BACnet schedule and select
Add Exception.
3. In the Exception Period section, select Calendar.
4. From the Calendar drop-down list, select the HolidayBreak calendar.
5. In the Exception Times section, delete one of the two entries.