
User Manual


Operating Reference
Schedulin
g
3
236 | 352 A6V10415471_en_a_40
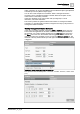
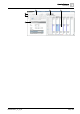
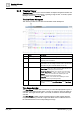
Name Description
1
Schedule Name Displays the name of the schedule.
2
Scheduler Toolbar Includes the following icons:
New: Opens a New BACnet Schedule, New Management Station
Schedule, New BACnet Calendar, New Management Station
Calendar, or New BACnet Command Table.
Save: Saves the schedule to the system.
Save As: Allows you to save another instance of the schedule
with a different name and description.
Delete: Deletes the schedule from the system.
3
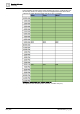
Tabs Displays four tabs: Schedule Entries, Outputs, Exceptions, and
Setup.
Schedule Entries: Displays a list of entries for the selected date
and Output values. The Output values indicate the ON and OFF
values for Daily schedules only. For weekly schedules the Ouput
values are present in the Setup tab.
Outputs: Outputs are objects associated with the schedule. You
can drag-and-drop objects to any tab to add them to the
schedule. Dropping them on a tab other than the Outputs tab
makes the Outputs tab active. Selecting an object in this section
sends data about the object to the Operation/Extended Operation
tabs, where you can view additional information about the object
and make changes to it. Double-clicking an output makes it the
new primary selection.
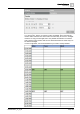
Exceptions: Displays a list of exceptions for the selected date
and allows you to set the exception period, including a
recurrence pattern. For calendar exceptions, you can choose a
calendar object from a drop-down list. This tab also displays
schedule entries and ON and OFF values. Adding an exception
makes the Exceptions tab active. You can create an exception by
right-clicking the schedule or by clicking the New button in the
Exceptions tab.
Setup: Allows you to specify the type of schedule (Weekly or
Daily) that you want to create. You can specify the type of
schedule by selecting either Weekly or Daily from the Sub-Type
drop down list. You can also specify the start date and end date
for the schedule from the Setup tab. The Any date check box
next to the Start date defaults to the current date, whereas the
Any date check box next to End date, defaults to an infinite date.
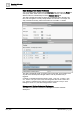
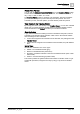
4
Date Picker Allows you to select a day to view or create schedule entries.
When first displayed or refreshed, the current day is selected by
default.
By default, every new schedule begins with the current date and
never ends. Once a new schedule is opened, you can choose the
start and end date for the schedule.
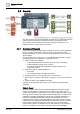
5
Schedule When first displayed or refreshed, the current day is selected by
default.
Day Tab: Shows a schedule for the day selected in the Date
Picker. Selecting the Detail check box reveals calendar entries,
weekly schedule entries, and exception schedule entries. The
Day tab also displays a horizontal time bar indicating the current
time.
Week Tab: Displays the weekly schedule. You can click any day
of the week to view details. The Week tab also displays a
horizontal time bar indicating the current time.
NOTE: You can schedule entries from the weekly view, however,
the weekly view shows only the resulting schedule and not the
details of the schedule. For more flexibility in visualizing and
creating schedule entries, you can use the Schedule Entries tab.
6
Current Time Indicator Displays a light-blue bar corresponding to the time of day.